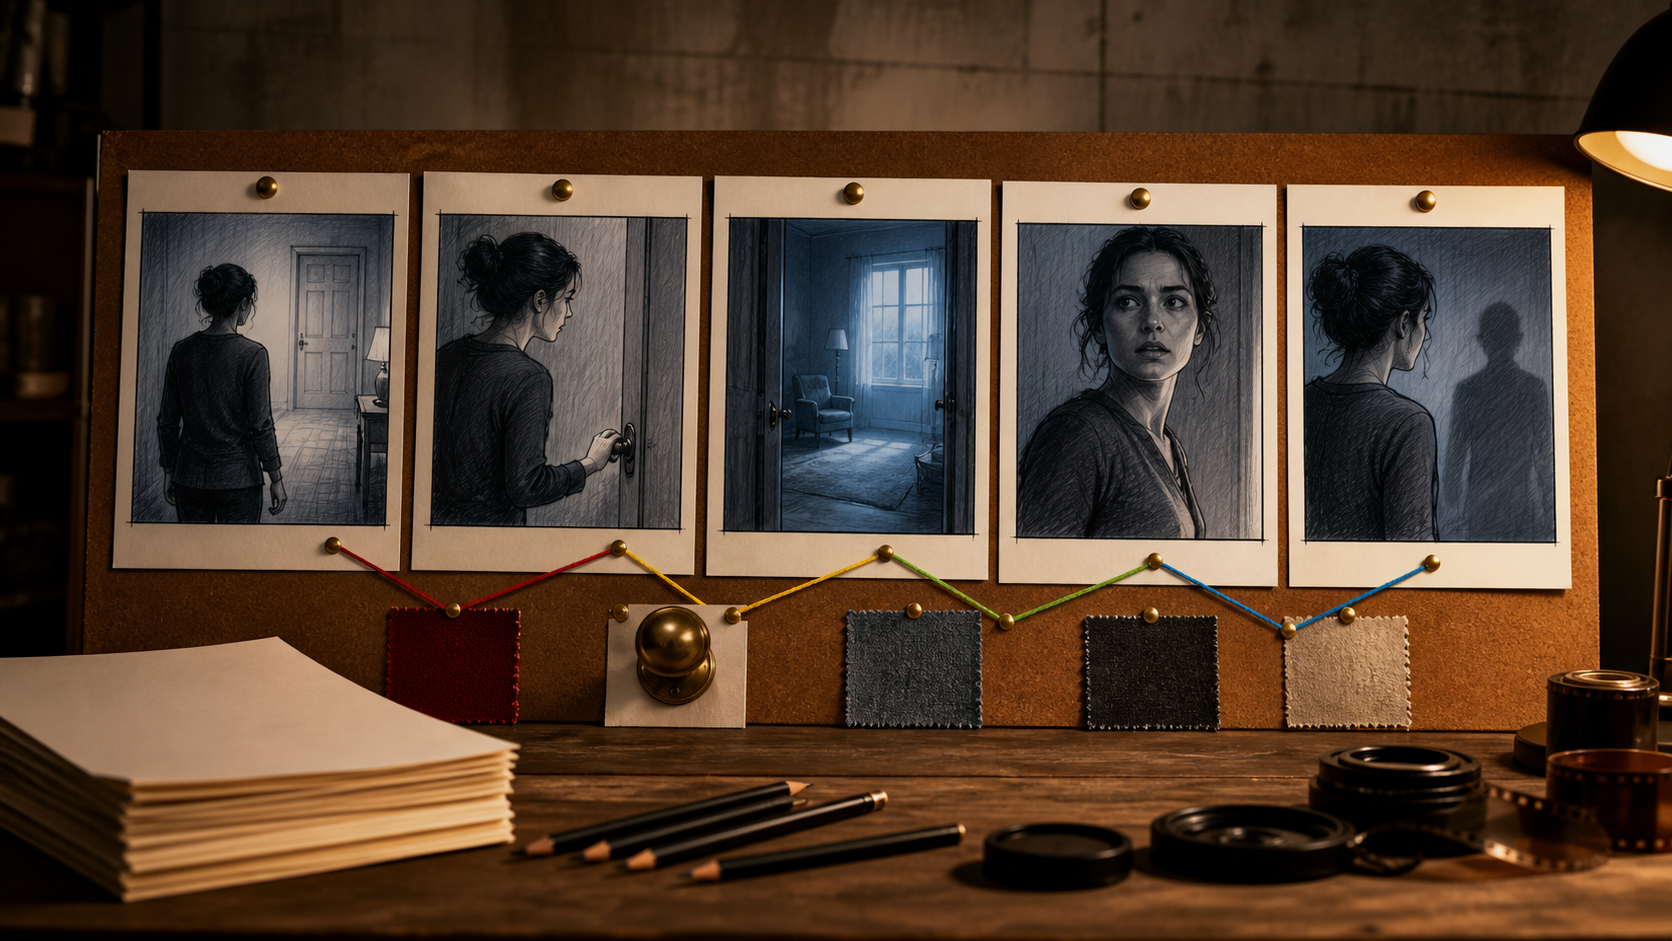
An AI storyboard generator can turn a script into images quickly, but speed is not the main reason to storyboard. The real value is reducing ambiguity before production. A script explains action and dialogue; a storyboard decides what the audience sees, where the camera is, how shots connect, and which details must remain stable.
Skipping that translation often creates attractive but disconnected images. A useful board makes later image and video generation more controlled because each panel has a job.
This guide presents a practical five-step method: extract visual beats, assign shot logic, add continuity notes, sequence the panels, and review the board as the production source of truth.
Quick Answer
To create an AI storyboard from a script:
- shorten the script into visual beats;
- assign a camera role and framing to each beat;
- add fixed and changing continuity information;
- arrange panels in the viewer's order;
- review story clarity, coverage, rhythm, and production feasibility before generation.
Do not turn every sentence into a panel. Select the moments the audience needs to see, then add coverage only where an edit or action requires it.
What You Need Before Starting
Prepare:
- one script page or a short scene excerpt;
- a target runtime and aspect ratio;
- one clear main subject;
- a rough tone and visual direction;
- any required dialogue or product details;
- a list of fixed continuity facts;
- a delivery goal such as animatic, pitch board, or generation plan.
You do not need polished production art. A board succeeds when another person can understand the scene and reproduce its shots.
The Example Scene
We will storyboard this short scene:
Nia walks down a narrow hallway and opens a bedroom door. The room appears empty. She steps inside and calls her brother's name. A floorboard creaks behind her. She turns as a tall shadow crosses the wall.
The script contains location, action, dialogue, and suspense, but it leaves questions:
- Where does the audience first see Nia?
- Which side of the hallway is the door on?
- Do we see the empty room before or after her reaction?
- What creates the shadow?
- How much of the figure should be revealed?
- Which shot motivates her turn?
Storyboarding is the process of answering those questions intentionally.
Step 1: Break the Script Into Visual Beats
A beat is a change in information or emotional state. Mark only what must be visible.
For the example:
- Approach: Nia moves toward the closed door.
- Entry: her hand opens it.
- Expectation breaks: the room is empty.
- Reaction: Nia listens and steps inside.
- Warning: a floorboard creaks behind her.
- Threat: a shadow crosses the wall.
Do Not Panel Every Line
Dialogue may continue over an existing panel. “Are you here?” does not automatically require a new camera angle. Add a shot when the audience needs new visual information, a performance change, or edit coverage.
Make Internal Ideas Visible
If the script says “Nia knows something is wrong,” translate the thought into evidence:
- she stops before crossing the threshold;
- her grip tightens on the door handle;
- she notices a familiar object is missing;
- sound drops out except for her breathing;
- her gaze follows a disturbance off-screen.
Estimate Duration
Assign rough time:
| Beat | Time | Visual information |
|---|---|---|
| Approach | 3 s | Hallway, direction, closed door |
| Entry | 2 s | Hand and handle |
| Empty room | 3 s | Space and absence |
| Reaction | 2 s | Nia's uncertainty |
| Warning | 2 s | Sound and turn preparation |
| Shadow | 3 s | Threat and ending |
The 15-second map prevents an AI-generated board from adding unnecessary action.
Step 2: Turn Beats Into Shot Logic
Choose framing based on what a shot needs to communicate.
Common Shot Jobs
| Shot type | Best used for |
|---|---|
| Establishing wide | Location, scale, geography, isolation |
| Medium shot | Body language, interaction, action clarity |
| Close-up | Reaction, decision, important object |
| Insert | Hand, prop, clue, mechanical detail |
| Over shoulder | Relationship between subject and discovery |
| Point of view | What the character notices |
| Transition shot | Time, location change, motion bridge |
Convert the Example Into Panels
| Panel | Frame | Action | Story purpose |
|---|---|---|---|
| 1 | Hallway wide from behind | Nia approaches the door | Establish geography and isolation |
| 2 | Hand close-up | Fingers pause, then turn handle | Slow the moment and create tension |
| 3 | Over-shoulder room wide | Door reveals an empty room | Show expectation is wrong |
| 4 | Reaction close-up | Nia scans left, then right | Transfer absence into emotion |
| 5 | Medium profile | She enters as a creak sounds behind | Prepare the reversal |
| 6 | Rear over-shoulder | Shadow moves across wall | Deliver threat without full reveal |
This is the minimum story board. If production needs more editing flexibility, add a hallway detail, a point-of-view angle, or a second reaction—not random alternate art.
Write One Clear Panel Prompt
Separate stable context from shot-specific direction:
Character: Nia, original young adult woman, dark curly hair in a low bun, charcoal long-sleeve shirt, faded blue jeans, thin silver necklace. Shot: close-up from chest height, she turns her eyes toward a sound behind her while keeping her shoulders facing the room. Environment: dim blue-gray bedroom doorway, warm hallway light behind. Mood: restrained suspense. Continuity: door open toward screen-left; necklace and hairstyle unchanged. Avoid: visible attacker, exaggerated fear, text, extra jewelry, camera tilt.
Generate rough panels first. High finish can hide weak shot logic.
Step 3: Add Continuity Notes
A storyboard that only plans framing is incomplete. Record what stays fixed and what changes.
Fixed Elements
- Nia's face, hairstyle, outfit, necklace, and proportions;
- hallway wallpaper and door placement;
- bedroom window, bed, chair, and wall arrangement;
- warm hall light and cool room light directions;
- the camera's side of the action line;
- aspect ratio and rendering style.
Flexible Elements
- Nia's exact hand pose;
- subtle expression intensity;
- shadow shape within a defined area;
- lens feeling within the chosen shot size;
- small background texture;
- timing of the head turn.
This fixed-versus-flexible distinction prevents the board from becoming rigid while protecting the facts that make the sequence coherent.
Track State Changes
| Element | Panel 1 | Panel 2 | Panel 3–4 | Panel 5–6 |
|---|---|---|---|---|
| Door | Closed | Opening | Fully open | Fully open |
| Nia | Hallway | At threshold | At threshold | Inside room |
| Light | Warm behind | Warm edge | Cool room dominant | Cool with moving shadow |
| Threat | Unknown | Unknown | Absence | Suggested, not revealed |
State tables catch impossible jumps before generation.
Protect Screen Direction
Draw an imaginary line through the hallway and doorway. Keep the camera on one side unless you deliberately show the crossing. If Nia moves left to right in Panel 1, a sudden right-to-left entrance in Panel 3 may feel like a different door.
Mark gaze direction too. In a close-up, leave visual space on the side she is looking toward so the next shot can answer that look.
Step 4: Sequence the Board Like a Viewer
Place all panels in order at the same size. Do not review only the images you like.
Read for Clarity
Ask:
- Can someone understand the scene without the script?
- Is the room clearly empty before the threat appears?
- Does the creak motivate Nia's turn?
- Is the shadow visible enough to read but incomplete enough to preserve suspense?
- Does every panel add information?
Read for Rhythm
Alternate shot sizes with purpose. Six close-ups can feel spatially confusing. Six wides may hide emotion. A wide-to-insert-to-wide-to-close progression creates increasing intimacy, then reverses attention behind the character.
Add estimated duration beneath each panel in your production file. Play the images as an animatic with temporary sound. A board that reads on paper may still feel rushed at real time.
Read for Coverage
Coverage means the editor has enough material to shape the scene. Add a shot only when it offers a different editorial function:
- a clean empty-room plate for timing;
- a closer door-handle insert for suspense;
- a reaction held without dialogue;
- a wall detail where the shadow can enter;
- a neutral transition frame.
Do not create five visually similar angles and call it coverage.
Read for Feasibility
Flag difficult actions, reflections, crowds, hand contact, complex camera moves, or identity-sensitive close-ups. Simplify before production or reserve extra testing time.
Step 5: Make the Storyboard the Source of Truth
Once approved, each panel becomes a production record. Give it a stable shot ID such as SH010, SH020, and SH030, leaving gaps for inserts.
For every shot, store:
- panel image;
- prompt and reference files;
- intended duration;
- start and end action;
- camera movement;
- dialogue and sound cue;
- continuity notes;
- approval status;
- generated takes and used time range.
If a later generation contradicts the board, decide explicitly whether the board changes or the asset is rejected. Do not let an accidental output silently rewrite the scene.
From Board to Keyframes
Use the approved panels to generate higher-quality stills. An image model from the model catalog can help develop production keyframes, but the fixed character and continuity blocks should travel with every prompt.
Review the final keyframes as the same sequence. Art detail should improve without changing shot purpose or geography.
From Keyframes to Motion
Animate the strongest planned moments. An image-to-video workflow is useful when the storyboard and keyframe already lock identity and composition.
Write motion notes before generation:
Nia holds still for half a second, then her eyes shift toward the hallway as the shadow crosses the wall behind her from left to right. The camera remains locked. Preserve her face, bun, necklace, clothing, door geometry, wall, and lighting.
The board defines why the motion exists.
How to Evaluate an AI Storyboard Generator
Do not judge only drawing quality. Test whether the tool helps you direct.
| Criterion | What to inspect |
|---|---|
| Script parsing | Does it find meaningful beats rather than every sentence? |
| Shot variety | Are frames selected for story function rather than randomness? |
| Editability | Can you replace one panel, reorder shots, and change duration? |
| Continuity | Can characters and locations use references or reusable elements? |
| Notes | Can you record action, camera, audio, and fixed details? |
| Export | Can boards, shot IDs, prompts, and assets move into production? |
| Collaboration | Can reviewers comment without overwriting approved decisions? |
Run one short scene through multiple systems. Count how many panels need structural correction, not how quickly the first board appears.
Common Storyboard Mistakes
Turning Every Dialogue Line Into a Shot
Shots change when visual information or performance needs change. Dialogue can continue over reactions, inserts, or existing coverage.
Using Vague Beats
“Something scary happens” is not a beat. “A tall shadow crosses the wall behind Nia” is visible and storyboardable.
Forgetting Continuity
Record door state, subject position, prop hand, light direction, costume, and geography. Images alone may not preserve those facts.
Reordering After Generation
Fix sequence logic at the board stage. Generating first locks money and emotion into shots that may not belong.
Polishing Too Early
Rough cards invite structural changes. Finish art only after the board reads clearly.
Treating the Board as Decoration
A mood board describes a look. A storyboard describes a sequence. Use shot IDs, timing, state, transitions, and production notes.
Storyboard Review Checklist
- The script is reduced to observable beats.
- Every panel has one clear story and camera job.
- Establishing, action, reaction, and ending information are present.
- Shot sizes create readable spatial and emotional rhythm.
- Screen direction and gaze direction are consistent.
- Character, costume, prop, environment, and lighting notes are recorded.
- Fixed and flexible elements are distinguished.
- State changes progress logically.
- The sequence works as an animatic at target duration.
- Difficult shots are identified before production.
- Every panel has a stable shot ID and approval state.
- No unintended text, logo, watermark, or unauthorized likeness appears.
Final Takeaway
An AI storyboard generator is valuable when it turns a script into decisions, not just pictures. The board should explain what the audience sees, why the camera is there, how the scene progresses, and what production must protect from shot to shot.
Reduce the script to visual beats, assign purposeful framing, write continuity before it is forgotten, test the sequence as a viewer, and keep the approved board open throughout generation. That planning layer makes every later tool easier to control.
Frequently Asked Questions
Do I need to draw a storyboard by hand?
No. Rough AI images, simple sketches, photographs, or even boxes and arrows can work. The board's sequence and notes matter more than illustration quality.
How many panels should a one-minute video have?
There is no fixed number, but roughly 8 to 15 planned shots is a practical starting range. Dialogue-heavy edits may need more coverage; contemplative scenes may need fewer, longer shots.
Why does storyboarding improve AI video?
It resolves framing, continuity, screen direction, transitions, and shot purpose before expensive motion generation. Each prompt becomes narrower and easier to evaluate.
Should every storyboard panel become a video clip?
No. Some panels may become still holds, inserts, transition guides, or reference frames. Animate only where motion serves the story.
Can AI maintain storyboard character consistency automatically?
References and reusable elements can help, but human review remains necessary. Use a character sheet, fixed descriptors, state tracking, and side-by-side sequence checks.