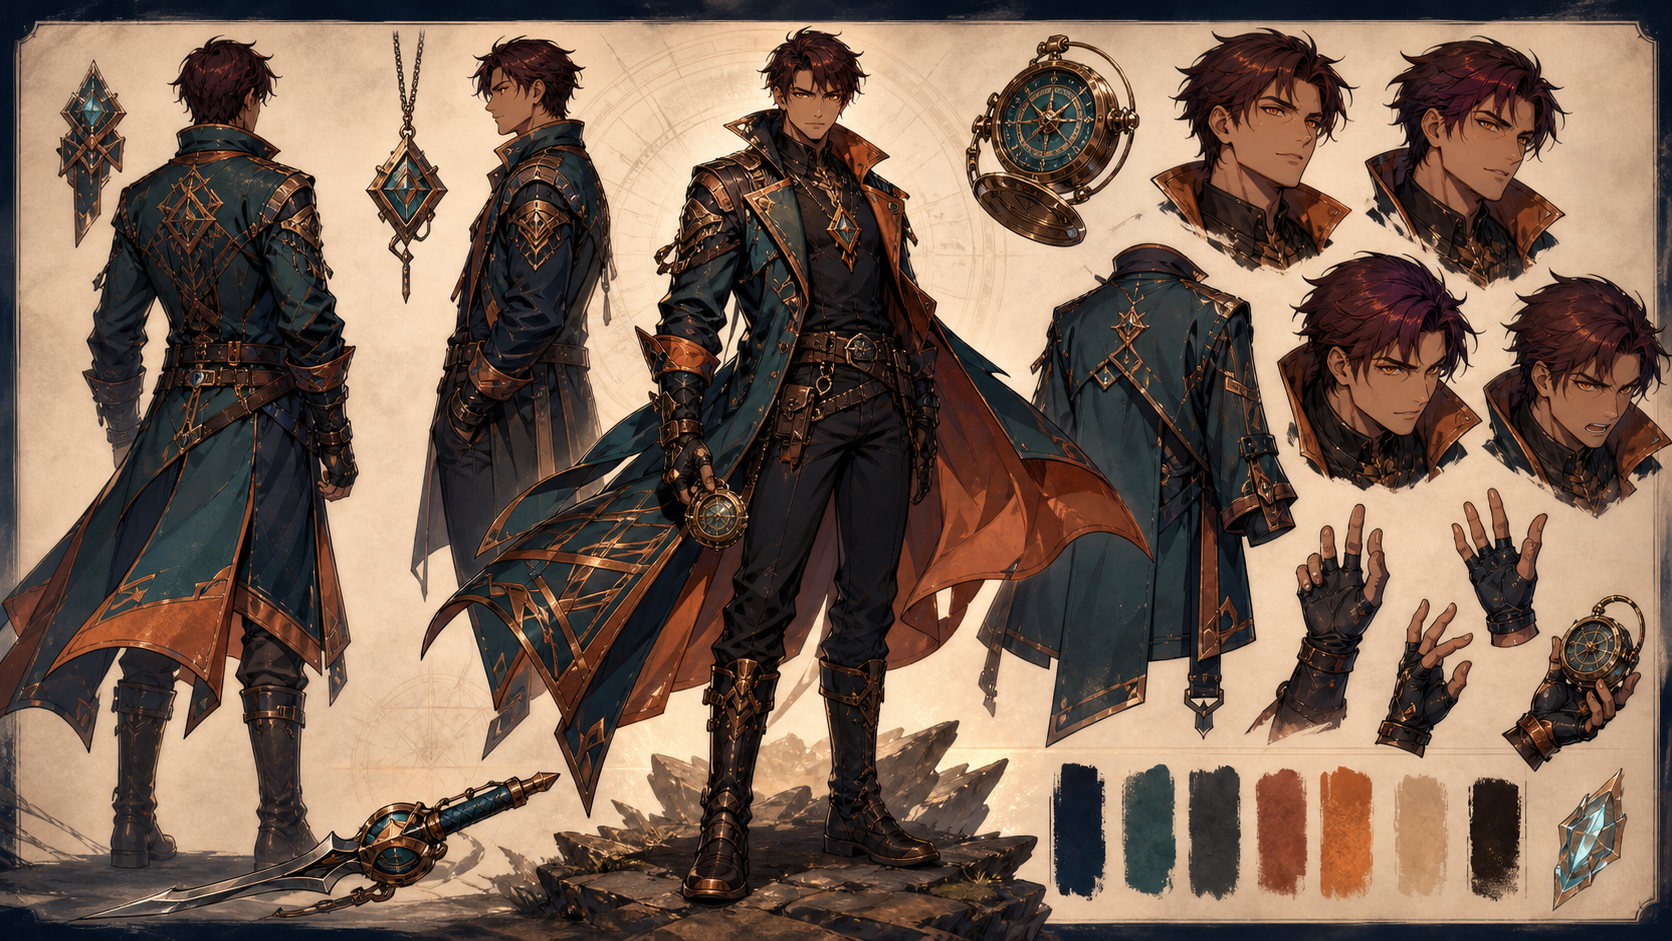
An original character often begins as a feeling rather than a finished design. You may know that the character is a tired courier from a floating city, a cheerful engineer who fears deep water, or a former palace guard hiding a magical injury. Turning that idea into a face, silhouette, outfit, palette, and reusable visual identity is the difficult part.
An AI anime OC generator can accelerate that translation. It can produce visual directions from text, help compare costumes, explore expressions, create reference views, and place the same concept into new scenes. But a single attractive portrait is not yet a character. A production-ready OC needs decisions that survive beyond one image.
This 2026 guide shows how to create an original anime character with DeepFake, build a consistent reference pack, generate scene variations, prepare the design for comics or games, and animate an approved illustration. It also explains the limits of consistency and the copyright questions that creators should consider before commercial use.
What is an AI anime OC generator?
“OC” means original character: a character created for your own story, game, comic, roleplay, channel, or fictional world. An AI anime OC generator turns language and optional reference images into anime-inspired character art.
The useful version of this tool does more than random portraits. It supports a process:
- Describe the character’s identity and design logic.
- Generate several visual directions.
- Select one design and define its fixed traits.
- Create front, side, back, expression, outfit, and prop references.
- Reuse those references in scenes and poses.
- Correct drift with image editing.
- Animate only after the still design is stable.
DeepFake brings image generation, image editing, and image-to-video tools into the same creative platform. Its model catalog gives creators several visual engines to test rather than locking every project to one aesthetic. Model and feature availability changes, so consult the live AI models page when choosing a workflow.
Why most AI characters become inconsistent
Image models do not automatically understand that every prompt mentioning “Mira” refers to one fixed design. If the visual description changes, the generated identity changes. Even when the prompt stays the same, sampling can alter facial proportions, hair details, costume seams, accessories, or age.
Consistency problems usually come from one or more of these causes:
- The character is described with abstract mood words but few visible traits.
- Too many traits compete for attention in one prompt.
- Outfit details have no clear hierarchy.
- Every new scene changes the core character description.
- The creator has no approved reference sheet.
- Pose, camera, setting, style, and identity all change at once.
- A complex action hides important identity anchors.
- The chosen image is animated before visual errors are corrected.
The solution is not an impossibly long prompt. It is a small, stable character specification supported by reference images and deliberate iteration.
Start with the character, not the hairstyle
A memorable design reflects story function. Before generating art, answer five questions.
What does the character want?
A clear desire produces useful visual choices. A courier who wants to map a forbidden route may carry a handmade compass and wear a coat repaired after many journeys. A royal investigator trying to remain anonymous may choose plain clothes but retain disciplined posture.
What contradiction makes them interesting?
Contradictions create personality: a fearless pilot who hates heights, a gentle healer with frightening armor, or a meticulous detective whose magic creates chaos. The contradiction does not need to appear literally, but it can guide expression, pose, and props.
What is their role in the world?
Occupation and environment explain materials. A desert mechanic needs dust protection, tools, breathable layers, and worn hardware. An academy musician needs an instrument case, uniform variations, and performance details. Outfit logic makes a character feel designed rather than decorated.
What is the strongest silhouette?
Reduce the character to a black shape. Would you recognize them? A long asymmetrical coat, triangular shoulder cape, wide trousers, compact backpack, or unusual staff can establish identity before facial detail is visible.
Which three details must never change?
Choose three identity anchors. For example:
- Short dark auburn hair with one copper streak.
- Asymmetrical teal travel coat with a copper lining.
- Round mechanical compass worn at the left hip.
These anchors should appear in every core prompt and every reference image. Other details can evolve.
The anatomy of a strong anime OC prompt
A reliable prompt separates identity from presentation. Use the following order.
1. Identity and age
State that this is one fictional character, plus an appropriate age category and role. If the design is intended for adult marketing or romantic content, explicitly say the character is an adult. Clear age language reduces ambiguity.
2. Body and silhouette
Describe height impression, build, posture, and the large shapes that define the character. Avoid a long list of measurements. “Compact athletic build, upright but watchful posture, long asymmetrical coat” is enough.
3. Face and hair
Choose a few stable traits: face shape, eye color and shape, hairstyle, and one identifying mark. Do not stack conflicting ideas such as several hair lengths or multiple eye colors.
4. Outfit logic
Name the major garment, material, functional details, and condition. Explain why the character wears it. A coherent outfit is easier for a model to preserve than a list of unrelated accessories.
5. Palette
Use three main colors and one accent. State where they appear. “Deep teal coat, charcoal layers, aged copper hardware, small cyan glow” gives the model a usable hierarchy.
6. Signature prop
One distinctive prop can carry story and identity. Define its scale, shape, material, and position. Avoid asking for many weapons or gadgets in the first generation.
7. Personality through pose
Replace vague adjectives with behavior. “Friendly” becomes “relaxed shoulders and a small uneven smile.” “Suspicious” becomes “chin lowered, eyes tracking to the side, one hand near the compass.”
8. Image purpose
Specify whether you need a full-body concept, neutral turnaround, expression sheet, action pose, cover illustration, or cinematic scene. Also specify aspect ratio and background simplicity.
9. Constraints
Add what must be absent: no text, no logo, no extra limbs, no cropped boots, no duplicate accessories, no existing franchise character, and no signature or watermark.
Example prompt: an original anime courier
Here is a reusable starting prompt:
Original fictional adult anime character, a 26-year-old route courier from a floating archipelago. Compact athletic build and alert upright posture. Short dark auburn hair with one narrow copper streak, warm amber eyes, angular brows, and a small scar beneath the right cheekbone. Long asymmetrical deep-teal travel coat with copper lining over charcoal utility layers, reinforced black boots, weathered copper fasteners, and a round mechanical compass at the left hip. Practical adventurous design with a readable silhouette and no resemblance to an existing franchise character. Full-body neutral concept pose, front three-quarter view, warm studio background, clean production concept art, accurate anatomy, entire body visible. No text, logo, watermark, extra fingers, duplicate props, or cropped feet.
The character block from “26-year-old” through “left hip” is the identity core. Copy it unchanged into future prompts. Change the presentation block when you need a profile, scene, expression, or action.
Step-by-step: create your anime OC with DeepFake
Step 1: Write a one-paragraph character brief
Before generating, write the role, desire, contradiction, setting, and three identity anchors. Do not begin with dozens of costume details. The brief should be short enough to remember and specific enough to inspire design choices.
Example:
Mara is an adult route courier who maps unstable passages between floating islands. She is brave in a crisis but privately terrified of getting lost. Her asymmetrical coat, copper-streaked hair, and mechanical compass define her silhouette. Her gear is repaired rather than luxurious, and her palette is teal, charcoal, and aged copper.
This brief gives the model and the creator a reason for every major visual choice.
Step 2: Choose an image model by testing, not reputation
Different image models interpret anime styling, references, edits, and detail differently. Run the same base prompt through a small selection of currently available models. Use the same aspect ratio and similar resolution.
Compare:
- Does the silhouette match the brief?
- Are the face and apparent age appropriate?
- Does the outfit look functional?
- Is the signature prop readable?
- Can you imagine drawing the design repeatedly?
- Does the result feel original rather than derivative?
Do not choose the image with the most detail automatically. The best OC design is one you can recognize, reproduce, pose, and simplify.
Step 3: Generate broad directions
Create a few variations with the same identity core but different shape language. One can emphasize rounded, friendly forms; another can use sharp, disciplined geometry; a third can feel rugged and layered.
At this stage, decide large questions only:
- Hair silhouette.
- Coat or uniform shape.
- Main palette.
- Prop size.
- Overall energy.
Do not spend credits repairing fingers on a design you may reject.
Step 4: Select and simplify
Choose one direction, then remove details that do not serve identity or story. AI often adds ornamental straps, buckles, jewelry, and patterns because they look impressive in one image. Those details become continuity liabilities across scenes.
Ask whether each feature belongs to one of four categories: identity, function, status, or history. If it belongs to none, consider removing it.
Step 5: Make the hero reference
Generate a clean full-body view on a simple background. Keep the pose neutral and the lighting even. Make sure hands, shoes, prop placement, and costume edges are visible.
Use image-to-image editing to correct specific problems while preserving the chosen design. The current DeepFake image editor supports reference uploads, several aspect ratios, and multiple output resolutions. Exact models and credit costs are shown in the interface.
Give edit instructions that separate fixed and changed elements:
Preserve the same adult character’s face, hair, coat shape, palette, compass, proportions, and art style. Correct the left hand to five natural fingers. Remove the duplicate belt pouch. Keep the pose and background unchanged.
Local, explicit edits are safer than “make it better.”
Step 6: Build a production character sheet
A useful character sheet is not one crowded generation. Build it in controlled parts and assemble the final sheet in an editor.
Create these assets:
Turnaround views
Generate front, three-quarter, profile, and back views with neutral posture. Keep the camera height and lighting similar. Back views are especially important because models often invent a completely different costume when the face is not visible.
Expression set
Create neutral, amused, worried, angry, determined, and exhausted expressions. Use head-and-shoulders framing and the same hairstyle, clothing collar, and lighting. Expressions should change the face without changing the person.
Hand and prop studies
Generate close references for the signature prop and the way the character holds it. If the design uses gloves, rings, prosthetics, or markings, document both hands clearly.
Palette and material notes
Save exact color values in a design document. Note whether a surface is matte cloth, worn leather, brushed metal, glass, or glowing energy. Models can shift colors under lighting; the reference should define the intended base.
Scale reference
If the character belongs to a cast, create a simple lineup. Relative height and body shape help keep group scenes coherent.
Step 7: Create a character bible
Store the visual references with a short written specification. A strong character bible includes:
- Full name, age category, pronouns, role, and one-sentence premise.
- Desire, fear, contradiction, and emotional arc.
- Three immutable identity anchors.
- Canonical face, hair, silhouette, outfit, palette, and prop descriptions.
- Approved reference images.
- Details that may change, such as weather gear or formal clothing.
- Details that must never appear.
- Prompt and model settings used for the approved design.
- Rights, consent, and source records for any uploaded material.
This turns a lucky generation into a system that another artist or collaborator can understand.
Step 8: Generate the character in new scenes
Once the reference pack is stable, place the character into simple scenes. Use one approved image as the visual anchor and keep the identity block unchanged.
Structure a scene prompt in layers:
- Preserve identity.
- State the new action and expression.
- Define camera and composition.
- Add environment and lighting.
- Restate important constraints.
Example:
Preserve the same adult courier from the reference: identical face, short auburn hair with one copper streak, amber eyes, asymmetrical teal-and-copper coat, and mechanical compass at the left hip. She kneels on a rain-soaked stone bridge, studying the open compass with a worried expression. Medium full shot from slightly above, distant floating islands in mist, blue-hour lighting and warm compass glow. Keep costume geometry and prop placement unchanged. No text, logo, extra people, duplicate compass, or cropped hands.
Generate one new variable at a time. First prove that the character works in a seated pose. Then change the weather. Then test a dramatic camera. Combining all challenges in the first attempt makes it difficult to identify the cause of drift.
Step 9: Create outfit variations without losing identity
Outfit changes are useful for story progression, but they can make the model redesign the person. Preserve the face, hair, body proportions, and at least one signature color or prop.
Define the relationship between old and new clothing:
Replace the travel coat with formal diplomatic clothing derived from the same asymmetrical silhouette. Preserve deep teal and aged copper, keep the mechanical compass at the left hip, and retain the same adult face, hair, body proportions, and illustration style.
The new costume should feel like the same designer and world made it.
Step 10: Animate the approved character
Do not animate the first portrait you like. First correct facial asymmetry, hands, clothing overlaps, prop duplication, and background artifacts. Motion tends to amplify unresolved errors.
Use the image-to-video generator with a short, controlled motion prompt:
The adult courier lifts her gaze from the compass and gives a small relieved smile. Her coat hem and loose hair move gently in the wind. Slow cinematic push-in. Preserve her face, outfit, compass, and background architecture. No scene change or new objects.
One main action plus one secondary environmental motion is usually enough. Generate short tests before choosing higher resolution or longer duration. If identity degrades, reduce motion, simplify the background, or return to a cleaner source image.
How to improve character consistency
Consistency is a workflow, not a switch. These practices make the largest difference.
Keep a canonical identity block
Copy the same essential description into every prompt. Do not alternate between synonyms for critical traits. If the coat is deep teal, do not call it turquoise in one scene and blue-green in another.
Use the same approved references
New reference images introduce new interpretations. Maintain a small approved set rather than uploading every generated portrait.
Control the crop
Models cannot preserve shoes that are never shown. Use full-body references for action and outfit work, and close portraits for expression studies. Choose a reference that contains the details needed by the new shot.
Separate character and background
If a complex environment causes drift, generate a simpler character scene first, then composite or transform the background. Reducing the number of competing tasks helps preserve identity.
Preserve shape before texture
Silhouette, face structure, hair mass, coat outline, and prop location matter more than tiny embroidery. Lock large shapes before decorative detail.
Accept targeted manual correction
Even a good system will miss details. Paint-over, compositing, layer masks, and conventional retouching are legitimate parts of an AI-assisted workflow. Human correction is often faster and more consistent than repeated generation.
Common prompt problems and fixes
The face changes in every image
Shorten the identity description, use one approved portrait reference, keep apparent age explicit, and avoid changing model or style during the same sequence.
The outfit becomes overloaded
Remove ornamental adjectives. Define one main garment, one functional layer, one prop, and a limited palette. Ask for clean production design rather than maximum detail.
Accessories duplicate
State the exact count and location: “one compass at the left hip, no other pendants or devices.” Use image editing to remove duplicates from the hero reference before generating variations.
The character looks like an existing franchise
Remove franchise and artist names. Build the style from broad visual attributes: clean cel shading, angular silhouette, muted palette, expressive eyes, dramatic rim light, or rough ink texture. Change the role, costume logic, palette, prop, and world assumptions until the design has its own identity.
Group scenes merge characters
Generate each character separately, give them distinct silhouettes and palettes, and compose the group carefully. In the prompt, describe positions from left to right and keep the first group shot simple.
Animation melts facial details
Reduce motion, avoid aggressive head turns, start with a sharper source image, and use a shorter clip. A subtle blink and camera push can be more convincing than a complex performance.
Use cases for an AI-generated anime OC
Comics and webtoons
Use the reference sheet to guide panel generation and manual drawing. Keep dialogue editable and review continuity across the full page, not just individual panels.
Indie games and visual novels
Create concept art, expression portraits, costume directions, background references, and pitch materials. Final game assets need consistent dimensions, transparency, poses, and licensing records.
VTuber and channel personas
Develop the identity, outfit, palette, and promotional illustrations before commissioning or building a rig. A generated picture is not automatically a rigged avatar.
Tabletop and roleplay characters
Create portraits, equipment views, party lineups, and key story moments. Avoid using another player’s likeness without permission.
Story pitches and animation tests
Character sheets and short animated keyframes can communicate tone before a project enters full production. Label AI-assisted concept material clearly when presenting it to collaborators or clients.
Copyright, originality, and ethical use
This section provides general information, not legal advice. Rules differ across countries and continue to evolve.
In the United States, the Copyright Office’s 2025 report concluded that generative outputs may be protected only where a human author determines sufficient expressive elements. Human-authored material visible in the result, creative selection and arrangement, or meaningful modifications can support protection; merely providing prompts is generally not enough by itself.
That makes human creative contribution important. Write the character’s story, make intentional design choices, combine and arrange elements, redraw or edit outputs, create the reference system, and document your process. If registering a work that includes appreciable AI-generated material in the United States, review current disclosure guidance or consult a qualified professional.
Also remember that “original character” does not mean “slightly altered famous character.” Avoid copying protected logos, costumes, signature props, or distinctive character designs. Fan work may still depend on the rights holder’s policies and local law. Do not assume that noncommercial use eliminates all risk.
For commercial projects, check the platform plan, selected model, and terms that applied when the asset was created. Save those records with your project files.
Final character quality checklist
Before calling the OC ready, verify:
- The character has a clear role, desire, and contradiction.
- The silhouette is readable at thumbnail size.
- Three identity anchors are defined and visible.
- Face, hair, apparent age, and body proportions remain stable.
- The outfit has functional logic and a controlled palette.
- Signature props have a fixed shape, count, and location.
- Front, profile, three-quarter, back, expression, hand, and prop references exist.
- Prompts and model settings are recorded.
- New scenes preserve the canonical identity block.
- Hands, anatomy, duplicated objects, and clothing continuity are reviewed.
- Uploaded materials are owned or properly licensed.
- The design does not imitate a protected character or living artist’s exact style.
- Commercial rights and AI disclosure requirements have been checked.
- Animation tests begin with a corrected, high-quality still.
Final verdict
The best AI anime OC generator is not the one that produces the flashiest first portrait. It is the one that helps you make decisions, preserve them, and carry the character into new expressions, outfits, scenes, and motion.
DeepFake provides the pieces for that process: a selection of image models, text-to-image exploration, image-to-image correction, and a path from an approved illustration to video. The creator supplies the part no model can automate completely: a coherent character idea, disciplined art direction, careful selection, meaningful human authorship, and respect for other people’s rights.
Begin with one character brief and three identity anchors. Generate broad directions, choose a design you can simplify, and build the reference sheet before creating dramatic scenes. When the character remains recognizable even without their face, you have moved beyond a random AI portrait and created an OC with a real visual identity.