Categories: AI Image, AI Video, Creator Guides
Tags: anime ai generator, consistent characters, character design, scene continuity, image to video
Introduction
An anime AI generator can produce an impressive character in seconds. Producing the same character across a close-up, a full-body shot, a rainy rooftop, a crowded workshop, and an animated sequence is a different challenge. Faces drift, hairstyles change sides, costume details migrate, props switch hands, and rooms quietly rearrange themselves between shots.
The solution is not simply a longer prompt. Consistency comes from treating the character and the world as reusable production assets. You define what must remain fixed, decide what may change, approve neutral references before making dramatic art, and introduce difficult variables in controlled steps.
This guide presents a complete workflow for original adult anime characters. It works for illustrated stories, visual novels, social clips, pitch animatics, and image-to-video sequences. The goal is not to eliminate variation; it is to make variation intentional.
First Diagnose the Kind of Inconsistency
“The character changed” can describe several problems. Identify the failure before rewriting anything:
- Identity drift: the face, apparent age, body type, or proportions change enough to suggest a different person.
- Design drift: the person remains recognizable, but hair length, clothing, colors, scars, jewelry, or equipment change.
- Style drift: line weight, shading, rendering detail, or visual genre changes between scenes.
- Spatial drift: a room, street, or object layout no longer matches the established location.
- State drift: story information is lost. A torn sleeve repairs itself, a parcel becomes unopened again, or an object jumps from one hand to the other.
- Motion drift: animation stretches the face, merges limbs, or causes costume details to flicker.
Each failure needs a different fix. Identity drift calls for a stronger character reference. Spatial drift needs a location map. State drift needs a continuity log. Motion drift often means the source still is too ambiguous to animate reliably.
Build a Four-Layer Character Identity Stack
Do not ask one descriptive paragraph to carry the entire design. Divide the character into four layers so you can tell the generator which details are structural and which are temporary.
Layer 1: Biological and Structural Features
Start with features that make the person recognizable without relying on clothing. Include apparent adult age, face shape, skin tone, eye shape and color, eyebrow shape, nose and mouth proportions, build, and one or two stable marks.
A useful description might be:
Clearly adult, late twenties; heart-shaped face; straight brows; gray-green almond eyes; compact athletic build; small diagonal scar beneath the right eyebrow.
Avoid vague labels such as “beautiful,” “cool,” or “handsome.” These words communicate taste but give little structural information, so the model may substitute a generic face.
Layer 2: Silhouette
Silhouette matters whenever the face is small or turned away. Define the large shapes: hair mass, relative height, shoulder width, coat length, footwear, and signature equipment.
For example:
Short cobalt bob ending at the jaw, with one longer strand on the left; cropped flight jacket; narrow messenger bag worn high across the back.
If the character is recognizable only in a portrait, the design is not yet robust enough for sequential art.
Layer 3: Recognition Anchors
Choose three to five details that must survive every scene. Strong anchors are visually distinct and easy to verify:
- short cobalt bob with one longer left-side strand;
- gray-green eyes;
- brass compass pin;
- navy jacket with one red cuff;
- charcoal messenger bag worn high.
Use the exact same wording whenever possible. “One red cuff,” “crimson sleeve detail,” and “red asymmetrical glove” may seem similar to a person, but they can imply three different designs to a model.
Layer 4: Controlled Variables
List the elements that may change: expression, pose, temporary accessories, weather, lighting, dirt, battle damage, and scene-specific props. Separating variables from identity prevents the generator from treating every fold and highlight in the first image as permanent.
This distinction also makes revisions easier. You can request “same identity and outfit, tired expression, rain damage, no hat” without rebuilding the character from zero.
Create a Neutral Model Sheet Before Story Art
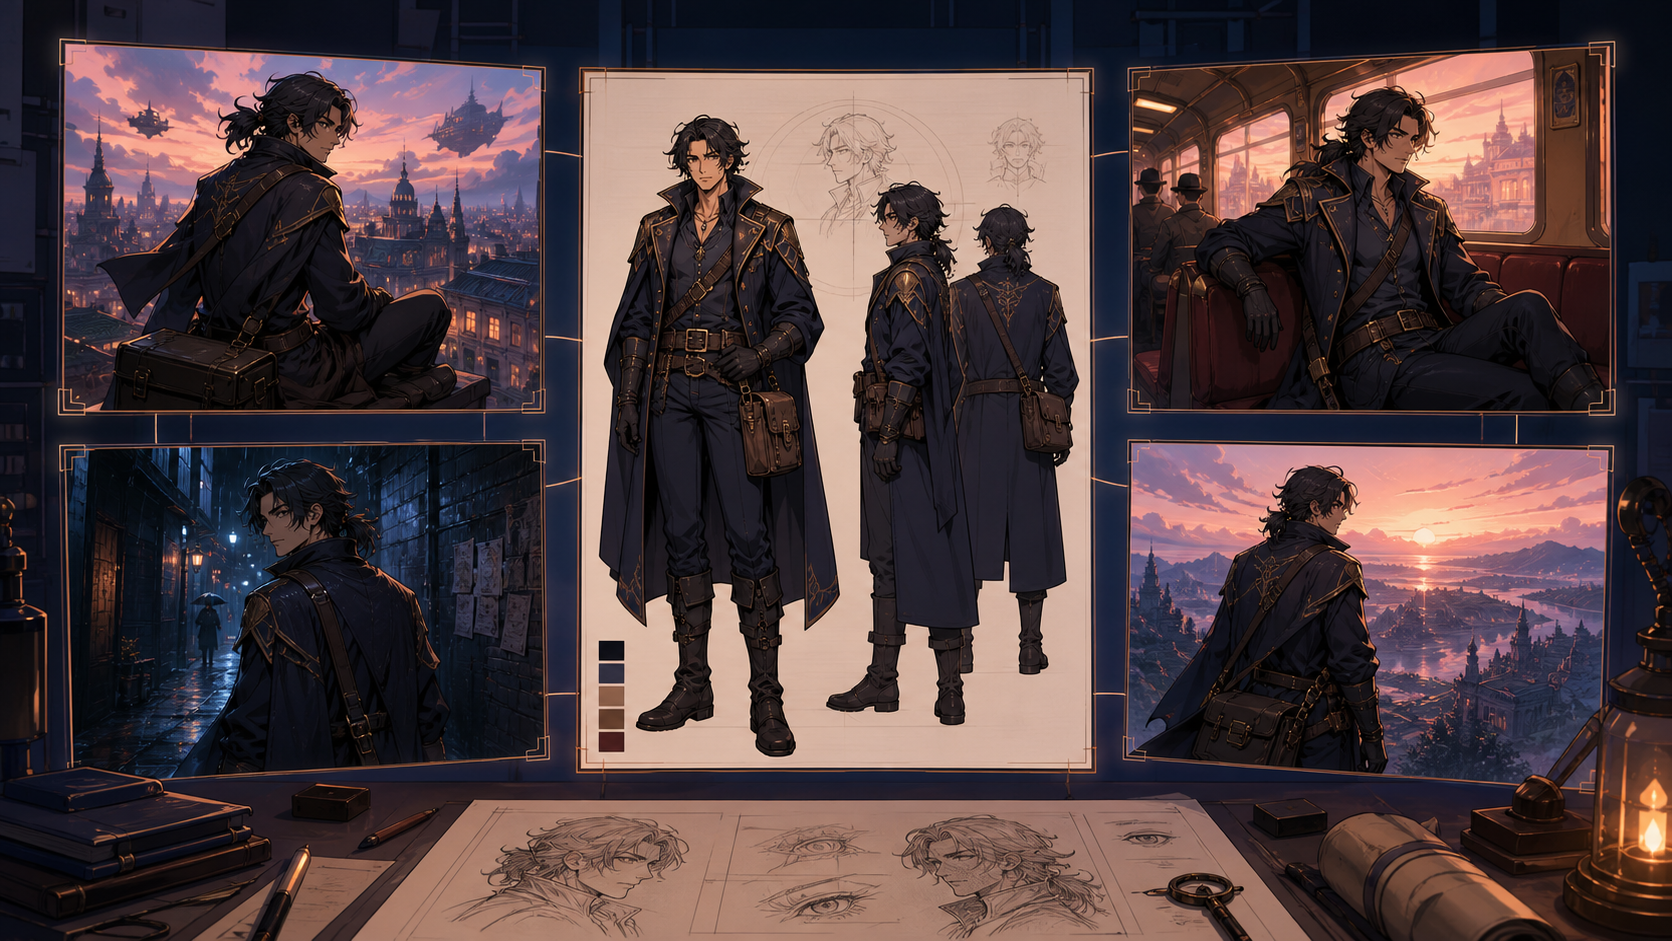
The first approved image should be boring in the best possible way. Generate a neutral full-body three-quarter view against a simple background. Use even lighting and a relaxed pose. Avoid dramatic perspective, crossed arms, flying hair, heavy shadows, or props that hide the torso.
Then build a compact reference set:
- front, side, and back views;
- a neutral face portrait;
- a six-expression sheet;
- hands holding the signature prop;
- seated and walking poses;
- outfit details and a limited color palette.
Generate these as separate, readable studies if a single crowded sheet causes distortion. Record important colors numerically outside the image rather than trusting a tiny printed swatch.
Check every reference for agreement. Does the scar remain under the same eyebrow? Is the long hair strand still on the left? Does the bag strap cross the torso in the same direction? Are the jacket hem and cuff placement physically coherent in front and back views?
Once the set passes review, create a one-page character bible. Divide it into must keep and may vary. Store the text outside the generator so it remains available even if a session, seed, or model changes.
Write Prompts That Protect Identity
A reliable prompt has three separate blocks:
- Stable character block — repeated without casual rewrites.
- Scene block — pose, action, location, camera, and lighting.
- Continuity instruction — a short list of features that must not drift.
Here is a practical structure:
Character: Adult night courier; heart-shaped face; short cobalt bob with one long strand on the left; gray-green eyes; brass compass pin; navy cropped flight jacket with one red cuff; charcoal messenger bag worn high.
Scene: Kneeling beside an open rooftop vent in the rain, medium-wide view from slightly above. Rain enters from camera right. Warm light rises from the vent against a cool skyline. Both hands are visible.
Continuity: Preserve face shape, apparent age, hair silhouette, compass pin, cuff placement, jacket, and bag.
Keep the character block stable across shots. Change only the scene block when you move the camera or alter the action.
Style instructions should also be coherent. Choose a small, compatible set such as “clean anime line art, restrained cel shading, cinematic color contrast.” Combining watercolor, glossy 3D, rough manga ink, photoreal skin, and flat vector art in one prompt invites unpredictable compromises.
Build a Location Bible for Every Important Scene
A consistent person inside an inconsistent room still produces a broken sequence. Treat locations as assets.
For a recurring interior, save:
- one wide establishing view;
- a simple top-down diagram;
- marked doors, windows, furniture, and major props;
- the direction of daylight;
- two approved camera angles;
- a short list of materials and dominant colors.
Write location invariants in plain language:
The workbench remains beneath the north window. The red tool cabinet is camera left. The only exit is behind the hanging blue curtain. Morning light enters from the right.
For outdoor scenes, record time of day, weather, architecture, street width, signage rules, horizon height, and palette. “Rainy cyberpunk street” is a mood, not a map.
Screen direction matters too. If the courier enters from the left and travels toward the right, reversing that direction in the next shot may look like retreating. Record entrances, exits, eyelines, and travel direction in the shot list.
Change One High-Risk Variable at a Time
Consistency drops when a prompt requests too many transformations at once. A new outfit, extreme low angle, sprinting pose, nighttime rain, second character, and different art style create multiple opportunities for drift.
Use a staged progression:
- approve the character in a neutral environment;
- introduce the new outfit;
- approve that outfit from two readable angles;
- test the action pose;
- place the approved pose in the final environment;
- add a second character;
- animate only after the still composition is stable.
This process may feel slower for one image, but it is much faster for a sequence because each approved stage becomes a reusable checkpoint.
When an image is nearly correct, edit it instead of generating the entire scene again. Mask or revise the wrong cuff, missing pin, hand, or background prop while preserving the approved face and composition. Regeneration is useful for exploration; targeted editing is usually better for continuity.
Keep Two Characters from Blending Together
Multi-character scenes add a common failure: attributes migrate. One person inherits the other’s eye color, jacket, hairstyle, or prop.
Reduce ambiguity before prompting:
- Give each character a distinct silhouette.
- Separate their dominant palettes.
- Use stable labels such as “Courier A” and “Mechanic B.”
- State left/right or foreground/background positions.
- Assign props explicitly.
- Describe interaction only after identities are established.
For example:
Courier A stands frame left holding the sealed parcel in both hands. Mechanic B sits frame right beside the red tool cabinet holding a silver wrench. Do not exchange hairstyles, clothing colors, accessories, or props.
Avoid giving both characters similar coats, similar hair lengths, and closely related colors unless the resemblance is narratively essential. Good production design prevents problems that prompting alone may not solve.
Prepare a Consistent Still for Animation
Animation cannot rescue a confused source image. Before sending a still into an image-to-video workflow, make sure:
- the face is readable at the intended output size;
- arms and legs are clearly separated;
- hands are not fused with clothing or props;
- foreground objects do not create ambiguous overlaps;
- small accessories are clean enough to track;
- there is visual space for the planned movement;
- unwanted text and background artifacts are removed.
Then describe motion with the same discipline used for identity:
The courier looks from the parcel toward the window, takes one visible breath, then tightens her grip. Hair tips and jacket hem move subtly in the wind. The camera performs a slow five-percent push-in. Preserve facial proportions, costume design, compass pin, red cuff, and bag placement.
Favor one primary action plus subtle secondary motion. A four-second clip with clean breathing, eye movement, and fabric response is more useful than a ten-second clip containing six competing actions and a collapsing design.
Review animation twice: once at normal speed for storytelling, then frame by frame for face warping, hand changes, flicker, accessory swaps, and background geometry. If a defect exists in the first frame, fix the still. If it develops over time, simplify the motion or shorten the shot.
Maintain a Continuity Checklist and State Log
Before approving each image or clip, compare it with the character and location bibles:
- apparent adult age and face structure;
- eye shape and color;
- hair length, mass, part, and signature strand;
- costume colors, cuff placement, pins, and fasteners;
- prop design and which hand holds it;
- height relationships between characters;
- location geometry and furniture placement;
- time, weather, and light direction;
- line quality, shading, and palette;
- screen direction and eyelines;
- story changes that are intentional.
Use a separate state log for changes over time. A simple row can record: “Shot 08 — jacket torn at right shoulder; parcel still sealed; compass pin intact; rain begins.” The next prompt should inherit the current story state, not the pristine model sheet.
Name assets clearly, such as courier_model_v03, workshop_wide_v02, and shot_08_rain_approved. Seeds and tool settings can help reproduction, but the approved visual reference and written bible are more portable across workflows.
Common Mistakes and Better Fixes
The Face Changes in Every Shot
The identity description may be too vague, the reference may be weak, or the dramatic scene may be overpowering the character. Return to a neutral portrait, describe structural features, strengthen three to five anchors, and increase scene difficulty gradually.
More References Make the Result Worse
References that disagree create an average rather than a stable identity. Use the smallest set that consistently explains the design—often one clear portrait, one full-body view, and one or two additional angles. Agreement matters more than quantity.
The Costume Keeps Mutating
Separate the outfit into invariant components and optional details. Specify exact placement, such as “one red cuff on the character’s right sleeve,” and verify front/back logic on the model sheet. Edit near-misses instead of rerolling the whole image.
The Room Looks Different from Every Angle
Mood words are not enough. Make an establishing shot and top-down plan, mark fixed objects, and derive new angles from that shared geometry.
The Animated Version Loses the Design
Reduce motion complexity, shorten duration, clean the still, and state the preservation constraints explicitly. Start with breathing, gaze, fabric, or camera motion before testing full-body action.
Responsible Character Creation
Create original adult characters or use designs you have permission to develop. Avoid copying a copyrighted character so closely that the result could be confused with the original. Describing observable production qualities—line weight, palette, lighting, or shading—is more controllable and respectful than requesting a living artist’s exact style.
If a design uses a real person’s likeness, obtain clear consent and disclose synthetic media where the context calls for it. Keep reference images and project files secure, and review platform rules before publishing commercial work.
A Repeatable Production Workflow
The entire process can be summarized as a practical loop:
- Define the original adult character with a four-layer identity stack.
- Generate and approve a neutral model sheet.
- Save a compact character bible with exact recognition anchors.
- Build a location bible for recurring environments.
- Split each prompt into stable character, scene, and continuity blocks.
- Introduce one high-risk change at a time.
- Edit near-misses instead of replacing approved content.
- Validate the still before animation.
- Animate one primary action with restrained secondary motion.
- Review against a continuity checklist and update the state log.
You can use DeepFake as part of the visual generation and experimentation stage, then assemble approved assets in your preferred illustration, compositing, or editing workflow. Save the prompts, references, and review notes alongside each export so later scenes remain reproducible.
Conclusion
Consistent anime generation is built before the final scene is rendered. A strong identity stack protects the face and silhouette. A neutral model sheet turns a promising design into a reusable asset. Location references protect spatial logic, while staged changes keep difficult poses and environments from overwhelming identity.
The most important habit is simple: approve stable components separately, then combine them deliberately. When a result is close, edit the failure instead of discarding everything that already works. And never animate a still whose anatomy, identity, or scene logic is already uncertain.
With a character bible, location bible, prompt blocks, and continuity log, an anime AI generator becomes less like a slot machine and more like a production tool.
Frequently Asked Questions
Why does an anime AI generator keep changing my character’s face?
The prompt may rely on subjective adjectives instead of structural features, the reference set may be inconsistent, or the scene may introduce too many difficult variables. Approve a neutral portrait, document face shape and recognition anchors, and add complexity in stages.
How many reference images do I need for a consistent character?
Use the smallest set that agrees with itself. A clear portrait, full-body view, and one or two extra angles are often more useful than a large collection containing conflicting faces, proportions, or costume details.
Should I reuse the exact same character description?
Yes. Keep a stable character block and repeat important anchor wording exactly. Put pose, weather, camera, expression, and other changes in a separate scene block.
Can I make the background consistent too?
Yes, but it needs its own reference system. Create an establishing image, a simple overhead layout, two approved angles, and written invariants for doors, windows, props, light direction, and palette.
What should I fix before turning an anime image into video?
Correct the face, hands, limb overlaps, accessories, text artifacts, and background geometry first. Use one clear action, subtle secondary motion, and an explicit instruction to preserve proportions and costume details.