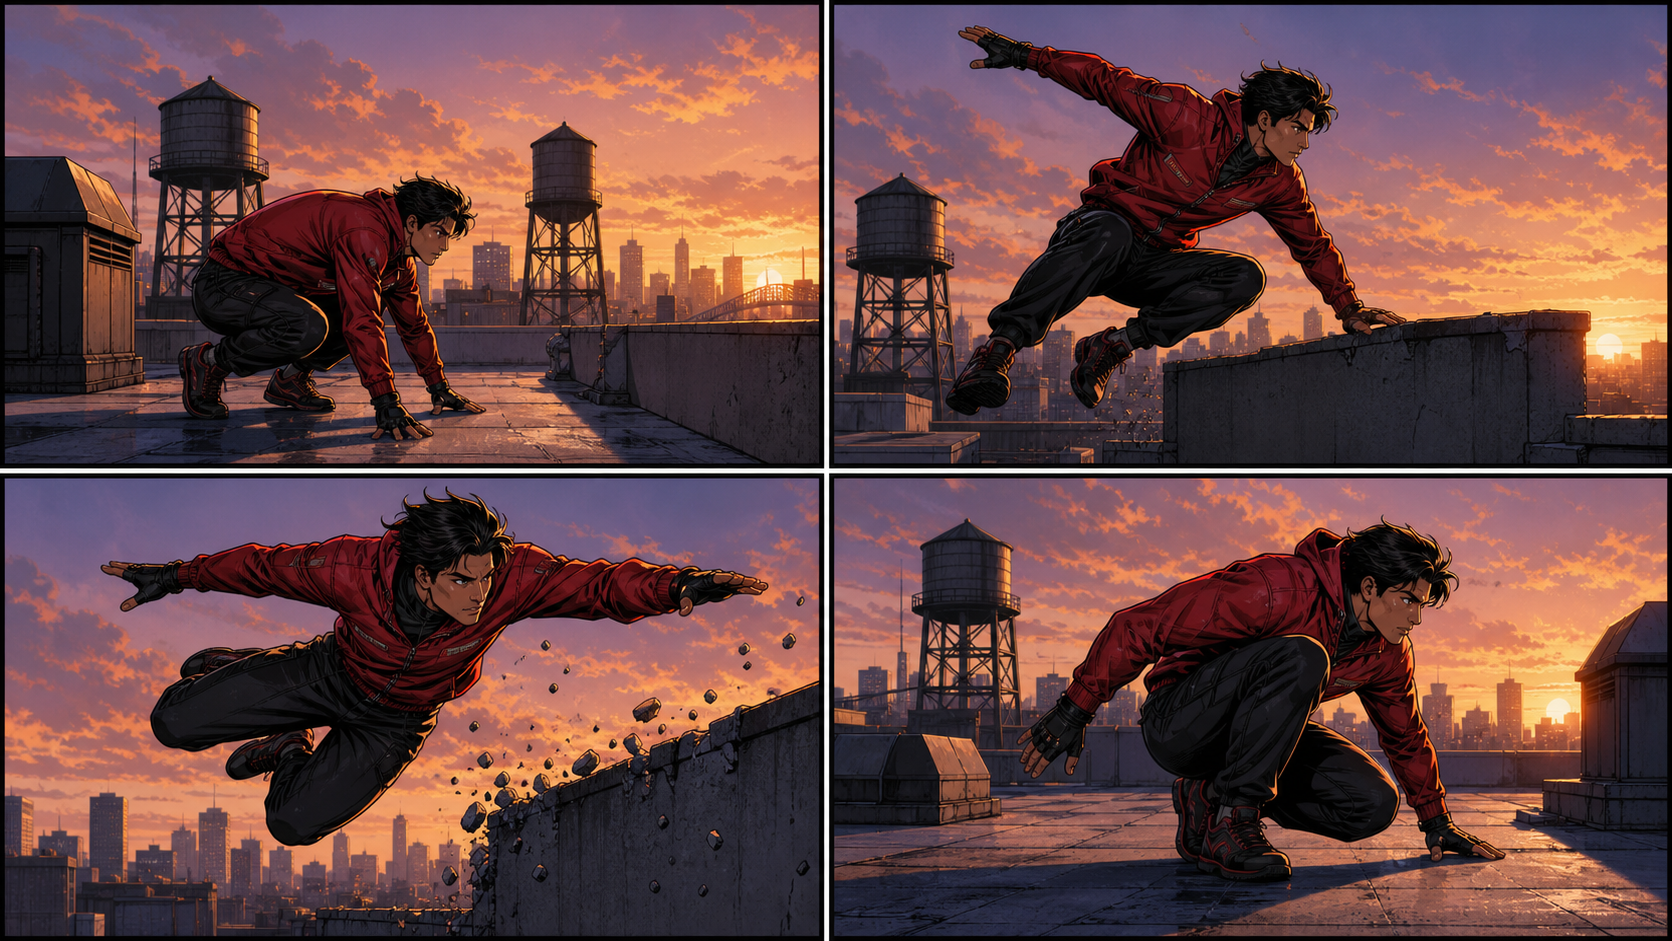
Good comic action is not defined by how many speed lines, sparks, or dramatic poses fit inside a panel. It is defined by whether the reader can tell who moved, where they moved, what made contact, and what changed as a result.
AI can produce energetic individual images, but a convincing action sequence still requires hands-on direction. You need a clear destination, stable character references, readable spatial geography, controlled variations, and a review process that judges the page at the size where it will actually be seen.
This workflow turns an action premise into a sequence of decisions you can test, revise, and reuse.
Start With the Result You Actually Need
Define the destination before generating art. A vertical mobile comic rewards large silhouettes and simple backgrounds. Print reveals small anatomical and texture problems. A profile crop needs one dominant pose. A teaser clip needs breathing room around the subject for motion and reframing.
Lock the following production constraints first:
- Page or platform
- Aspect ratio and panel orientation
- Final resolution and safe crop
- Reading direction
- Space required for dialogue and sound effects
- Whether any panel will later become a motion keyframe
Then write a short acceptance test. A strong action sequence should pass five checks:
- The reading order is immediate.
- Recurring characters remain recognizable.
- Dialogue and sound effects do not crowd the art.
- Camera choices clarify each beat.
- Every panel changes the story.
A polished preview should not pass if it misses the assignment. These checks turn “make it more exciting” into an actionable correction such as simplify the background, strengthen the silhouette, preserve the face, shorten the dialogue, or clarify the direction of movement.
Map the Action Geography Before Styling It
The first technical decision is spatial: where does every character start, where do they move, and where do they end? Draw a simple overhead map if necessary. Mark doors, obstacles, height differences, escape paths, and the direction of force.
Unreadable geography cannot be repaired with motion blur. If a hero is left of an obstacle in one panel and inexplicably appears on the opposite side in the next, the reader spends time reconstructing the space instead of feeling the action.
Keep screen direction stable through the core movement. When you intentionally cross the action axis or reverse direction, insert a re-establishing shot that shows the new relationship. Wider views are especially useful before a chase begins, after characters change position, and whenever the environment becomes part of the threat.
Use Anticipation, Action, Impact, and Reaction
Many weak action pages compress an entire event into one chaotic image. A clearer approach distributes the event across distinct beats:
- Anticipation: the body coils, a hand reaches, an opponent notices, or an obstacle enters the path.
- Action: the decisive movement begins with a clear direction and readable pose.
- Impact: contact, a near miss, a landing, or a sudden environmental change creates the peak.
- Reaction: balance is recovered, pain registers, debris settles, or a new decision follows.
Not every moment needs four panels, but the sequence should preserve the causal chain. Anticipation gives the action weight. Impact gives it a focal point. Reaction confirms what the event meant.
The Working Process
1. Reduce the premise to a clear conflict
Write one sentence containing a character, a goal, and an obstacle. “A rooftop courier must clear a collapsing wall before the pursuer reaches the stairwell” is buildable. It suggests direction, urgency, a landmark, and an ending condition.
Avoid stacking vague adjectives. Concrete visual facts are more useful: name the shape of the obstacle, clothing construction, body action, camera distance, light source, and material being struck. “Low concrete divider, sunset rim light, red nylon jacket, wide side view” gives the system something visible to construct.
2. Break the conflict into visual beats
List only the moments that change information. A possible beat sheet is:
- The courier sees the blocked path.
- The courier lowers into a takeoff stance.
- The pursuer closes the distance.
- The courier vaults as the divider breaks.
- The courier lands off balance.
- A new exit becomes visible.
Remove any beat that repeats the previous panel without adding risk, movement, or reaction. A small, finishable sequence usually teaches more than a sprawling battle with unclear continuity.
3. Assign one job to each panel
Decide whether a panel establishes space, anticipates movement, shows contact, reveals emotion, or changes the objective. One strong job produces a cleaner composition than asking every panel to show the entire environment, multiple characters, dialogue, impact, and reaction at once.
Treat the first approved character asset as the master reference. Record the few traits that make the character recognizable—face shape, proportions, hair, jacket construction, palette, and signature props. If a candidate changes identity, discard that drift rather than passing it into the next prompt.
4. Make the visual action work before adding dialogue
Review the page temporarily without text. Can you identify the attacker and defender? Is the movement direction clear? Does the pose show force, resistance, or balance? Can you tell what happened after contact?
Add dialogue only after the visual sequence works. Keep speech short during fast movement and reserve enough negative space in the original composition. Dialogue should sharpen intention or emotion rather than narrate what the reader can already see.
5. Run controlled generations, not random retries
Keep the source, character reference, and core brief fixed. Change one decision—camera distance, pose phase, lighting, or background detail—and generate a small batch of three or four candidates. Eliminate structural failures before judging decorative finish:
- Broken anatomy or weight distribution
- Conflicting perspective
- Reversed screen direction
- Character or costume drift
- Ambiguous contact point
- Weak silhouette against the background
- Visual effects that obscure the action
For ideation, a text-to-image workflow can help explore specific shots. Preserve the chosen character and geography notes outside the generation history so the production does not depend on remembering a lucky prompt.
6. Review the sequence at two scales
First, view the page the way the audience will. On a phone-sized preview, check silhouettes, focal order, text size, and whether the action survives reduction. A beautiful full-screen close-up can become visual noise in a narrow mobile panel.
Then zoom in and inspect anatomy, hands, seams, edges, duplicated debris, lettering, and continuity. A strong thumbnail can still hide technical defects that become obvious in print.
7. Repair the smallest failing region
Once most of a panel is approved, narrow the scope of every edit. Fix the hand, face, jacket edge, contact point, balloon, or background patch without reopening the successful camera and composition.
Broad regeneration is useful while exploring. Late in the process, it reintroduces solved problems. Compare every local repair with neighboring panels and the master character reference before accepting it.
Choose Camera Distance for the Beat
Use wider shots to establish geography, display multiple bodies, and show the path through an environment. Use medium shots for readable full-body movement and physical interaction. Reserve close-ups for decisive emotion, contact, or a small detail that changes the conflict.
A page made entirely of close-ups can feel energetic while remaining spatially confusing. Re-establish the scene after major movement so the reader knows where everyone ended up. Conversely, an entire page of distant shots may explain geography but reduce the emotional force of impact and reaction.
The camera should serve the beat, not merely vary for novelty.
Control Motion Effects
Speed lines, blur, debris, and impact shapes are supporting evidence. They should reinforce a movement already expressed through pose, spacing, and composition.
- Align motion effects with the actual direction of travel.
- Keep the face, hands, and contact point readable.
- Use debris that matches the struck material.
- Let reaction poses confirm the direction and strength of force.
- Reduce effects at the edge of speech balloons and critical silhouettes.
If removing the effects makes the action incomprehensible, revise the underlying pose or geography first.
A Realistic Production Example
Consider the rooftop courier sequence. Begin with a wide establishing panel showing the courier, low divider, stairwell, and pursuer. The next panel moves closer for the crouched anticipation pose. A side view captures the takeoff and makes the travel direction unmistakable. The impact panel focuses on the hand and foot clearing the cracked divider. A wider landing panel restores geography and shows the pursuer’s new position. The final reaction reveals the exit and changes the objective.
Keep the courier’s red jacket, shoes, proportions, and bag consistent. Track which shoulder carries the bag and where the damaged concrete lands. If the strongest impact panel contains a malformed hand, repair the hand locally from the master reference rather than regenerating the full action.
If selected panels will become a teaser, compose them with additional space around the subject before moving into an optional image-to-video stage. Plan that use at the beginning; do not attempt to rescue a tightly cropped frame afterward.
Common Mistakes and Better Fixes
Changing too much at once
Lock successful regions and alter one category per pass. If you change costume, camera, pose, lighting, and environment together, you cannot identify which instruction caused a failure.
Using style words instead of construction
“Epic” and “dynamic” do not define a readable pose. Describe the bend of the body, the visible contact point, camera height, material, light direction, and foreground/background separation.
Reviewing only the most attractive preview
Do not confuse polish with function. Inspect anatomy, edges, text, geography, and continuity at full size, then return to publishing size to confirm the page still reads.
Adding effects before solving the pose
Extra blur and debris can disguise the focal action. Establish a clean silhouette and believable balance first, then add only the effects that clarify force and direction.
Losing continuity between action beats
Fast movement does not excuse changing faces, outfits, props, or environmental landmarks. Protect identity and scene state with a character reference and a lightweight continuity log.
Keep a Creation Log
For each accepted panel, record what changed, why the version passed, which defects remain, and which reference was used. Save prompts, aspect ratios, crops, and export settings with meaningful filenames.
This turns one successful page into a reproducible method. The reusable value lies in the preserved decisions—identity, palette, proportions, wardrobe, camera language, and review criteria—not in an unexplained lucky generation.
Quality, Safety, and Rights
Use photos, character designs, logos, and reference art only when you own them or have permission. Get consent before editing a recognizable person, particularly for public or commercial work. Clearly label conceptual scenes if viewers might mistake them for real events or documentary imagery.
Before release, review the current tool terms and the copyright, publicity, trademark, and fan-art rules that apply to the project. Keep provenance notes and approvals for client work.
FAQ
Should I generate an entire action comic at once?
A full-page generation can be useful for rough thumbnails. For control, approve the script, beat sheet, geography, and character references first, then review panel by panel and repair weak regions locally.
Do I need professional drawing or editing skills?
No, but basic knowledge of composition, continuity, perspective, and file formats is valuable. A precise brief and careful review often matter more than advanced software knowledge.
How many versions should I generate?
Start with a small controlled batch, often three or four candidates for one decision. If none solves the structural problem, revise the source, reference, or instructions before generating more.
Can I use the result commercially?
Possibly, depending on the current platform terms and the rights attached to your source material, characters, brands, and references. Give client work a documented rights review before publication.
Conclusion
Readable AI comic action comes from control. Map the space, divide movement into anticipation, action, impact, and reaction, protect character identity, vary one decision at a time, and review the page at both full resolution and publishing size. When a panel is mostly right, repair the smallest failure instead of reopening the entire image. The result is not merely a dramatic frame—it is a coherent sequence the reader can follow and feel.