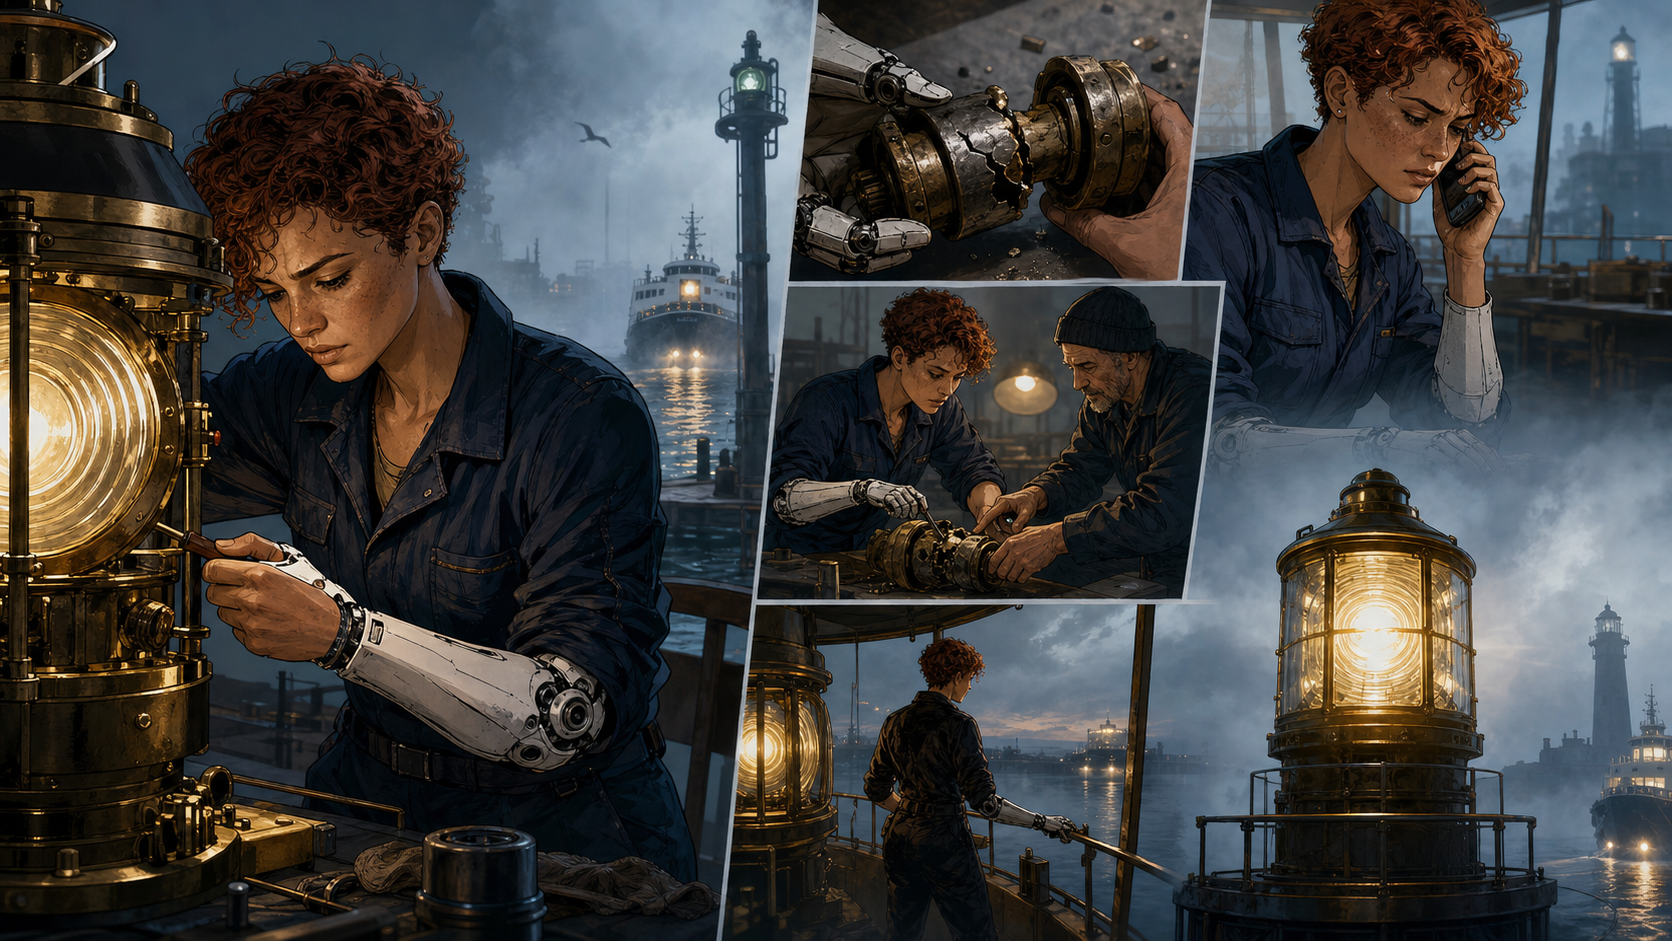
A polished portrait can make an original character feel alive, but it does not automatically become a comic. A comic needs decisions, cause and effect, readable geography, varied shots, purposeful dialogue, consistent props, and a character who changes under pressure. Even beautiful individual panels will feel like an unrelated slideshow if those systems are missing.
The most reliable first project is not a sprawling graphic novel. Aim for six to twelve pages and one emotional turn. That is enough space for a setup, complication, difficult choice, and visible resolution, yet short enough for a solo creator to finish and revise. Completing eight coherent pages teaches more than generating eighty disconnected illustrations.
AI image tools can help with visual exploration, reference drafts, and controlled panel revisions. They cannot decide what your story means, guarantee continuity, arrange a readable page, letter dialogue, or perform the final editorial judgment. In this guide, DeepFake’s text-to-image and image editing workflows are used only as optional visual-drafting aids. Writing, thumbnails, composition, page layout, lettering, continuity control, rights review, and final editing remain deliberate human work.
To make the workflow concrete, we will develop a short harbor story about Mara, a proud signal-engine mechanic. The example is specific enough to test every production decision, but the method works for fantasy adventurers, school rivals, science-fiction pilots, romantic leads, or any other original cast.
1. Choose a Finishable Comic Before Expanding the World
An OC often arrives with a large archive: childhood history, favorite food, magical taxonomy, family trees, costume variants, allies, enemies, and plans for several seasons. None of that is automatically a story. For a first comic, select only the material that changes what happens in the next six to twelve pages.
Define a tight production box:
- Length: six to twelve pages;
- Emotional scope: one meaningful change rather than a complete life transformation;
- Speaking cast: two or three characters;
- Primary setting: ideally one location with a nearby secondary space;
- Central problem: one visible task with a deadline;
- Visual challenge: one or two memorable props, not a crowd of unique machines and costumes.
The constraint is creative leverage. A harbor workshop, a signal room, and the walkway between them can support wide establishing views, close mechanical inserts, tense conversations, and a final exterior reveal without introducing five unrelated locations. A single damaged engine can express plot, theme, and character at once.
Write down what the comic is not trying to do. It does not need to explain the full setting, resolve every relationship, display every ability, or prove that the OC is the most powerful person in the world. Its job is to let a reader meet the character through one complete choice.
2. Build a Four-Part Premise Around Pressure
Biography tells us who a person has been. A premise tells us what they must do now. Use this four-part structure:
When [disruption] happens, [OC] must [visible goal] before [deadline], but [inner limitation] makes the task harder.
Each component has a separate function:
- Disruption breaks the ordinary routine.
- Visible goal gives the character an action a panel can show.
- Deadline creates forward motion and makes delay costly.
- Inner limitation turns an external repair, contest, escape, or conversation into a personal story.
Here is the working premise for Mara:
When the harbor’s signal engine fails, Mara must repair it before the midnight ferry reaches the reef, but getting the missing part from her estranged mentor would require admitting that her own design was flawed.
The engine failure is the disruption. Repairing the signal is a drawable goal. The arriving ferry is a clock the reader can see approaching through fog. Mara’s pride and fear of admitting error create the inner obstacle. The premise also suggests useful images: an empty workshop, a dead indicator, a cracked brass coupling, distant ferry lights, an unanswered phone, two mechanics working side by side, and a signal returning to life.
Test your premise with four questions:
- Can a stranger understand the immediate problem in one sentence?
- Can the goal be shown through action rather than explained in narration?
- Does waiting make the situation measurably worse?
- Must the OC make a revealing choice, not merely perform a technical task?
If the answer to the last question is no, intensify the inner limitation rather than adding a larger explosion. A small event that forces an honest choice usually creates a stronger short comic than a huge event that leaves the protagonist emotionally unchanged.
3. Define the Character Arc in Four Sentences
A complete short comic needs a beginning state and an ending state. The change can be modest: asking for help, speaking honestly, accepting uncertainty, sharing responsibility, or setting a boundary. Small changes are believable and visually provable within a few pages.
Complete these four sentences before scripting:
- At the start, the OC believes .
- The problem forces the OC to .
- At the turning point, the OC chooses .
- At the end, we can see the change because .
For Mara, the arc might read:
- At the start, Mara believes competent people correct their own mistakes without exposing them.
- The failed engine forces her to choose between protecting that image and protecting the ferry.
- At the turning point, she calls her estranged mentor and states exactly what failed.
- At the end, we can see the change because she engraves her mentor’s name beside her own on the repaired engine plate.
The fourth sentence matters because a comic should prove change visually. Mara does not need to announce, “I have learned to collaborate.” The shared nameplate is a physical result of her choice. It repeats an object introduced earlier—her solo prototype mark—but changes its meaning. This is both efficient storytelling and a useful continuity anchor.
Look for a comparable final proof in your story: an unlocked door, a returned badge, a repaired photograph, an empty chair finally occupied, a weapon set down, or a second signature added to a plan. The image should let the reader infer the emotional conclusion.
4. Keep the Speaking Cast Small and Contrasting
For a six-to-twelve-page first comic, use two or three speaking characters. More voices consume panel space, create additional reference work, and dilute the central relationship. Supporting characters should not repeat the same pressure in different costumes.
Mara’s compact cast could be:
- Mara, the mechanic: wants to protect the harbor but edits herself whenever a sentence might reveal uncertainty.
- The mentor: knows Mara’s habits and answers emotional avoidance with concrete diagnostic questions.
- The ferry captain: has no interest in workshop history and communicates urgency through clipped radio calls.
Give each person a different function and speaking behavior. Mara begins explanations, revises them, and leaves key facts late. The mentor uses precise questions: “Which coupling?” “How long has it been vibrating?” The captain speaks in time and distance: “Outer buoy. Six minutes.” Distinct conversational logic is more useful than giving everyone a different catchphrase.
For every recurring character, prepare a compact reference set:
- front, three-quarter, profile, and back views;
- neutral, worried, angry, focused, and relieved expressions as needed;
- height comparison with the other cast members;
- standard outfit and any story-specific damage or grime states;
- three to five identity anchors that should not change between panels.
Identity anchors should be concrete and visually durable. “Mysterious,” “brave,” and “anime-looking” are moods or categories, not anchors. A triangular nose, cropped copper curls, a white prosthetic left forearm, a distinctive collar, and heavy lower eyelids are anchors. Limit the list to features that remain visible across several angles; too many equally important details make correction harder.
5. Outline Eight Beats That Change the Situation
Before drawing panels, reduce the episode to eight beats. Each beat must either change the external situation or reveal something important about the character. Here is Mara’s full outline:
- Normal state: Mara works alone in the harbor shop, proudly checking an engine plate marked only with her name.
- Disruption: the signal engine stops, leaving the fogbound reef approach without its guiding light.
- First attempt: she diagnoses the fault and installs an improvised bypass rather than contacting her mentor.
- Complication: the bypass fails and cracks a rare brass coupling stamped with Mara’s prototype mark.
- Pressure rises: the midnight ferry’s lights appear through the fog while the captain reports the shrinking distance.
- Choice: after hiding the fracture for one last beat, Mara calls her mentor and admits which design assumption failed.
- Climax: the two mechanics install the replacement together as the captain counts down the final approach.
- Resolution: the signal reignites, the ferry passes safely, and Mara adds the mentor’s name to the engine plate.
Check the links between beats with the words because and therefore. Mara tries the bypass because she is unwilling to ask for help. The coupling cracks; therefore, the repair becomes impossible without the missing part. The ferry appears; therefore, postponing the admission is no longer harmless. Causal links make the plot feel like one tightening chain rather than eight adjacent events.
Remove any beat that repeats an earlier function. If Mara attempts three similar repairs before calling, the middle attempts may not deepen the choice. If a flashback explains the mentor conflict but the broken prototype and evasive dialogue already communicate it, the flashback may interrupt momentum. Save unused lore for another episode.
Also conduct a feasibility pass. One workshop story with three characters, a radio, a mechanical prop, and controlled weather is demanding but manageable. Adding a harbor crowd, moving vehicles, an underwater sequence, a fire, four costume changes, and a flashback creates continuity work far beyond the emotional value it may add.
6. Turn the Eight Beats Into an Eight-Page Rhythm
An outline says what happens; page design controls when the reader learns it. For an eight-page version, give each beat a page:
- Page 1 — Normal state: establish the quiet workshop, Mara’s solitary routine, and the solo nameplate.
- Page 2 — Disruption: move into the signal room, reveal the dead mechanism, and establish the reef stakes.
- Page 3 — First attempt: show diagnosis and an improvised bypass through a compressed repair sequence.
- Page 4 — Complication: use the page turn to reveal ferry lights, then show the cracked coupling in Mara’s hand.
- Page 5 — Pressure rises: alternate the approaching lights, captain’s countdown, phone, and Mara’s hesitation.
- Page 6 — Choice: let the call begin with conflict, then bring the mentor into the room with the replacement.
- Page 7 — Climax: build a faster installation sequence and give the returning signal one large release panel.
- Page 8 — Resolution: slow the rhythm, confirm the ferry is safe, and end on the changed nameplate.
This one-beat-per-page layout is a starting point, not a law. A twelve-page comic could give the choice and climax more room. A six-page version might combine the disruption with diagnosis and compress the mentor’s arrival. Preserve the emotional order even when the page count changes.
Vary panel density with purpose. A page of four narrow repair panels can feel fast. One wide panel of ferry lights emerging from fog can suspend time. A silent close-up can make a decision feel heavier than three speech balloons. Avoid assigning the same five-panel grid to every page merely because the template is convenient.
Page turns are especially valuable. If the reader sees the ferry before turning to Page 4, the reveal loses force. End Page 3 on the temporary hum of a seemingly successful repair. Let the next page overturn that relief with the danger outside and the broken component inside.
7. Write Every Panel as a Production Instruction
A production-friendly panel script contains five items:
- Panel purpose — reveal, reaction, transition, evidence, escalation, decision, or release;
- Location and time — including meaningful weather or light state;
- Camera and composition — shot size, angle, subject placement, and important negative space;
- Visible action — what a reader can actually see happening;
- Dialogue or sound — including silence when silence is intentional.
These fields force abstract emotion into visible evidence. “Mara feels crushed by her history” is not a renderable instruction. “Mara turns the cracked prototype mark away from the window and closes her hand around it” gives an artist a pose, prop, direction, and implication.
Here is a fresh Page 4 example:
Page 4, Panel 1 — Threat reveal. Midnight exterior, viewed past Mara’s shoulder from inside the signal room. Most of the harbor is swallowed by fog; a paired ferry light has just become visible beyond the glass. Mara occupies the lower-right edge, small against the empty gray space. No dialogue. SFX: a distant horn.
Page 4, Panel 2 — Evidence. Tight insert on Mara’s grease-marked palm. The brass coupling has split directly through the engraved prototype plate. Her white prosthetic thumb holds one side; the other half sags loose. CAPTAIN (radio): “Eight minutes.” MARA: “Understood.”
The first panel changes the scale from private workshop trouble to public danger. The second connects the danger to Mara’s personal design failure. Her spoken “Understood” is controlled, while the image shows what she has not admitted.
Write useful spatial information, but do not over-direct decorative details that do not affect the panel. State whether the phone is in her right hand if hand continuity matters. State the window’s position if the next shot depends on screen direction. You do not need to inventory every wrench on a background shelf.
8. Thumbnail the Whole Comic Before Making Finished Art
Thumbnails can be boxes, arrows, circles, and stick figures. Their purpose is to solve reading order and rhythm while changes are cheap. A detailed face cannot rescue a page whose balloons lead backward or whose vital action is hidden in a corner.
Check all six of these questions at thumbnail scale:
- Is the reading order obvious? The eye should move through panels and balloons without guessing.
- Does each panel have a clear focal point? A reader should know what matters before noticing decoration.
- Are consecutive shots meaningfully different? Change size, angle, subject, or visual purpose rather than repeating portraits.
- Is the speaker visible or clearly established? Off-panel voices need deliberate context.
- Is there room for balloons and sound effects? Reserve it before rendering faces and props.
- Does each page have one dominant moment? Decide which panel deserves the most size or contrast.
View thumbnails at the approximate final mobile size. A composition that works only when enlarged on a desktop monitor may collapse on a phone. Place temporary balloon shapes with roughly realistic line counts. If the text covers a face, blocks the cracked coupling, or forces a tail across another balloon, fix the layout now.
Use shot types as storytelling tools. Establishing shots orient the reader after a location change. Medium shots support relationship and body language. Close-ups emphasize decisions. Inserts make small evidence—an engine mark, countdown display, or phone screen—legible. A page made entirely of close portraits may contain attractive images but no physical story.
9. Build a Continuity Pack Before Drafting Panels
Do not begin with eight unrelated scene prompts. Approve a compact continuity pack first. It should include:
- character turnarounds and expression references;
- standard outfits plus planned damage, dirt, or wetness states;
- a workshop map and signal-room map with doors, windows, engine, bench, and radio positions;
- the signal engine, intact coupling, cracked coupling, replacement part, phone, tools, and nameplate;
- an exterior harbor view that fixes the signal tower, reef direction, and ferry approach;
- a palette, line-weight note, shading rule, and lettering plan.
For Mara, keep these five fixed identity anchors unchanged:
- triangular nose;
- heavy lower eyelids;
- cropped copper curls;
- dark-blue coverall;
- white prosthetic left forearm.
Repeat the anchor wording exactly in visual briefs. Do not alternate between “auburn waves,” “short orange hair,” and “copper curls” if those phrases lead to different shapes. Do not let the prosthetic switch arms because a composition was mirrored. Record deviations in a continuity table with columns for page, panel, face, hair, outfit, left/right details, prop state, weather, time, and correction status.
An optional image-to-image pass can help explore a controlled visual change—such as correcting the coverall color or revising a rough composition while preserving the approved character reference. It does not guarantee identical identity, correct anatomy, readable props, or page-to-page continuity. Review each output against the pack and reject drift before it reaches later panels.
Use only the references relevant to the current panel. A Page 4 insert may need Mara’s left-forearm reference and the cracked-coupling sheet, not every location and character document. Too many competing references can make intent less clear. Keep a versioned folder with approved assets separated from experiments so an old mistake is not accidentally reused.
10. Draft and Revise One Panel at a Time
Work in story order after the script and thumbnails are stable. Creating isolated “hero shots” first is tempting, but those images may not fit the page’s camera, balloon space, or continuity state.
For each panel:
- copy the purpose, location, camera, action, and text from the locked script;
- attach or consult only the relevant approved references;
- produce a rough composition with space reserved for lettering;
- compare identity, geography, props, damage, lighting, and screen direction with adjacent panels;
- revise one major variable at a time;
- place the panel into the page layout before polishing small details.
Revise in an order that prevents wasted work: composition first; then character identity and proportions; then hands, tools, and mechanical relationships; then lighting and surface detail; then cleanup. If the panel needs a different angle, do not spend time perfecting a hand that will disappear.
Track prop state explicitly. The coupling begins intact, becomes cracked after the failed bypass, remains in Mara’s possession during the call, and is replaced during the climax. The nameplate begins with one engraved name and ends with two. Fog remains dense until the signal returns. These are story facts, not optional decorations.
11. Treat Dialogue and Lettering as Visual Composition
Dialogue should add what the image cannot. If the panel clearly shows a broken coupling and an approaching ferry, do not write, “The coupling is broken, and the ferry is approaching through the fog.” That sentence asks words to repeat two visible facts.
A stronger exchange might be:
CAPTAIN (radio): “Outer marker. Four minutes.”
MARA: “I know.”
The image communicates the broken part. The captain supplies a time pressure the still image cannot measure precisely. Mara’s short reply reveals defensiveness. Image and text cooperate instead of competing.
Read every line aloud. Remove greetings, repeated names, throat-clearing, and explanations the reader already understands. Keep speech rhythms distinct: Mara self-corrects, the mentor diagnoses, and the captain counts. A character’s voice is a pattern of decisions about what to say, not merely punctuation or slang.
Letter at the final output size, not only on a large canvas. Use a font you are licensed to publish, maintain consistent size and leading, and keep balloon tails unambiguous. Balloon order should follow the natural reading direction. Avoid placing essential text across a gutter or bleed. When a line cannot fit without becoming tiny, shorten it or divide the information across panels; do not squeeze a paragraph into a narrow bubble.
Place temporary lettering during thumbnails, revise it during scripting, and finalize it after the art composition is stable. Lettering is not a caption layer pasted on at the end. Its shapes affect balance, eye movement, pacing, and how much silence a panel appears to contain.
12. Revise in Five Focused Passes
Trying to evaluate plot, anatomy, geography, dialogue, and export settings simultaneously makes feedback vague. Complete five distinct passes.
Pass 1: Story and emotional logic
Does every page advance the external problem or the relationship? Is Mara’s failed shortcut caused by her flaw? Does the deadline intensify rather than merely exist in dialogue? Is the call an active choice with a cost? Does the shared nameplate prove change without a speech explaining the theme?
Pass 2: Visual continuity
Check apparent age, facial structure, body proportions, hair silhouette, clothing, prosthetic side, grime, injuries, prop state, weather, and time of night. Compare nonadjacent pages as well as neighboring panels; drift often accumulates gradually. Verify all five Mara anchors against the approved sheet.
Pass 3: Geography and action clarity
Can a reader understand where the engine, window, radio, bench, door, and characters are? Does Mara cross the room in a legible direction? Are hand positions compatible with the task? Does the repair sequence show enough cause and effect to be believable without becoming a manual?
Pass 4: Dialogue and lettering
Remove lines that restate pictures. Confirm that voices sound different, balloon order is natural, tails point clearly, and captions do not duplicate dialogue. Read the entire comic aloud, then view it silently to see whether the key actions still make sense.
Pass 5: Craft, rights, and export
Correct anatomy, tangencies, inconsistent borders, missing shadows, spelling, bleed, color profile, page dimensions, resolution, and file names. Test the actual delivery format on a phone or printed proof. Check licenses and permissions for references, models, stock elements, textures, and fonts. Add disclosure where a publisher, platform, contest, or client requires it.
Keep a change log during revision. “Page 4, Panel 2: prosthetic moved to right arm” is actionable. “Make it more consistent” is not. Freeze corrected pages only after verifying that the correction did not introduce a new lighting, prop, or lettering error.
13. Respect Ownership, Style, and Disclosure
An original character should be genuinely original, not a lightly modified version of a recognizable franchise character, public figure, private person, or living artist’s signature style. Use visual references and assets you created, licensed, or have permission to use. If a real person’s face, private photograph, or identifiable likeness is involved, obtain informed consent and appropriate usage rights before processing or publishing it.
Commercial permission is not one universal checkbox. Review the terms for every tool and source involved. Check whether stock assets allow modification, whether a font license covers ebooks or print runs, whether a model’s output has relevant restrictions, and whether a publication accepts AI-assisted work. Preserve licenses, consent records, source notes, prompt logs, and edit histories with the project files.
Disclose generative assistance plainly when required by a client, platform, publisher, festival, or contest. Even when formal disclosure is optional, do not misrepresent authorship, claim that a generated sketch was hand-drawn, or imply endorsement by a person or rights holder. Clear process notes protect readers, collaborators, and your own credibility.
Never assume that an image service has cleared a prompt, character, logo, font, or reference for publication. The creator remains responsible for selection, editing, context, and release. When ownership is uncertain, replace the asset or obtain qualified legal advice for the relevant jurisdiction.
A Practical Production Checklist
Before calling the comic complete, confirm the following:
- The story is six to twelve pages with one clear emotional turn.
- The four-part premise contains a disruption, visible goal, deadline, and inner limitation.
- The beginning belief, pressure, turning choice, and visual proof of change are all present.
- Only two or three speaking characters carry the episode, and their voices serve different functions.
- Every recurring character has three to five stable identity anchors.
- The eight beats form a causal chain and map to an intentional page rhythm.
- Every scripted panel includes purpose, place and time, camera, visible action, and dialogue or sound.
- All six thumbnail checks pass at the final reading size.
- Character, location, prop, palette, and lettering references are approved before finished panels.
- Mara’s five identity anchors and all left/right details stay fixed.
- Dialogue adds pressure or personality instead of narrating the artwork.
- The comic has passed story, continuity, geography, dialogue, and craft/export reviews.
- Fonts, references, models, and other assets have appropriate permissions.
- Any required AI-assistance disclosure is accurate and visible.
FAQ
How long should a first OC comic be?
Six to twelve pages is a practical target. It gives you room for a normal state, disruption, failed attempt, complication, difficult choice, climax, and resolution without creating an overwhelming continuity burden. One emotional turn is enough for a satisfying first episode.
Can a single character portrait automatically become a complete comic?
No. A portrait can establish appearance or inspire a scene, but it does not contain a premise, character arc, page rhythm, staging, readable geography, panel-to-panel continuity, dialogue, lettering, or editorial decisions. Those elements must be designed and reviewed intentionally.
Should I write the full script before making panels?
Lock at least the premise, ending, eight beats, page assignments, dialogue, and thumbnails first. Small wording changes can continue later, but generating finished panels while the story structure is still moving turns every rewrite into expensive visual rework.
How do I keep an OC consistent across different angles?
Approve turnarounds and expressions, choose three to five immutable identity anchors, repeat their wording, track left/right details, limit variables per panel, and compare every draft with the continuity pack. Correct drift immediately rather than letting a wrong feature propagate into later references.
What can DeepFake contribute to this workflow?
DeepFake can support optional text-to-image visual drafts and image-to-image revisions. Those outputs still require human selection and correction. DeepFake does not automatically write a coherent comic, guarantee identity continuity, lay out pages, place lettering, clear rights, or perform the final edit.
How many characters and locations should I use?
For a first short comic, two or three speaking characters and one primary location are efficient. Add a character or setting only when it changes the story in a way the existing elements cannot. Every addition creates new design, continuity, staging, and lettering work.
When should I add dialogue balloons?
Reserve balloon space during thumbnails, use temporary lettering throughout layout, and finalize it after the panel composition is stable. Do not wait until every image is polished, because late balloons often cover faces, hands, evidence, or important negative space.
What files should be saved with the final comic?
Keep the locked script, thumbnail pages, approved reference sheets, continuity table, editable page files, lettering files, export presets, license records, consent records where relevant, disclosure notes, and final outputs. A clean archive makes corrections, translations, sequels, and reprints much safer.
Turn One Portrait Into One Finished Decision
The leap from OC portrait to comic is not a single generation. It is a sequence of authored decisions: put the character under pressure, define what changes, reduce the cast, connect eight causal beats, control the page turn, script visible actions, thumbnail the reading experience, freeze a continuity pack, letter with restraint, and revise in focused passes.
Mara’s harbor episode works because its external and internal stories are the same mechanism. The signal engine fails, her private shortcut breaks the coupling, the ferry approaches, and safety requires the admission she has avoided. The final shared nameplate turns that admission into visible proof. Nothing about the emotional result depends on a narrator declaring what she learned.
Start small: six to twelve pages, two or three voices, one major setting, one deadline, and one honest change. Use visual-generation tools for drafts where they genuinely help, then apply human writing, layout, lettering, continuity control, rights review, and editing until every page reads as part of the same complete story.