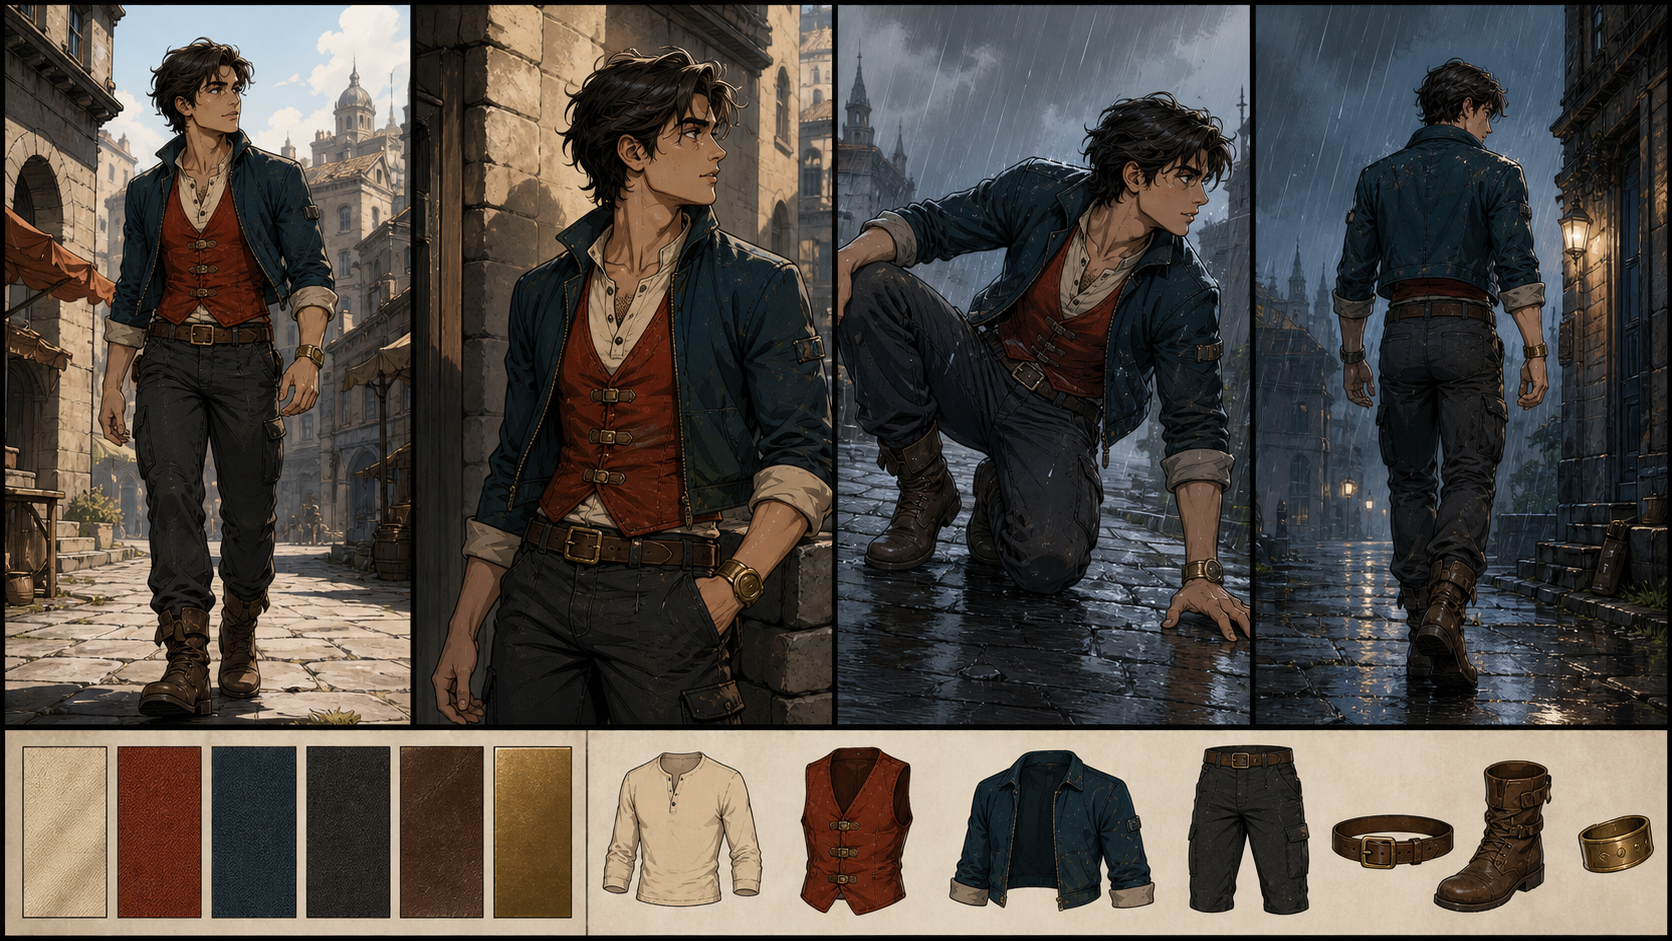
An AI comic character can keep the same face while their outfit quietly changes from panel to panel. A jacket gains a pocket, a vest changes length, rolled cuffs disappear, a belt moves, or dark teal becomes black under different lighting. Each change may seem minor, but together they make sequential art feel like a collection of unrelated illustrations.
Consistent clothing requires more than repeating “same outfit.” You need an ordered garment specification, a visual reference sheet, rules for what cannot change, and a panel-by-panel ledger for legitimate state changes such as rain, dirt, rolled sleeves, removed layers, or battle damage.
This guide turns those elements into a practical wardrobe continuity workflow.
Start With the Result You Actually Need
Begin with one sentence naming the audience, subject, action, mood, and delivery format. Then list the elements that must remain fixed and the changes the story actually requires.
For a mobile comic, clothing needs a simple readable silhouette and a few strong visual anchors. Print can support finer seams and materials but also exposes continuity mistakes. If a panel will become a motion keyframe, the outfit needs enough construction logic to deform naturally as the character moves.
Before generation, define pass-or-revise checks for the whole page:
- Reading order is immediate.
- Characters remain recognizable.
- Dialogue fits without crowding the art.
- Camera choices serve each story beat.
- Every panel changes the story.
- Garment layers, closures, hems, accessories, and palette follow the wardrobe rules.
These checks keep surface polish from hiding a structural failure. They also turn “make the outfit more consistent” into visible corrections a reviewer can point to.
Why AI Comic Outfits Drift
Most clothing drift begins before generation because the brief never states what must remain fixed, what may change, or how consistency will be evaluated.
“Blue jacket and red vest” leaves many open questions. Is the jacket cropped or hip length? Are the cuffs rolled? Is it worn open? How many pockets and closures are visible? Does the vest sit over or under a belt? Which fabric reflects light? What happens from the rear view?
The model fills those gaps differently as pose, camera, lighting, and background change. A close-up may omit the belt. A rear view may invent a hood. Rain may turn teal fabric nearly black. An action pose may duplicate a strap. To prevent that, describe clothing as construction, not just a list of colors.
Build a Wardrobe Bible From the Skin Outward
Write every outfit as ordered layers from the body outward. For example:
- Cream long-sleeve undershirt with a short button placket
- Rust-red fitted vest with four brass closures, ending above the belt
- Dark teal cropped jacket, worn open, with rolled cream-lined cuffs
- Charcoal utility trousers with one consistent side pocket
- Brown leather belt with a rectangular brass buckle
- Mid-calf brown lace-up boots
- One brass wrist accessory on the left arm
The exact design can differ, but the specification should answer the same construction questions:
- Which layer sits above or below another?
- Where does each hem end?
- Which closures are open, closed, or visible?
- Which cuffs, collars, straps, and pockets define the silhouette?
- How many accessories exist, and where are they worn?
- Which materials are matte, glossy, soft, rigid, or weathered?
Ordered layers prevent contradictions. They also make it easier to track a jacket removal or rolled sleeve because you know what should become visible underneath.
Create a Visual Outfit Reference Sheet
Do not rely on prose alone. Build a reference sheet that includes:
- Front, three-quarter, side, and back views
- Full-body proportions
- Close-ups of closures, collar, cuffs, belt, and signature accessories
- Flat color or fabric swatches
- A simplified silhouette
- Notes on what is hidden beneath each layer
Use neutral lighting for the master sheet so color and material are easy to compare. The back view is especially important; otherwise later panels may invent seams, hoods, pockets, or straps.
During early design exploration, a text-to-image workflow can help produce outfit directions. Choose one approved design and make it the master. Attractive alternatives belong in an experiment folder, not in the continuity chain.
Separate Invariants From Story State
An outfit does not need to remain perfectly clean or arranged in the same way forever. It needs consistent construction and logically tracked changes.
Outfit invariants
These normally remain fixed:
- Garment identity, cut, and layer order
- Base colors and materials
- Number and position of closures
- Permanent pockets, trims, and seams
- Footwear and signature accessories
- Fit relative to the character’s proportions
Scene state
These may change when the story justifies them:
- Jacket removed or tied around the waist
- Sleeves rolled or unrolled
- Buttons or zippers opened
- Fabric becoming wet, dirty, torn, or scorched
- A strap shifting during movement
- A lost or transferred accessory
The distinction matters. Rain may darken a jacket without changing its base teal color. A torn sleeve should stay torn in later panels until repaired. A removed coat should not reappear merely because the camera changes.
Track Wardrobe State by Panel Number
Create a lightweight continuity ledger beside the storyboard. A simple table is enough:
| Panel | Jacket | Sleeves | Vest and shirt | Accessories | Weather or damage |
|---|---|---|---|---|---|
| 1 | Open, dry | Rolled | Clean, fully visible | Wrist piece left arm | None |
| 2 | Open | Rolled | Unchanged | Unchanged | First rain spots |
| 3 | Open, wet | Rolled | Darkened by rain only | Unchanged | Mud on right knee |
| 4 | Open, wet | Rolled | Unchanged construction | Unchanged | Mud persists |
Update the ledger whenever the script changes. The goal is not paperwork for its own sake; it is to prevent a creator or model from inferring state from an old, ambiguous output.
Use panel numbers, not phrases such as “later.” Precise state makes review fast and gives collaborators the same source of truth.
The Working Process
1. Lock delivery format and silhouette
Decide aspect ratio, crop, resolution, and dialogue space before rendering. Then test the outfit as a flat silhouette. The jacket length, shoulder shape, trouser volume, and footwear should remain recognizable even when details are small.
Fix framing and reading order before adding complex fabric texture. Phone screens reward strong shape; print will reveal construction mistakes later.
2. Turn taste into observable clothing notes
Replace “stylish fantasy outfit” with visible facts: fitted rust vest, four brass closures, cropped dark teal jacket, rolled cream-lined cuffs, charcoal utility trousers, brown lace-up boots.
Describe what a reviewer can point to—the cut of a sleeve, direction of a seam, distance between a hem and belt, or number of accessories. Broad praise words are not useful continuity notes.
3. Reuse the same master reference and wording
Keep the approved face, hair, proportions, palette, and outfit anchors together. Use the same reference sheet and stable wardrobe language across panels.
When a result drifts, return to the last approved master rather than using a drifted neighboring panel as the new definition. Repeatedly copying copies causes errors to accumulate.
4. Generate small controlled batches
Keep the character, outfit specification, scene state, and core composition fixed. Vary one decision and create three or four candidates.
Eliminate structural failures first:
- Missing or extra garment layers
- Changed closures or hem lengths
- Doubled belts, straps, or jewelry
- Broken anatomy beneath fabric
- Inconsistent pocket location
- Perspective that makes the outfit impossible
- Palette drift unrelated to lighting
Judge decorative finish only after the construction passes.
5. Review panels as a sequence
At 100 percent, inspect merged fingers, broken seams, doubled accessories, fabric edges, text, and masking. At delivery size, check the outfit silhouette, identity, focal hierarchy, and action.
Compare neighboring panels directly. A jacket may look plausible in isolation while contradicting the previous camera angle or losing a story-state change.
6. Repair only the faulty region
Once most of the panel works, reduce the scope of editing. Correct the cuff, pocket, belt, accessory, or color region while preserving character identity, pose, camera, environment, and successful garment details.
A bounded image-to-image revision may help with local correction, provided you compare the result with both the master outfit sheet and the panel ledger. Broad regeneration reopens every solved problem.
Prevent Color Drift Across Lighting
Color consistency does not mean every pixel must be identical. Fabric responds to daylight, warm interiors, rain, rim light, and shadow. The task is to preserve the underlying material and its relationship to the palette.
Use flat swatches as anchors, then record expected lighting behavior. A dark teal jacket may become cooler in rain and warmer under a lamp, but it should not silently turn navy in one panel and green in the next. Keep adjacent colors distinct enough that layers do not merge at publishing size.
Run a dedicated color review after structural continuity passes. Strong lighting and surface polish can make palette drift easy to overlook.
A Realistic Example: The Whispering Package
Suppose a courier discovers that a package is whispering. The scene progresses through arrival, odd sound, denial, closer inspection, revelation, and decision.
Before drawing panels, establish the courier’s coat, bag, hair, height, and outfit layers. The ledger records that the coat remains open, the sleeves stay rolled, the bag stays on the same shoulder, and light rain begins in panel four.
As the courier kneels for the reveal, the vest should not gain closures and the coat should not become longer simply because the pose changes. Rain can darken the fabric, but the palette and construction remain the same. If mud appears on one knee during the landing, it persists into the reaction panel.
Review the sequence for new story information and remove any redundant panel. A small, controlled scene like this teaches more about wardrobe state than a spectacular illustration with no continuity plan.
Common Mistakes and Better Fixes
Adding clothing detail before composition works
Fix silhouette, framing, and reading order first. Extra buckles and embroidery cannot rescue a weak pose and give the model more details to drift.
Listing colors without construction
“Red vest and blue jacket” is incomplete. Define layer order, cut, hem, closures, pockets, cuffs, and material.
Relying on memory
Keep a visual reference sheet and written wardrobe ledger. Memory becomes unreliable once a project contains many angles, lighting setups, and versions.
Treating legitimate state changes as redesigns
Track wetness, dirt, damage, and removed layers separately from the base outfit. The construction stays fixed even as story state evolves.
Making every panel equally intense
Use contrast. Quiet setup panels allow an important reveal or action beat to feel stronger and reduce pressure to vary clothing merely for visual novelty.
Accepting an attractive variation
Ask whether the change serves the story or only adds novelty. A beautiful new coat is still a continuity error if the character never changed clothes.
Organize Approved Assets
Archive the master outfit sheet, accepted panels, prompts, state ledger, and color swatches separately from experiments. Use meaningful filenames and keep a short creation log describing what changed and why a candidate passed.
When drift appears, return to a known reference instead of searching through anonymous downloads. A reproducible set of decisions is more valuable than one unexplained lucky generation.
Quality, Safety, and Rights
Treat consent and provenance as production requirements. Do not upload private portraits or another artist’s work merely because a tool accepts them. Verify source permissions, disclose synthetic or conceptual imagery where confusion is likely, and check current copyright, publicity, trademark, and fan-art rules before monetization.
Keep a short rights record for client work. It makes later approvals and corrections easier.
FAQ
Should I generate an entire comic at once?
That may help with rough exploration. For stronger control, approve the script, character reference, and wardrobe bible first, then review each panel and repair weak regions locally.
Do I need professional fashion or drawing skills?
No. You do need a clear construction brief and a willingness to inspect details. Basic knowledge of silhouette, layers, materials, continuity, and file formats improves results.
How many outfit versions should I generate?
During design, start with a small controlled batch, often three or four. Once a design is approved, stop exploring alternatives and use bounded revisions to protect continuity.
Can I use the result commercially?
Possibly, depending on current platform terms and the rights attached to source material, characters, brands, and references. Client work should receive a documented rights review.
Conclusion
Consistent comic clothing is a system, not a repeated adjective. Define the outfit from the skin outward, create a multi-angle reference sheet, separate construction from scene state, track changes by panel number, and check colors under changing light. Generate broadly only while designing; once the outfit works, protect it and repair the smallest failing region. That discipline turns a recurring costume into a reliable storytelling asset.