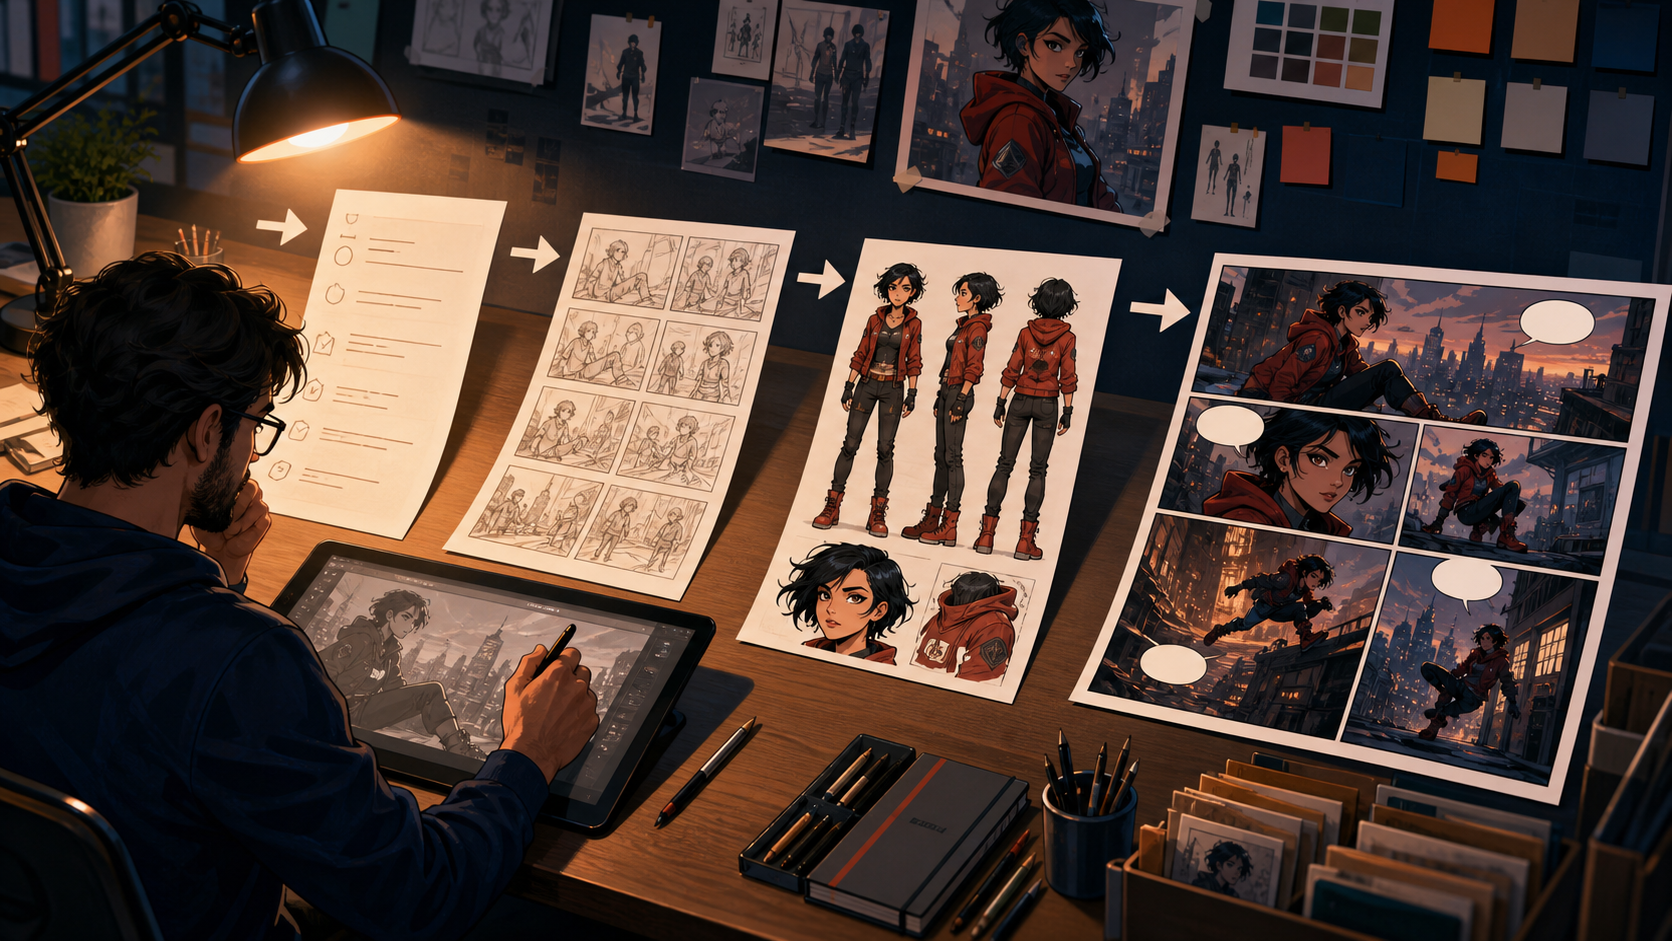
A polished AI comic does not come from one enormous prompt. It comes from separating story decisions, visual decisions, and technical cleanup, then solving them in the right order.
The most reliable workflow begins with a defined deliverable and an acceptance test. It moves from story to script, from script to storyboard, and from storyboard to approved panels. Broad generation belongs near the beginning; once a direction works, revisions should become smaller and more selective.
This tutorial covers that complete sequence, including character continuity, panel review, dialogue, version control, and optional motion handoff.
Start With the Result You Actually Need
Write one sentence that names the audience, subject, action, mood, and delivery format. For example:
A six-panel vertical comic for mobile readers in which a cautious rooftop courier discovers that a routine package contains a living signal, told with restrained suspense and minimal dialogue.
Next, list the elements that cannot change: the courier’s identity and outfit, the package design, the reading direction, the aspect ratio, and the visual tone. This turns an open-ended generation task into a controlled production unit.
Before creating images, define a simple acceptance test:
- The story or source material is suitable for the chosen length.
- The prompt describes a concrete, visible result.
- The chosen output supports the next production stage.
- Weak regions are refined deliberately rather than randomly.
- Sources, downloads, and approved versions are organized.
Review the list in order and stop at the first failure. There is little value in perfecting fabric texture when the character identity, anatomy, pacing, or reading order is still wrong.
Step 1: Write the Delivery Specification
Record the platform, orientation, resolution, crop, page count, and whether text must share each frame. These facts determine composition more reliably than a style adjective.
For a mobile comic, favor clear silhouettes, larger faces, and fewer tiny details. For print, plan sufficient resolution and inspect fine linework. If a panel may later become a video shot, leave safe space around the subject for reframing and motion.
Create a project folder or saved workspace before serious iteration. Keep the story brief, character notes, accepted prompts, references, outputs, and export settings together. A multi-stage comic is difficult to reproduce when its decisions are scattered across chat histories and anonymous downloads.
Step 2: Prepare the Story and Source Material
You can begin with a written premise, an outline, a character image, or a combination of sources. Whatever the input, reduce it to observable information.
For written material, identify:
- The protagonist’s immediate goal
- The obstacle or conflict
- The emotional change
- The location and time
- The final decision or reveal
For a visual reference, use clear lighting, sufficient resolution, and unobstructed key features. Note the existing pose and camera angle. Asking a reference image to support impossible geometry often causes anatomy and clothing to drift.
If you are developing the visual direction from text, a text-to-image workflow can help explore candidate designs. Generate broadly only at this stage, and do not allow every attractive output to redefine the project.
Step 3: Lock Format and Creative Direction
Choose the format, art style, aspect ratio, page count, and panel-text approach before adding decorative detail. Record the choice so later revisions follow the same rule.
Replace vague taste words with buildable facts. Instead of “make it premium,” specify a clean silhouette, restrained palette, visible material, lens distance, camera height, and motivated light source. Concrete nouns and relationships give the model fewer ways to misread the brief.
Decide how dialogue will be handled:
- Text-free generation: create clean art with reserved balloon space, then letter separately.
- Panel text during generation: useful for rough planning, but it demands an additional accuracy pass.
- Hybrid workflow: use temporary dialogue for layout, then replace it during final lettering.
For most projects, separating art from final lettering gives more control over copy, typography, and localization.
Step 4: Generate and Review the Script First
Script changes are inexpensive; finished-panel changes are not. Review the script before generating the comic.
Check every scene for:
- A clear setup, change, and outcome
- One primary visual action per beat
- Dialogue that reveals intention or emotion
- No panel that merely repeats the previous one
- Enough space for reactions and transitions
- A page ending that creates resolution or forward pull
Read dialogue aloud. Shorten any line that competes with the image or would require an oversized balloon. If the visual action already communicates the information, let the art carry it.
This script becomes the source of truth. Do not solve weak pacing by asking the image model for more decoration.
Step 5: Build a Character Continuity Card
Once a design is approved, record the traits that must remain stable:
- Face shape and distinctive features
- Body proportions and age impression
- Hairstyle, hairline, and color
- Costume layers, materials, and palette
- Shoes, accessories, and recurring props
- Features allowed to change, such as pose or expression
Include front, three-quarter, and full-body references when possible. Feed later stages from this original card, not from a chain of progressively altered outputs.
Name the master reference clearly and archive it separately from experiments. If a later panel changes identity, reject the drift rather than absorbing it into the next prompt.
Step 6: Turn the Script Into a Storyboard
Convert each story beat into a rough panel before requesting polished art. Assign one job to every panel: establish location, introduce a clue, show an action, reveal emotion, or change the objective.
At storyboard size, check:
- Reading order
- Shot-size variation
- Character and prop placement
- Direction of movement
- Balloon space
- Page rhythm and visual emphasis
A storyboard does not need beautiful rendering. It needs to prove that the sequence works. If a panel is confusing in thumbnail form, more detail will probably make the confusion harder to fix.
Step 7: Generate a Small Set of Candidates
For each important panel, keep the character reference, story beat, and core composition fixed. Change one variable at a time and create a small batch, often three or four candidates.
Compare structure before polish:
- Silhouette and character identity
- Anatomy and garment fit
- Perspective and environmental continuity
- Reading order and visual hierarchy
- Space for dialogue
- Relationship to the previous and next panels
Surface detail cannot rescue a broken foundation. Choose the candidate that best serves the sequence, not necessarily the image that looks most impressive in isolation.
Step 8: Review at Full Size and Publishing Size
Use two review modes. At full resolution, inspect anatomy, hands, masks, textures, duplicated details, lettering, seams, and background artifacts. At actual publishing size, ask whether the subject, action, emotion, and reading order remain immediate.
Record why a candidate passed. A simple note such as “face matches master; silhouette reads on mobile; balloon area is clear; left hand needs repair” makes the next action obvious.
Do not approve the first plausible result automatically. Plan a cleanup pass for small artifacts and presentation.
Step 9: Regenerate or Edit Only the Weak Region
Whole-panel regeneration is appropriate during exploration. Once composition and continuity work, it reopens every solved decision.
If one sleeve, face, hand, balloon, or background patch is wrong, preserve the successful areas and correct only that region. A controlled image-to-image revision can support this stage, but the repaired panel must still be compared with the original character card and its neighboring panels.
Keep the source pose and camera in mind. A local edit should not silently redesign the body, lighting, or environment.
Step 10: Letter, Export, and Preserve the Comic
Add final dialogue only after the art sequence is stable. Use consistent balloon shapes, tail direction, margins, type size, and reading order. Check spelling at full resolution and confirm that text remains readable at the final display size.
Export a clean master page and, when useful, separate panel files. Save the source, accepted prompt, aspect ratio, selected output, and critical settings as one versioned bundle.
The finished comic should remain the source of truth. If you continue into a selective image-to-video workflow, animate only approved panels and keep motion versions downstream from the locked comic assets. Do not let a moving derivative redefine the original character or page.
A Realistic Example: A Three-Image Character Reveal
Suppose the goal is a short reveal sequence for a new original character.
- Create or upload a clear base reference with stable lighting.
- Write a three-beat script: hidden silhouette, partial reveal, full decision pose.
- Choose a consistent aspect ratio and restrained palette.
- Generate rough thumbnails and verify that each beat adds information.
- Produce a small candidate batch for the first panel.
- Save the most stable result and use the master character card for the next two panels.
- Review the sequence at thumbnail size, then repair any weak face, sleeve, or background region locally.
This deliberately modest project is useful because it is small enough to finish while still testing identity, pacing, camera progression, and version organization. A controlled exercise teaches more than a spectacular generation with no continuity plan.
Common Mistakes and Better Fixes
Starting from a weak source
Use references with sufficient resolution, clear lighting, and unobstructed features. If the foundation is ambiguous, later prompts will spend effort guessing rather than preserving.
Skipping the script review
Correct pacing and dialogue while changes are cheap. A finished page is the wrong place to discover that two panels repeat the same beat or a speech balloon cannot fit.
Letting the prompt contradict the image
Respect the existing pose, camera, and visible surfaces. Change only what the source geometry can plausibly support.
Generating too many uncontrolled versions
More candidates do not help when every variable changes. Keep the brief fixed, vary one decision, and stop when the structural requirement is met.
Treating the first result as final
Plan separate passes for story, identity, composition, artifacts, lettering, and export. Attractive detail should not hide a failure earlier in the checklist.
Rebuilding from memory between stages
Keep approved references, prompts, settings, and files together. A versioned bundle makes successful decisions reusable and future model comparisons fair.
Quality, Safety, and Rights
Use source photos, characters, logos, and reference art only when you own them or have permission. Obtain consent before editing a recognizable person, especially for public or commercial work. Clearly label conceptual mockups if viewers might mistake them for documentary images or official material.
Before commercial release, review the current tool terms and the copyright, publicity, trademark, and fan-art rules that apply. Keep a provenance note and human approvals for client work.
FAQ
Do I need a saved workspace before experimenting?
Not necessarily for a quick test. A saved workspace becomes valuable once you have a real source asset, a defined format, and multiple production stages because it helps preserve references, settings, history, and accepted versions.
Do I need professional drawing or editing skills?
No, but you need a clear brief and a willingness to inspect details. Basic knowledge of composition, continuity, lettering, and file formats improves results more than adding more style words.
How many versions should I generate?
Start with a small controlled batch, often three or four. If none solves the structural problem, revise the source or prompt before generating more.
Can I use an AI-generated comic commercially?
Possibly, depending on the current platform terms and the rights attached to your source material, characters, brands, and references. Client work should receive a documented rights review before publication.
Conclusion
A strong AI comic does not require endless prompting. It requires a clear acceptance test, a reviewed script, a stable character reference, deliberate storyboards, a small number of controlled iterations, and human judgment at the end. Generate broadly only while exploring; once a direction works, protect it and make the smallest useful correction. That discipline turns script, panels, dialogue, and optional motion into one repeatable production workflow rather than a gamble.