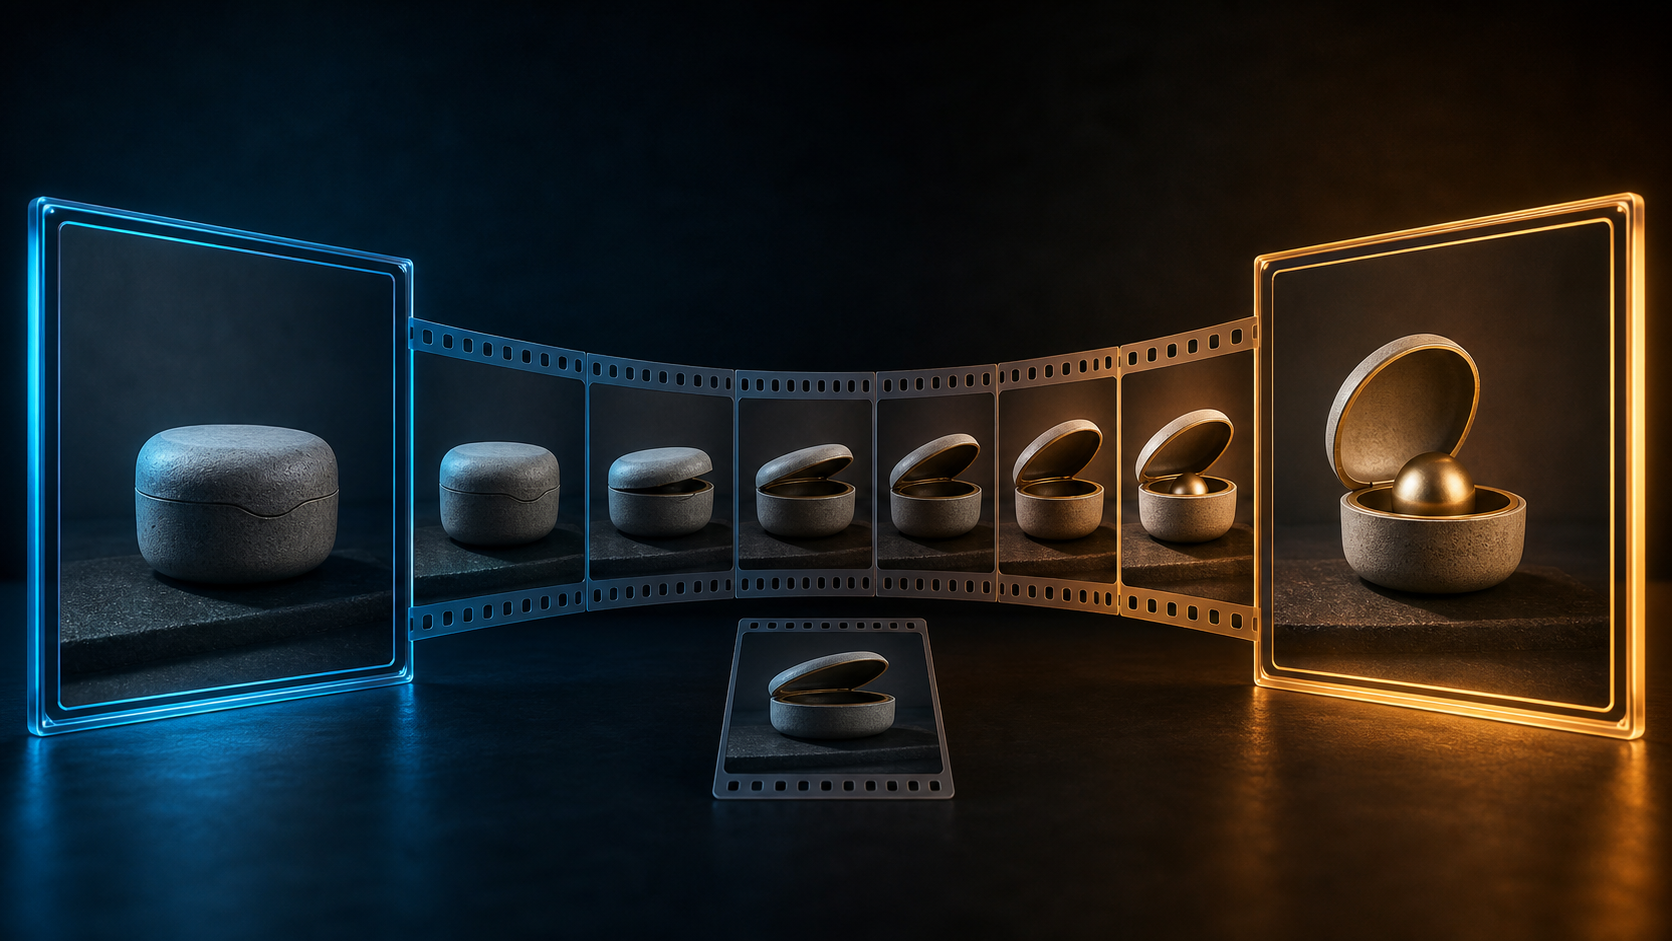
First-and-last-frame AI video gives a model two visual anchors. The first image defines where the shot begins; the last image defines where it should land. The model generates the motion between them.
That sounds similar to traditional keyframing, but the control is different. Animation software can calculate a position along a curve you set. A generative video model imagines a plausible path based on learned patterns. The ending is a target, not a pixel-perfect contract, and the middle can change every time you generate.
Used carefully, two-frame control makes AI video more directable. Used carelessly, it asks the model to invent an entire transformation, location change, costume change, camera move, and identity bridge inside one short clip.
What first-and-last-frame AI video actually means
You provide:
- a start frame with the opening composition, subject, environment, light, and camera;
- an end frame with the desired final state;
- a prompt explaining the physical and camera path between them.
The model attempts to create intermediate frames that make both anchors appear to belong to one continuous shot.
The most important principle is:
The frames define the endpoints; the prompt defines the path.
If the start shows a closed product case and the end shows the same case open, the prompt should describe a smooth lid-opening action. It should not waste most of its words describing colors already visible in both images.
Interpolation, not traditional keyframing
In traditional animation, a keyframe is inspectable and editable. You can set an object's position at two times, choose easing, and adjust a motion curve.
Generative interpolation behaves differently:
- the model chooses a plausible motion path;
- hidden surfaces and body positions are invented;
- the final frame may be approached rather than matched exactly;
- identity and fine detail can drift in the middle;
- the same inputs can produce different motion on another run;
- text, logos, hands, reflections, and repeated patterns may change.
Two anchors reduce ambiguity, but they do not eliminate it. If a final product hero must be exact, end the generated motion near the target and hold the original approved still in the edit.
Support and behavior vary by model
“First and last frame,” “start and end frame,” “frame interpolation,” and “image-to-image video” are not standardized terms.
Some models accept two images natively. Some accept only a starting image and ask you to describe the ending in text. Some accept both but give the first frame more influence. Duration, resolution, aspect ratio, reference strength, seed control, and final-frame adherence vary.
Before planning a campaign around the feature:
- confirm that the exact model and mode accept two images;
- test one disposable frame pair;
- inspect whether the result approaches the final anchor closely enough;
- check current pricing, regional access, and commercial terms;
- record the model version because behavior can change.
On DeepFake, review the current controls offered by the image-to-video workflow or relevant video-transition mode. The existence of a route does not mean every underlying model supports two native frame inputs.
When start-and-end control earns its keep
Product reveals
Use it when a product must finish open, rotated to a hero angle, placed in a hand, poured into a container, or arranged in a final composition.
Keep product geometry, background, contact shadow, and light consistent. Add exact labels and legal text during editing if the model cannot preserve typography.
Character expression or pose changes
A close start and end pair can guide a small head turn, one expression change, a hand lowering, or a seated-to-standing action.
Derive the end image from the start image rather than generating an unrelated second portrait. Preserve identity, apparent age, clothing, hair, lighting, and set. Obtain informed consent for any real person's likeness.
Planned transitions
End clip A on a composition that matches the opening of clip B. This can hide a cut or create a bridge between scenes. Motion speed, light, texture, and subject scale must also match; similar framing alone is not enough.
Loops
The same or very similar start and end image can give the model a return target. It does not guarantee a seamless loop. You may still need trimming, a crossfade, a ping-pong edit, or a dedicated transition.
Storyboard execution
Treat each pair of storyboard panels as one shot. This turns a sequence of approved compositions into several manageable generation problems instead of one long uncontrolled prompt.
Environment or lighting changes
Use a locked camera and unchanged geometry while daylight becomes evening, a practical lamp turns on, or a small weather event develops. Lighting-only changes fail when the start and end frames also move the camera or rearrange the set.
When not to use it
If the destination does not matter—ambient smoke, water, crowds, hair in wind, leaves, or general atmosphere—a single start image and clear motion prompt may look more natural. Forcing a fixed endpoint can make organic movement feel mechanical.
Plan the shot before generating
Most bad start-and-end results are planning problems before they are prompt problems.
Fill in this table:
| Decision | What to define | Safer default |
|---|---|---|
| Shot purpose | What must be true in the final image? | One visible outcome |
| Frame distance | How much changes between anchors? | Same subject, set, light, and moderate pose change |
| Identity | Which details must remain exact? | Derive end frame from the approved start |
| Camera | What is the principal camera action? | Locked, slow push, slow pull, or small orbit |
| Action budget | What can happen within the duration? | One action at a comfortable pace |
| Lighting | Does direction and color temperature match? | Keep consistent unless light change is the whole shot |
| Background | Are geometry and props identical? | Same clean plate and composition scale |
| Detail risk | Which text, jewelry, hands, or logos may drift? | Simplify or composite exact elements later |
| Next shot | Does the final frame connect cleanly? | Match scale, motion direction, and light |
Think of every difference between the anchors as motion debt. A new lens position, pose, garment, prop layout, or lighting direction each requires a believable explanation inside the same few seconds. Set a small debt ceiling for every shot: preserve most of the image and spend the available change on the one event the audience needs to see.
A locked tabletop reveal can spend its budget on one box opening. Asking that same take to relocate the box from a studio desk to a rooftop while changing its color creates several unrelated debts. Divide the concept into edited shots, and design each landing to pass useful visual momentum forward.
Build the frame pair
Start with the final requirement
Write the landing in one sentence before creating images:
The matte product case is fully open, the abstract object is centered, the camera remains locked, and the final composition has clean space above it.
If the required ending cannot be stated clearly, the shot is not planned yet.
Create the start frame
Make the opening image as strong as a standalone source: sharp subject, clear geometry, readable separation, conservative grading, and enough room for the movement.
Derive the end frame
Edit the start image whenever possible. Change only the state needed for the story: lid angle, facial expression, pose, light level, or object position. Keep camera, crop, material, identity, and background stable.
Generating the end frame from scratch may introduce a different lens, face, costume, set, or light that the video model must somehow reconcile.
Compare the anchors directly
Place them side by side and toggle rapidly. Look for unintended changes in:
- face and body proportions;
- product shape and label;
- clothing folds and accessories;
- background objects;
- horizon and perspective;
- light direction and shadow;
- camera height and focal feel;
- crop and aspect ratio.
Correct the images before spending video credits.
Copy-ready prompt templates
Fill the brackets and remove fields that do not apply. Keep the prompt focused on the path.
A continuity-lock structure
LANDING PROOF: [the observable fact that must be true at completion].
LOCKED FACTS: [identity, wardrobe, object geometry, materials, set, and illumination that cannot drift].
PHYSICAL PATH: [one action connecting the supplied anchors].
CAMERA CONTRACT: [fixed tripod / gentle inward track / gentle outward track / shallow arc] throughout.
TIMING: [deliberate / even / gently accelerating], with the final beat allowed to settle.
FAIL IF: [name the specific invention, distortion, edit, shimmer, or viewpoint change that would reject the take].
Ecommerce product reveal
The closed matte product case opens smoothly to the approved final angle, revealing the same centered object shown in the end frame. Locked camera and even pace. Preserve exact case geometry, material, table, contact shadow, background, reflection level, and light direction. No rotation, label change, new prop, camera move, deformation, or cut.Character expression or pose change
The clearly adult subject moves continuously from the opening pose to the approved final pose with one small natural head turn and one relaxed expression change. Locked camera, smooth pace. Preserve face shape, apparent age, skin tone, hairstyle, clothing, body proportions, background, and lighting. No speech, extra people, new accessories, identity drift, cut, or sudden motion.Scene-to-scene transition pair
One continuous slow forward movement connects the opening composition to the final composition. Preserve the central subject's scale and motion direction while the environment transitions gradually through shared shapes and matching perspective. Keep exposure, color temperature, texture, and horizon coherent. No hard cut, unrelated object, flicker, or sudden zoom.Environment or lighting shift
Locked camera and completely unchanged scene geometry. Daylight fades gradually into the approved evening frame while the practical lamp warms at a steady rate. Preserve subject position, architecture, props, materials, shadows, and framing. Change only illumination and sky tone; no camera movement, object motion, weather event, or new light source.The prompt names the path and invariants. It does not re-describe every pixel already visible in the anchors.
End-to-end workflow
1. Define the landing
Write the required final state in one sentence.
2. Build the start frame
Confirm composition, sharpness, geometry, light, and identity at full resolution.
3. Derive the end frame
Edit the start and change only the intended state.
4. Toggle and compare
Remove every accidental difference that the model would need to reconcile.
5. Choose an honest duration
Give the action enough time to happen without rushing. Longer is not always safer: extra duration gives identity and texture more time to drift.
6. Write one action and one camera move
If both are complicated, split the shot.
7. Generate a small batch
Several attempts are more informative than repeatedly editing one unlucky sample. Keep the inputs identical so you can compare motion paths.
8. Review normally and frame by frame
Watch the clip at intended speed, then inspect faces, hands, product geometry, labels, background, shadows, and the weak midpoint.
9. Trim and assemble
Remove unstable opening or closing frames. When an exact final hero is required, cut to or hold the original approved end still.
10. Record the recipe
Save both frames, prompt, negative constraints, duration, aspect ratio, model, version, seed if available, and selected output.
Use an intermediate anchor when the middle fails
If the endpoints look good but the center repeatedly becomes strange, the frame distance may be too large.
Create a midpoint derived from the same source, then generate:
- start to midpoint;
- midpoint to end.
Join the two shorter clips at the approved middle composition. The new anchor reduces the span where the model must guess.
This technique is useful for:
- a hand moving around an object;
- a product lid opening through a difficult angle;
- a seated character standing;
- a camera moving around hard geometry;
- a larger lighting transition;
- a multi-stage costume or environment change that cannot be simplified further.
Failure diagnosis
| Symptom | Likely cause | Better fix |
|---|---|---|
| Identity warps in the middle | Anchors differ too much or end image was generated independently | Derive the end from the start and reduce pose change |
| Long pause, then sudden jump | Action exceeds the duration or path is unclear | Reduce action, increase honest duration, or add midpoint |
| Text or logo bends | Small typography must transform through motion | Simplify, enlarge, reduce motion, or composite exact text in post |
| Hands or feet deform | Hidden limb path must be invented | Recompose, show the path, or add an intermediate anchor |
| Final frame is only approximate | Normal generative drift | Trim and hold the original end still when exactness matters |
| Background objects appear or vanish | Backgrounds differ between anchors | Match the clean plate and remove inconsistent props |
| Locked shot still drifts | Prompt contains implied camera motion or frames have mismatched perspective | Remove motion language and match camera geometry |
| Lighting jumps midway | Direction or color temperature differs | Correct the anchors before generation and change light alone |
| Product shape “breathes” | Geometry or reflection is ambiguous | Use a clearer matte source and smaller movement |
| Transition looks like a dissolve | Frames are too different to imply one physical path | Split into separate shots and use an intentional edit |
Fix the cause in the anchors before adding more prompt adjectives.
Rights and responsible use
Use only frames, faces, products, logos, locations, and reference media you have the right to use. Obtain informed consent before animating a real person's likeness or voice, and disclose synthetic media when the context calls for it. Do not use start-and-end control to impersonate someone, create non-consensual sexual content, fabricate deceptive political media, falsify evidence, or misrepresent a generated event as authentic footage.
Review the result in four passes
Do not judge everything during one playback. Inspect each pass for a different class of failure.
Pass 1: story and timing
- The intended event reads without an explanation.
- The move starts promptly, develops at a believable rate, and has time to settle.
- The landing serves the next edit rather than ending on a random phase of motion.
Pass 2: anchor fidelity
- Face, silhouette, wardrobe, materials, and major object dimensions survive the midpoint.
- The closing state is acceptably close to the approved final anchor.
- Exact labels, marks, or logos are stable—or deliberately reserved for compositing afterward.
Pass 3: spatial integrity
- Hands, joints, contact points, reflections, and occlusions remain physically credible.
- Set geometry, prop count, light direction, and shadows evolve without unexplained jumps.
- A locked view stays locked; a moving view follows only the chosen direction.
- Fine texture is free of boiling, crawling, flashing, and sudden loss of detail.
Pass 4: delivery record
- The chosen take has been watched at its actual export size, not only in a small preview.
- Frames, prompt, model/version, duration, settings, and take number are saved together.
- Permissions and consent for every identifiable person, voice, brand asset, and reference are documented.
Final perspective
First-and-last-frame control does not make AI video deterministic. It makes the shot more directable.
Keep the anchors close. Preserve identity and set geometry. Change one thing. Describe the physical path. Generate a small batch. Add an intermediate frame where the model guesses most. Use the original final still when exact presentation matters.
The stronger the frame pair and the simpler the action, the more useful the control becomes.
Frequently asked questions
What clip length works best?
Duration should follow the action, not a universal number. Estimate how long the movement would take on set, then choose the nearest supported duration with a little room to settle. If that forces several events into one take, reduce the motion debt or insert another anchor instead of merely making the generation longer.
How much may change between the anchors?
Use the motion-debt test: can one uninterrupted physical event explain every visible difference? A lid opening or a face turning usually can. A simultaneous change of identity, room, lens, costume, and time of day cannot; turn those into an edited sequence.
Is the supplied final frame reproduced pixel for pixel?
Treat it as a destination signal, not a guaranteed last bitmap. Small forms and lettering may still wander as the model approaches it. When the closing product pack, legal line, or logo must be exact, replace or extend the generated ending with the approved still during finishing.
Why can the same pair create different motion?
The anchors constrain what is visible at two moments but leave many possible trajectories between them. Each generation samples one of those possibilities. Reusing a seed, where available, can narrow variation; keeping a take log and generating a controlled mini-batch makes comparison more useful.
Is two-frame control available in every model?
No. Product interfaces may call it endpoint control, start/end frames, interpolation, or transition mode, and some systems accept only an opening reference. Others apply unequal influence to the two anchors. Confirm the current input fields and limitations before designing the storyboard around them.
Can endpoint control bridge two different scenes?
It can help when the outgoing and incoming compositions already share visual logic—similar scale, direction, illumination, and texture. It does not remove the need for an edit, and a radically different destination is more likely to produce a morph than an invisible seam.
Do I still need a prompt if I provide both frames?
DeepFake's current transition workflow requires a prompt; other tools and models vary, and some may accept an empty or minimal instruction. Even when optional, a concise prompt is usually useful because the frames define the endpoints while the prompt explains the route, camera, pace, invariants, and forbidden changes. Check the exact mode you use.