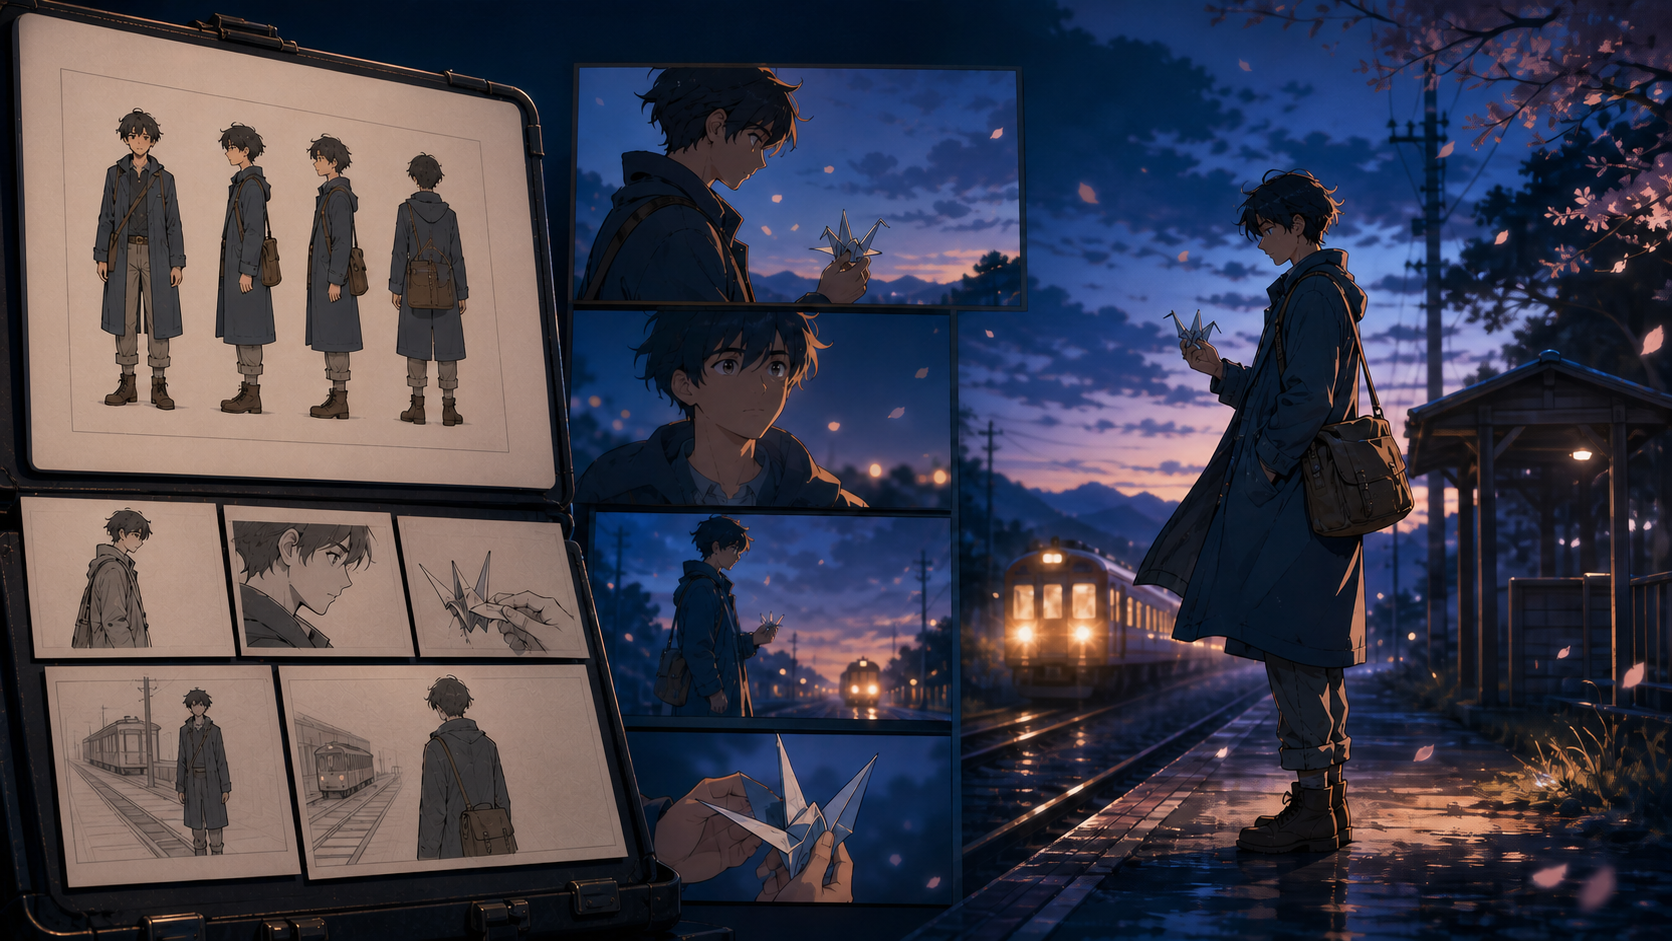
Creating anime with AI is easier when the goal is not “generate an episode.” A useful first goal is one finished piece: a 15-second character reveal, a 30-second emotional scene, a compact fight beat, or a short music-video passage.
The hard part is rarely producing one attractive frame. It is keeping the same character, visual language, geography, and emotional intention across several shots. That is why anime creation works better as a production pipeline than as one prompt.
This five-step tutorial uses an original scene about a traveler waiting at a rural train platform while holding a paper crane. The method emphasizes the strengths of anime filmmaking—clear silhouettes, economical motion, expressive composition, sound, and editing—without imitating a named artist, studio, series, or protected character.
Quick Workflow
- Define one visible story beat.
- Design the main character before the scene.
- Plan five to seven purposeful shots.
- Generate and approve keyframes as a sequence.
- Animate selectively, edit for rhythm, and add sound.
Start small. A short completed scene teaches continuity and direction more effectively than an unfinished five-minute concept.
What to Prepare
For a first anime project, decide:
| Production choice | Practical starting point |
|---|---|
| Runtime | 15–30 seconds |
| Main characters | One |
| Locations | One |
| Story beats | One central change plus setup and ending |
| Final shots | Five to seven |
| Spoken lines | Zero to two |
| Delivery | 16:9 teaser or 9:16 character reveal |
Also prepare a folder structure for concept, character references, storyboards, approved keyframes, motion takes, audio, and exports. Record prompts, model versions, source references, and approval notes as you work.
Step 1: Start With a Story Beat
Do not begin with effects. Begin with a small action carrying an emotion.
Example:
At blue hour, a young traveler waits alone at a rural platform. She unfolds a paper crane just as the lights of the final train appear, then decides not to board.
The visible change is decision. The train supplies time pressure. The crane is a recurring prop. The location and mood are clear.
Reduce the Scene to Three Parts
- Setup: she waits and watches the empty track.
- Change: train lights appear while she opens the crane.
- Ending: she steps back from the platform edge as the train arrives.
That structure is enough for a short. Avoid adding backstory that cannot be shown.
Write the Emotional Direction
Choose a precise arc:
quiet obligation → painful recognition → calm resolve
Then select visual choices that support it:
- still opening composition;
- cool indigo palette with one warm train light;
- paper crane close-up as the turning point;
- a subtle backward step instead of dramatic crying;
- sound that grows, then drops at the decision.
Use Anime Economy
Anime does not require continuous complex motion. A held drawing, careful eye movement, hair responding to wind, an insert of the crane, and a strong cut can carry more emotion than constant body animation.
Plan where stillness is intentional. This lowers generation complexity and strengthens contrast when movement occurs.
Step 2: Create the Character First
Character drift is especially visible in stylized work. Small changes to eye spacing, hair silhouette, collar shape, or color design can make a person look like someone else.
Build an Original Character Sheet
Include:
- front, profile, three-quarter, and rear views;
- full-body proportions and height reference;
- face close-up with neutral expression;
- hairstyle construction and accessories;
- outfit layers, closures, and footwear;
- paper crane size and folding pattern;
- three scene expressions: waiting, recognition, resolve;
- palette swatches.
Write a fixed identity block:
Original young adult traveler, heart-shaped face, dark hazel eyes, short black bob with one longer strand behind the left ear, moss-green knee-length coat over a cream knit top, charcoal wide-leg trousers, brown ankle boots, narrow canvas shoulder bag, small white paper crane.
Reuse the block without adding contradictory synonyms.
Protect Silhouette
Anime character recognition often depends on shape. Check the black silhouette of:
- bob haircut;
- coat length and collar;
- trouser width;
- shoulder bag angle;
- posture while holding the crane.
A strong silhouette remains readable in wide shots where facial detail is limited.
Keep the Design Original
Do not prompt with the name of a famous character or request an exact studio style. Describe line quality, rendering, color, lighting, and emotional tone directly. Originality is easier to maintain when the character's role, prop, costume logic, and personality were designed together.
Define the Platform
Create one environment plate:
Small rural platform at blue hour, single track, weathered wooden shelter, waist-high iron railing, cream station lamps, distant dark hills, scattered late-summer petals, no signage or readable text.
Sketch the platform from both directions. Mark where the train enters and which side the character faces.
Step 3: Plan the Scene With a Storyboard
A six-shot board is enough:
| Shot | Frame | Action | Emotional function |
|---|---|---|---|
| 1 | Wide | Traveler stands alone; track disappears into dusk | Establish isolation |
| 2 | Medium profile | Wind moves coat; she looks down the track | Build waiting and obligation |
| 3 | Insert | Fingers unfold the paper crane | Introduce the memory or message |
| 4 | Close-up | Warm train light enters her eyes | Recognition and pressure |
| 5 | Boots insert | One foot steps back from platform edge | Show the decision without dialogue |
| 6 | Rear wide | Train arrives as she remains outside its doors | Resolve the scene |
Add Anime-Specific Notes
For each panel, record:
- line-of-action and silhouette;
- foreground, character, and background layers;
- eye direction;
- expected hold duration;
- moving elements;
- impact or accent frame if needed;
- transition and sound cue.
Example for Shot 4:
Tight face close-up, eyes just below upper third, gaze screen-right toward approaching train. Hold neutral for eight frames, warm reflection grows across pupils, one blink, no head turn. Wind moves only the longer hair strand. Cut on train horn to boots.
Use Shot Size for Emotion
The wide shot shows the character's relationship to the empty landscape. The close-up removes that space and forces attention to choice. The boots insert turns an internal decision into visible action. The final wide restores distance but changes its meaning.
Check Screen Direction
If the train approaches from screen-right, preserve that direction in reflections, eye lines, and the final wide. A reversal can make it seem like another train or location unless the camera crossing is shown.
Step 4: Generate Keyframes
Generate several still candidates per shot, then select one sequence. More images do not automatically mean more quality.
Prompt in Blocks
Character: [fixed identity block]. Shot: [framing, pose, action, gaze]. Environment: [platform block and visible details]. Rendering: original 2D animation concept art, confident clean linework, subtle cel shading, painterly background, indigo and warm amber palette. Continuity: [prop hand, screen direction, coat state, light]. Avoid: text, logos, style imitation, costume change, additional characters, anatomy defects.
Review the Contact Sheet
Check:
- same face proportions and hair silhouette;
- same coat, bag, trousers, boots, and crane;
- consistent platform geometry;
- train light always approaches from the same side;
- palette moves from cool toward warm without changing style;
- shot sizes match the storyboard;
- the emotional change reads across the sequence.
Do not approve keyframes independently. A beautiful close-up may fail if it depicts a different coat or eye direction.
Simplify Difficult Frames
Hands unfolding paper can be fragile. Use clear finger separation, a larger prop, and a simple camera angle. If necessary, split the action: closed crane in one insert, unfolded paper in another, with sound bridging the cut.
Correct unintended text and anatomy before motion. Generation should not become a way to hide a weak source image.
Step 5: Animate and Polish
Move selected keyframes into an image-to-video workflow. Start with two representative shots—one subtle close-up and one wider environment shot—before generating the full sequence.
Animate One Idea Per Shot
Examples:
- Shot 1: locked camera; petals drift; coat hem moves slightly.
- Shot 2: slow lateral camera drift; character breathes and shifts gaze.
- Shot 3: fingers complete one unfolding action; camera locked.
- Shot 4: train reflection grows; one blink; hair strand moves.
- Shot 5: one foot steps backward and settles.
- Shot 6: train glides in and slows; character remains still.
Avoid combining a spin, run, dialogue, camera orbit, train arrival, and blowing debris in one clip.
Write Stability Constraints
Preserve facial identity, hairstyle, coat, bag, paper crane, body proportions, platform architecture, train direction, blue-hour lighting, and original 2D rendering. No camera shake, sudden zoom, extra passengers, or style change.
Stability notes do not guarantee success, but they make the intended evaluation clear.
Edit With Holds
Do not remove every still moment. A short hold before the train light appears creates anticipation. A hold after the backward step lets the audience understand the choice.
Use straight cuts for clarity. Let the train horn begin before the eye close-up, and carry wheel sound into the boots insert. Sound bridges make separately generated shots feel connected.
Build the Sound World
Layer:
- distant insects and soft wind;
- fabric, paper, and shoe movement;
- rail vibration, horn, and braking;
- restrained music that pauses at the decision;
- optional one-line voiceover if the visual meaning remains unclear.
An anime scene often feels more polished because of timing and sound, not because every drawing moves.
Final Visual Pass
Unify line sharpness, color, contrast, grain, and light. Watch for face drift, moving platform geometry, flickering petals, warped hands, and unreadable pseudo-signs. Regenerate the shots that break continuity instead of applying heavy filters.
Best First Anime Projects
Original Character Reveal
Use a silhouette, prop close-up, face reveal, and final pose. This teaches visual identity and controlled camera movement.
Emotional One-Scene Short
Use one location and a visible decision, like the train-platform example. This teaches pacing, reactions, inserts, and sound.
Short Fight Test
Plan clear poses and divide action across anticipation, contact, impact, and reaction shots. Avoid long continuous choreography at first.
Teaser Trailer
Combine location, character, object, and ending-hook shots. Use text only in the final editor so typography remains intentional and accurate.
Music-Video Passage
Let rhythm guide cuts and repeated visual motifs. Confirm rights to music and avoid imitating an existing music video or performer without authorization.
Common Mistakes
Starting With Effects
Effects are not a scene. Define the emotional change and ending first.
Redesigning the Character Per Shot
Lock a sheet, identity block, silhouette, prop, and palette. Track all changes as continuity states.
Skipping Storyboards
A storyboard solves framing, geography, screen direction, and edit rhythm before expensive animation.
Animating Long Scenes Too Soon
Test 15 to 30 seconds. Expand only after the short sequence stays coherent.
Moving Everything
Use limited animation deliberately. Select the eye, hand, cloth, light, or camera movement that carries the beat.
Copying a Famous Style or Character
Build original designs and describe visual qualities directly. Respect copyrights, trademarks, creator rights, and platform rules.
Final Checklist
- One story beat has a clear setup, change, and ending.
- The character sheet is original and approved.
- Silhouette, costume, prop, and palette remain stable.
- The environment plate defines geography and train direction.
- Five to seven shots each have one story function.
- Keyframes work together as a contact sheet.
- Motion is restrained and purposeful.
- Holds, cuts, music, ambience, and effects support emotion.
- No accidental text, logo, watermark, anatomy defect, or protected character remains.
- All voices, likenesses, images, and music have appropriate permission.
- The export has been watched on the intended screen size.
Final Takeaway
The simplest way to create anime with AI is to make one directed scene. Start with a visible emotional beat, design an original character whose silhouette can survive multiple shots, storyboard the sequence, select keyframes as a group, and animate only what the audience needs to notice.
AI can accelerate drawing and motion, but the anime feeling comes from composition, performance, rhythm, sound, and deliberate economy. Finish a small scene, learn from its continuity failures, then build something larger.
Frequently Asked Questions
What is the easiest anime project to make with AI?
An original-character reveal or 15- to 30-second emotional scene is a strong first project. Use one character, one location, and five to seven shots.
Do I need drawing skills?
No, but rough drawing can help communicate framing. More important skills are design judgment, continuity review, shot planning, and editing.
Why do AI anime scenes feel inconsistent?
Character and environment references may be weak, prompts may redesign details, or shots may be generated without a common storyboard. Lock stable elements before motion.
Should every shot move constantly?
No. Held frames, subtle eye movement, wind, light changes, and strong cuts are valid animation choices. Motion should serve the beat.
Can I make fan anime with AI?
You can experiment only within applicable rights and platform rules, but original characters and worlds are safer for publishing and commercial work. Do not imitate a protected character or creator's signature style without authorization.