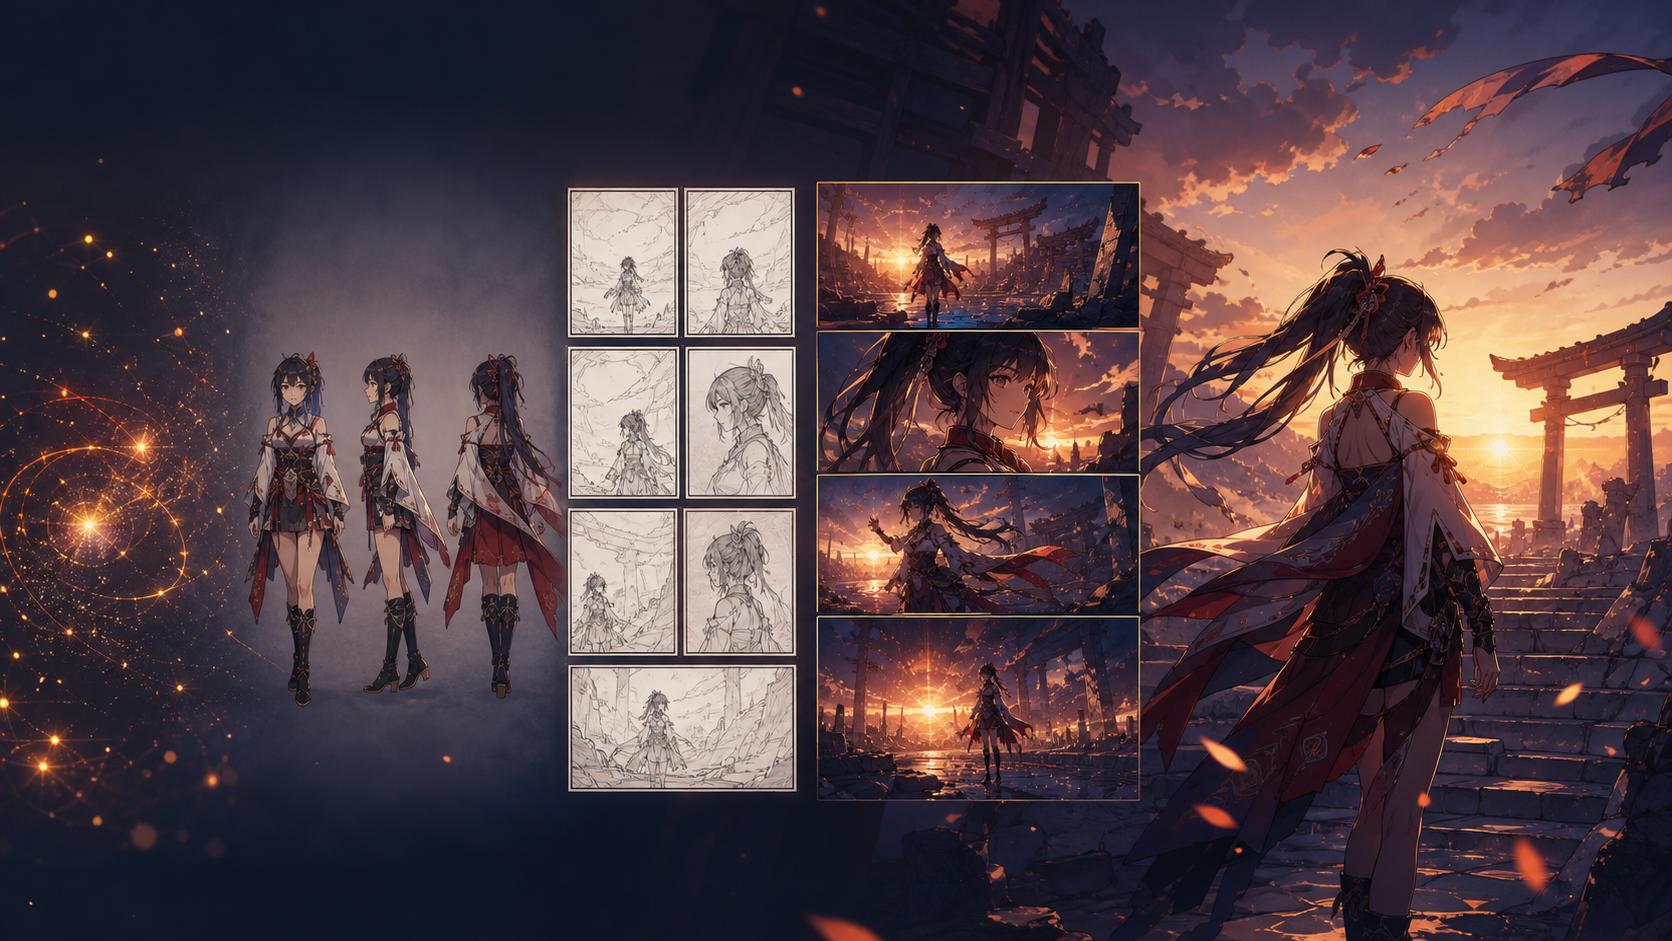
Creating anime with AI is no longer limited to generating a single attractive portrait. A useful production workflow can now help with story development, character exploration, storyboards, keyframes, motion, voices, music, and finishing. The difficult part is not accessing those capabilities. It is making every stage support the same story.
Beginners often ask one model for a complete episode and receive a sequence that looks impressive for a few seconds but lacks continuity. Faces change, costumes drift, camera angles feel random, and movement has no dramatic purpose. A better approach is to treat AI as a set of production assistants inside a small, controlled pipeline.
This tutorial shows how to create a short anime scene in five steps. The method works for a character reveal, a quiet emotional beat, a teaser, a music-video insert, or a compact action test. It also leaves room for human decisions—the ingredient that turns generated material into an intentional film.
The Five-Step AI Anime Workflow
The reliable order is:
- define one small story and a visual direction;
- create a stable character reference;
- turn the scene into shots and storyboards;
- generate keyframes, then animate selected frames;
- edit the sequence and add sound, voices, and final polish.
Each step produces an asset used by the next one. The story defines the character's needs. The character sheet anchors the storyboard. The storyboard defines the keyframes. The keyframes constrain the motion. Editing decides what the audience finally sees and hears.
For a first project, target 10 to 20 seconds rather than a full episode. Six deliberate shots teach more than a minute of disconnected generations.
What to Prepare Before You Generate Anything
You do not need a studio-sized package. Create a compact project brief with five decisions:
| Decision | Beginner-friendly choice |
|---|---|
| Format | 16:9 teaser or 9:16 character reveal |
| Duration | 10–20 seconds |
| Cast | One main character, one optional secondary figure |
| Location | One visually distinctive setting |
| Dramatic change | One discovery, decision, attack, or emotional turn |
Also create folders for references, storyboards, selected frames, video clips, audio, and exports. Generated files accumulate quickly; disciplined naming prevents an excellent take from disappearing among dozens of tests.
Use versioned names such as sh03_closeup_v04 instead of final-new-2. Record the prompt, model, seed when available, aspect ratio, and source reference for every approved image. That record becomes essential when you need to reproduce a character or revise one shot later.
Step 1: Define a Small Story and Visual Direction
Start with a scene that can be expressed in one sentence. For example:
At sunset, a courier reaches an abandoned mountain shrine and realizes the message she carries is addressed to herself.
This premise establishes a character, place, objective, and reveal. It is specific enough to guide images but open enough for visual interpretation.
Write a Five-Beat Scene
Expand the premise into five beats:
- Arrival: the courier climbs the final steps.
- Unease: bells move although there is no visible wind.
- Discovery: she finds a sealed envelope on the altar.
- Recognition: the handwriting is her own.
- Decision: she opens it as the light disappears.
These beats are not dialogue. They are observable changes that can become shots. If a beat cannot be shown or heard, rewrite it into an action, expression, object, or sound.
Build a Visual Sentence
Choose one answer for each visual category:
- era: contemporary, historical fantasy, or science fiction;
- rendering: clean cel shading, painterly backgrounds, or graphic ink;
- palette: warm amber against indigo shadows;
- lighting: low sunset rim light and lantern accents;
- camera language: restrained wides followed by intimate close-ups;
- mood: quiet mystery rather than horror.
Combine them into a reusable direction: “Cinematic historical-fantasy anime, clean character linework against painterly shrine backgrounds, amber sunset and indigo shadows, restrained camera movement, contemplative mystery.”
Keep that sentence at the top of every shot prompt. It is your style anchor.
Step 2: Create a Character Bible
Character consistency begins before the first scene image. Generate a neutral reference sheet that shows the same person from front, profile, three-quarter, and rear views. Add one close-up for facial proportions and two expressions relevant to the scene.
Lock details that viewers notice immediately:
- face shape, eye color, and eyebrow shape;
- haircut, fringe, and hair accessories;
- outfit silhouette and layer order;
- sleeve, collar, footwear, and fastening details;
- height and body proportions;
- signature prop;
- two or three identifying colors.
Do not describe the character only as “beautiful courier girl.” Use a compact identity block that can be copied into every prompt:
Young adult mountain courier, oval face, dark brown eyes, black high ponytail tied with a faded red cord, short indigo travel coat over an off-white wrap shirt, charcoal pleated trousers, red satchel worn across the left shoulder.
Separate Identity From the Shot
Organize prompts into four blocks:
- identity: details that never change;
- shot: framing, pose, action, and gaze;
- environment: location, weather, time, and depth;
- rendering: anime style, palette, light, and finish.
This structure makes revisions surgical. If the pose is wrong, change the shot block without accidentally redesigning the costume.
Where a tool supports image references, use the approved sheet rather than relying only on text. Keep reference strength moderate enough to preserve identity without forcing every pose into the same composition. Always review hands, prop placement, clothing layers, and left-right orientation before approving a frame.
Step 3: Convert the Scene Into a Storyboard
A storyboard prevents beautiful but unrelated shots. For a 15-second scene, six shots are enough:
| Shot | Duration | Framing | Story purpose |
|---|---|---|---|
| 1 | 3.0 s | Wide establishing | Reveal the shrine and isolation |
| 2 | 2.0 s | Medium tracking | Introduce the courier and satchel |
| 3 | 2.0 s | Insert | Show the moving bells |
| 4 | 3.0 s | Over shoulder | Discover the envelope |
| 5 | 2.5 s | Close-up | Recognize the handwriting |
| 6 | 2.5 s | Tight hands/profile | Open the letter at sunset |
Each card should state the composition, subject action, emotional information, motion, and transition. Rough sketches are sufficient. The purpose is to solve screen direction and pacing cheaply before generating polished assets.
Protect Continuity
Mark where the character stands, which hand holds the prop, where the light comes from, and which direction she faces. If she moves screen-left to screen-right in one shot, an unexplained reversal can feel like a location change.
Create a continuity checklist for every storyboard card:
- same costume and satchel orientation;
- same time of day and weather;
- plausible progression through the space;
- consistent sun direction;
- one clear focal point;
- action starts and ends in an editable pose.
The storyboard is your source of truth. When a generated image is attractive but contradicts it, regenerate the image rather than redesigning the whole sequence around an accident.
Step 4: Generate Keyframes Before Motion
Produce several still candidates for each storyboard card. Select frames based on continuity and storytelling, not detail alone. A slightly simpler image that preserves the character and composition is usually more valuable than a spectacular image that belongs to another film.
Use Start and End Poses
For subtle shots, one strong image may be enough for image-to-video animation. For a larger action, design both the start and end pose. The pair gives the motion model clearer boundaries and makes the cut easier to control.
A useful motion prompt describes change over time:
Slow camera push toward the courier. She lowers her gaze from the altar to the envelope, her ponytail and coat hem moving gently in the evening breeze. The shrine and facial identity remain stable. No sudden zoom, no extra limbs, no costume change.
Prioritize one subject action, one environmental motion, and one camera move. Asking for a spin, run, explosion, dialogue, crowd reaction, and orbiting camera in the same short clip creates competing instructions.
Animate for the Edit
Generate clips slightly longer than the planned cut so the editor has handles. Favor readable motion:
- breath and a small change in expression;
- hair or fabric responding to wind;
- a controlled head turn;
- fingers closing around a prop;
- a slow push-in or lateral drift;
- one decisive action between clear poses.
Inspect every clip frame by frame near the beginning and end. Watch for face drift, duplicated fingers, warped props, background pulsing, and sudden exposure changes. Cut away before a defect if the useful portion still tells the story. Regenerate when the error affects the dramatic beat.
You can explore suitable animation and video-generation options in the DeepFake AI model library, but model choice should follow the shot. A tool that excels at atmosphere may not be the best choice for precise character action.
Step 5: Edit, Add Audio, and Finish
Place the selected clips in storyboard order before adding effects. Watch the silent sequence and ask whether the discovery is understandable. Shorten any shot once its information has landed. Hold a reaction slightly longer when the audience needs time to interpret it.
Design Sound in Layers
Build audio from broad to specific:
- room tone: distant wind, insects, and the shrine's open space;
- story cues: footsteps, bell movement, paper, and fabric;
- music: a restrained theme that supports the reveal;
- voice: narration or dialogue only when the images cannot carry the idea.
Sound effects should confirm physical events. The quiet click of a satchel clasp can make a generated hand movement feel intentional. A bell heard before its close-up can motivate the cut. Silence immediately before the letter opens can give the final action weight.
If using generated dialogue, keep performances short and direct. Match voice age, intensity, and breathing to the character. Do not clone a real person's voice without permission. Record or generate alternate takes so the edit is not trapped by one rhythm.
Apply a Final Consistency Pass
Unify clips with modest color correction, contrast, grain, and sharpening. Heavy filters cannot repair identity drift and may emphasize artifacts. Check the export at full resolution and on a phone-sized display.
Before publishing, verify:
- no unexplained changes in face, hair, costume, or prop;
- no deformed hands in held frames;
- no accidental text or watermarks;
- clean cuts and intentional transitions;
- balanced voice, effects, and music;
- licenses or permissions for every external asset;
- disclosure where a platform or audience expects AI-generated media to be labeled.
Common Problems and Practical Fixes
The Character Changes Between Shots
Return to the approved reference sheet. Shorten the identity block to its most distinctive features, reuse the same reference image, and change only one prompt variable at a time. Avoid mixing models midway unless you plan a deliberate style transition.
The Sequence Feels Like a Slideshow
Add motivation between shots. Let a sound begin before the corresponding image, cut on a gaze, or match the direction of movement. Vary framing from wide to medium to close rather than placing six similar portraits in a row.
Motion Looks Busy or Unstable
Reduce the prompt to one action. Use a stable keyframe, shorten the generated duration, and let editing create energy. Several controlled two-second clips often feel more cinematic than one chaotic ten-second generation.
The Images Look Good but the Story Is Unclear
Review the five beats without dialogue. Every shot must reveal new information or change the character's state. Replace decorative shots with inserts, reactions, or spatial context that advances the scene.
Production Never Ends
Set approval rules before generation. For example: the character identity must match, the action must be readable, and no severe anatomy error may appear during the planned cut. When a take passes, move forward. Infinite variations are not the same as improvement.
A Reusable Prompt Template
Use this structure for each keyframe:
Identity: [unchanging character block]. Shot: [shot size, camera angle, pose, action, gaze]. Environment: [location, time, weather, foreground, background]. Rendering: [consistent visual sentence]. Continuity: [prop hand, screen direction, light direction]. Avoid: [shot-specific defects or unwanted changes].
For motion, append:
Over [duration], [subject action]. [Environmental element] moves subtly. Camera [single camera move]. Preserve facial identity, costume, composition, lighting, and background structure.
Treat templates as production controls, not magic words. The decisive work is choosing the right shot and approving only assets that serve it.
Final Takeaway
The easiest way to create anime with AI is to finish one small scene through a disciplined pipeline. Define a visible dramatic change, lock a character bible, plan six purposeful shots, animate only approved keyframes, and let editing and sound shape the final experience.
AI can accelerate exploration and produce material that would once have required a much larger team. It does not replace continuity, taste, pacing, or authorship. Those decisions remain the director's job—and they are exactly what make a short generated scene feel like anime rather than a collection of demonstrations.
Frequently Asked Questions
Can I make a complete anime episode with AI?
It is possible to assemble longer work, but beginners should first complete a 10- to 20-second scene. Longer projects multiply continuity, performance, editing, and audio challenges. Build a repeatable short-scene pipeline before expanding.
How do I keep an AI anime character consistent?
Create one approved reference sheet, lock a compact identity description, reuse the same image references, and record prompts and settings. Evaluate costume, props, proportions, and screen direction—not just the face.
Should I generate video directly from text or animate still images?
Text-to-video is useful for exploration and atmospheric shots. Image-to-video usually gives beginners more control over character identity and composition because the approved keyframe defines the starting image. Use whichever method best fits each shot.
How many shots should my first AI anime include?
Five to seven shots are enough for a meaningful 10- to 20-second scene. Include an establishing view, character introduction, action or discovery, reaction, and ending image.
Do I need drawing skills?
Drawing helps with design and storyboarding but is not required. You still need visual judgment: the ability to evaluate composition, continuity, performance, anatomy, and whether each shot communicates the intended beat.