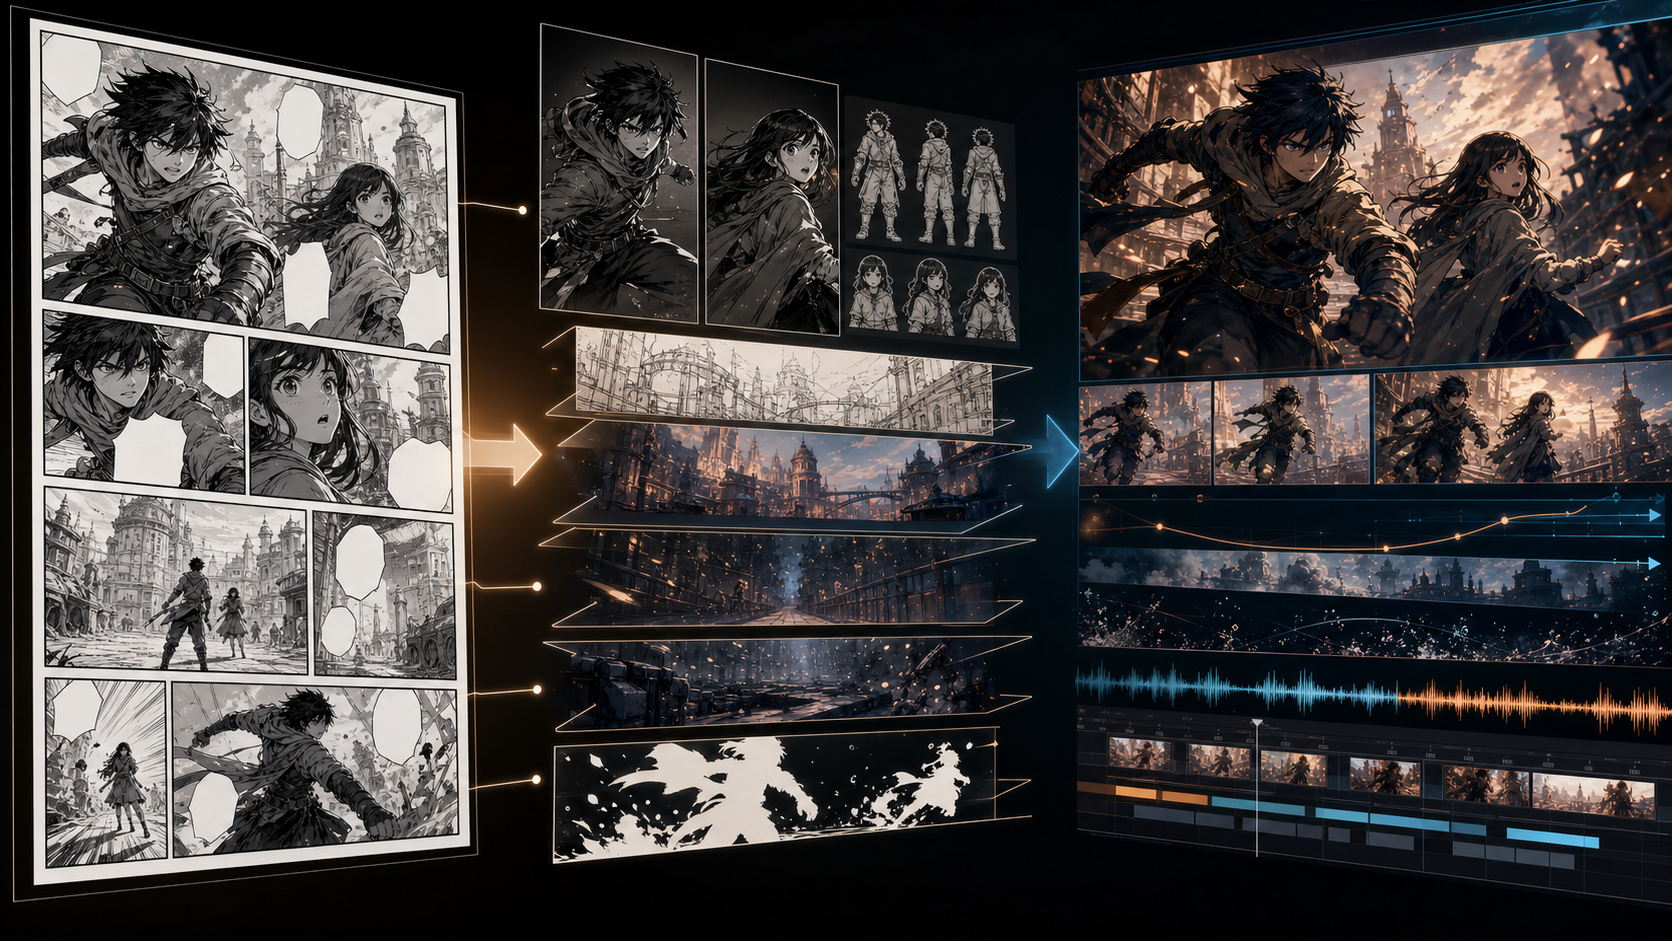
A comic already contains many of the decisions that make video production difficult: characters, environments, compositions, dialogue, and story beats. That makes manga-to-animation a natural use of generative video. It does not make the process a one-click conversion.
Comic panels are designed to be read as still images. A close-up may not show the character’s body. Speed lines suggest motion without defining its path. Two people shown in separate panels may need to share one moving shot. Speech balloons, captions, sound-effect lettering, and borders can confuse a video model. The page gives you strong creative direction, but it is not yet a clean production asset.
A reliable adaptation workflow rebuilds the scene for time, motion, sound, and continuity. The ten-step process below follows that principle: choose a manageable scene, translate panels into shots, prepare the art, lock character rules, test timing in an animatic, select an animation method per shot, write motion-focused prompts, handle voices responsibly, design sound, and edit around the limitations of generated footage.
Before animation, confirm the rights
Only animate work you created, work in the public domain, or material you have permission to adapt and distribute. Buying a printed volume or digital copy does not automatically transfer the right to make a motion-picture adaptation. Copyright rules vary by country and circumstance, so obtain qualified advice when the ownership or intended use is uncertain.
For commissioned or collaborative comics, confirm the scope in writing. The agreement should address animation, AI-assisted processing, voice and music use, marketing, monetization, territories, platforms, and distribution. Keep source files, licenses, consent records, and approvals with the project.
This is not just a legal formality. Clear ownership lets the production team make decisions about training restrictions, platform terms, client confidentiality, and reuse without guessing. Original characters and properly licensed materials offer the cleanest route. The WIPO guide to rights clearance for independent filmmakers is a useful starting point, but it is not a substitute for advice tailored to your project.
The complete manga-to-animation workflow
- Choose a short scene that can survive adaptation.
- Convert panels into a shot list.
- Clean, extend, and separate the artwork.
- Build character and location continuity references.
- Create an animatic before generating video.
- Choose the animation method shot by shot.
- Write prompts that describe motion, not appearance.
- Record dialogue and apply lip sync responsibly.
- Build sound layers that connect the visuals.
- Edit around generation failures and finish consistently.
For a first project, aim for 30 to 60 seconds. That is long enough to test story clarity, character consistency, dialogue, motion, sound, and editing without creating an unmanageable number of shots.
Step 1: choose a scene that can survive adaptation
The best test scene usually has:
- Two or three characters
- One primary location
- A clear emotional change
- Limited physical contact
- A small number of essential props
- Dialogue that fits comfortably within the target duration
Avoid beginning with a crowd, a transformation, a long fight, a dance involving several bodies, or a complicated exchange of objects. Those scenes combine the hardest continuity and motion problems before the pipeline has proved itself.
Read the scene aloud. A line that feels instant on a page may take four seconds to perform. Add time for breaths, reactions, eye movement, establishing context, and the visual beat after an important line. Comics let a reader control pace; video must make timing explicit.
Create a short adaptation brief:
| Field | Decision |
|---|---|
| Target duration | Total scene length and preferred shot range |
| Audience and platform | Where it will be watched and at what size |
| Aspect ratio | 9:16, 16:9, 1:1, or another delivery format |
| Visual treatment | Monochrome ink, color anime, limited animation, cinematic hybrid |
| Characters | Who appears and what each person wants |
| Emotional turn | What changes between the beginning and the end |
| Essential dialogue | Lines that must remain |
| Faithful moments | Panels or poses that should match the source |
| Invention allowed | Background extensions, transitions, reaction shots, camera moves |
This brief protects the identity of the comic while allowing the adaptation to function as video.
Step 2: convert comic panels into a shot list
One panel does not always equal one shot. A wide establishing panel could become a location reveal, a character entrance, and an insert of a clue. Three narrow reaction panels might become one slow camera move across the characters. A close-up with dialogue may need an earlier over-the-shoulder setup so viewers understand who is speaking.
For every shot, record:
- Shot number and duration
- Source page and panel
- Story purpose
- Framing and camera position
- Character action
- Camera movement
- Dialogue, ambience, or sound effect
- Continuity constraints
- Proposed generation method
- Review status
Keep generated shots short. Roughly two to eight seconds is a useful planning range for many current workflows, but the correct duration depends on the tool and action. Split a shot when it contains several actions, a major camera change, an identity-sensitive turn, or two separate emotional beats.
A shot list also reveals what the comic does not show. If a character walks from a doorway to a desk, you may need a wider room layout, a full-body design, and the reverse angle. Those missing assets should be solved before generation.
Step 3: prepare clean panel assets
The fastest way to reduce visual confusion is to remove elements that belong to page design rather than the animated world.
Remove lettering and panel borders
Erase speech balloons, captions, sound-effect text, page texture outside the art, and border lines that should not appear in the scene. Rebuild the hidden background behind them. Add dialogue later as voice, subtitles, or intentionally designed manga graphics.
Do not rely on the video model to ignore a balloon. It may distort the shape, convert it into a moving object, or generate unstable pseudo-lettering.
Extend cropped artwork
Manga composition often cuts off the top of a head, a hand, a sleeve, a weapon, or much of the room because readers infer what lies outside the panel. Motion exposes those missing areas. Extend the canvas to the delivery aspect ratio and reconstruct the hidden anatomy, clothing, props, and background before animating.
Match the target ratio early. A tall panel may translate naturally to a vertical social clip, while a 16:9 version requires intentional side extensions or a new composition. Animating first and cropping later can remove the action, break balance, or force a low-resolution enlargement.
Separate layers when possible
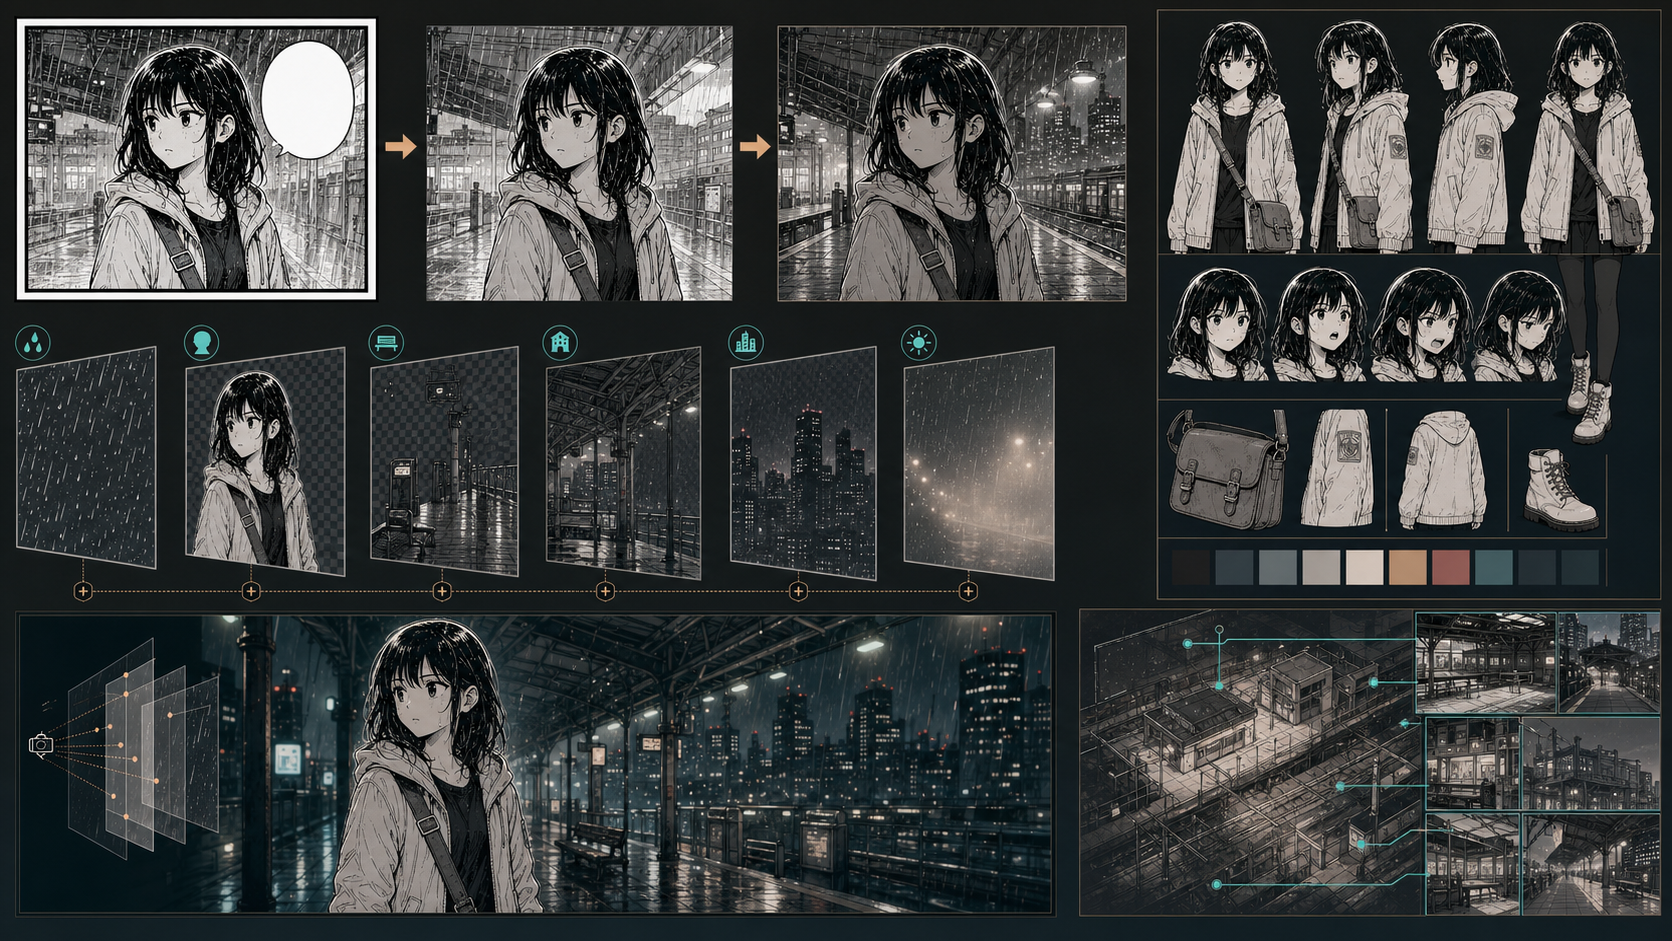
Divide the art into character, foreground, middle-ground, background, atmosphere, and effects layers. Even a simple 2.5D parallax move can feel intentional while preserving the original drawing more faithfully than full regeneration.
Layered motion works particularly well for:
- Slow pushes into an emotional close-up
- Rain, dust, smoke, snow, or drifting light
- Foreground objects passing the lens
- Hair tips, cloth edges, and small environmental loops
- Impact frames with controlled camera shake
- Establishing shots where geometry must remain exact
Step 4: build a continuity package
Every recurring character needs a compact visual bible. At minimum, include:
- Front, three-quarter, and profile views
- Full-body proportions
- Neutral and story-specific expressions
- Costume construction and color placement
- Hair shape from multiple angles
- Signature props and accessories
- Height relationship between characters
- Approved palette and line treatment
Create location sheets too. Show the room or environment from several directions, identify entrances and windows, and map important furniture. Comics can cheat geography between panels; a moving camera makes contradictions visible.
Write immutable rules in concrete language:
- The scar remains above the left eyebrow.
- The satchel strap crosses from the right shoulder to the left hip.
- The red lining appears only inside the coat.
- The station clock sits behind the bench.
- The window is behind the desk when the hero faces the door.
These statements become review criteria for every generated take. Store the approved references near the shot record so the team does not accidentally use an early design.
For additional continuity strategies, see the guide to image-to-video character consistency.
Step 5: make an animatic before AI video
Place the cleaned panels or newly composed storyboard frames on an editing timeline. Hold each image for the intended shot duration. Add temporary dialogue, room tone, music, and sound effects. Use simple cuts, pans, and zooms.
Watch the animatic without looking at the original comic:
- Can a new viewer follow the scene?
- Are speaking relationships clear?
- Do reactions last long enough to read?
- Does each shot add information or emotion?
- Does the camera cross the line of action?
- Is there enough visual variety?
- Does the final shot justify the buildup?
Fix pacing here. Regenerating many shots because the edit structure is wrong is one of the most expensive revisions. An animatic also tells you which panels can remain almost static and which moments deserve more ambitious motion.
Step 6: choose the animation method per shot
The best adaptation usually combines methods rather than forcing every shot through one model.
Use 2.5D motion for faithful panels
Separate layers, add controlled parallax, animate a modest camera move, and introduce particles or lighting. This is ideal when the source composition is already powerful or the drawing must remain extremely faithful.
Use image-to-video for subtle character motion
An approved frame can support breathing, blinking, a small head turn, moving hair, shifting fabric, a hand gesture, or a slow expression change. Short restrained motion is easier to keep on-model than a complex full-body action.
You can test this approach with an AI image-to-video tool, but always compare the result against the reference rather than accepting the most dramatic take.
Use broader generative motion for action and transitions
Some shots need motion that is not present in the source: a character crossing a room, a camera orbit, a transformation between compositions, or a new connecting shot. Use a capable generation model, multiple references or keyframes when available, and several takes.
Reject identity, costume, prop, or location changes even when the motion is impressive. A less spectacular shot that cuts cleanly and preserves the story is often the better choice.
Use specialized lip sync for dialogue close-ups
Dialogue tools are most useful for close-ups and medium close-ups with a stable face. A sequence can use a cinematic generation method for the establishing view, then cut to a controlled dialogue close-up, an over-the-shoulder angle, or a reaction shot.
Step 7: write motion-focused prompts
The reference image already defines appearance. The prompt should explain what changes over time and what must not change.
A useful structure is:
Preserve [identity, line art, costume, palette, composition]. The character [primary action in order]. [Secondary environmental motion]. [One camera instruction]. End on [stable final state]. Do not change [locked features].
Example:
Preserve the exact character design, ink lines, costume, and limited color palette from the reference. The character inhales, looks down at the letter, then raises her eyes toward the camera. Only the tips of her hair and scarf move in a faint indoor draft. Locked medium close-up with a very subtle push-in. End with her gaze steady and the letter still in both hands. No new accessories, no facial redesign, no camera rotation, no moving screentone.
Use one main action and one camera instruction. If the model ignores the action, simplify the shot before adding more adjectives.
Specify how manga textures should behave. Screentones and crosshatching can shimmer or crawl when every frame is regenerated. In many shots, the better direction is to keep ink texture fixed while moving only shapes, lighting, separated layers, and camera position.
Step 8: handle dialogue and voices responsibly
Record performers or use voices you are authorized to use. Do not imitate a known actor, creator, or private person without appropriate permission. Store raw recordings, licenses, and consent records.
For lip sync:
- Edit the performance first.
- Remove background noise.
- Split the dialogue by shot.
- Generate or animate the face from the clean voice track.
- Review mouth shape, face identity, emotion, and timing.
- Add room tone, music, and effects during the final mix.
Do not turn every line into a centered talking head. Use off-screen dialogue, over-the-shoulder framing, reaction shots, hands, objects, and environmental inserts. This creates more cinematic rhythm and reduces the number of shots that require perfect mouth animation.
Step 9: design sound, not just pictures
Sound creates continuity across clips made by different methods or models. Build it in layers:
- Dialogue
- Room tone or environmental ambience
- Foley such as footsteps, cloth, doors, paper, and props
- Designed effects for impacts, powers, transitions, and graphic moments
- Music
- Transitional sounds that lead into or out of cuts
Carry ambience across a cut so two visually different generations feel like the same space. Let a sound begin before the picture changes to pull viewers into the next shot. Use brief silence before a reveal or impact. A visual transition that feels weak by itself can become intentional when sound motivates it.
Plan music around the emotional turn in the adaptation brief. It should not fight the dialogue or force every shot into the same intensity.
Step 10: edit around AI failures
AI-assisted animation becomes much stronger when the edit embraces limited-animation techniques:
- Cut before a hand or face begins to deform.
- Freeze an approved frame and animate light, particles, or camera movement around it.
- Crop to a close-up that excludes a broken area.
- Replace unreliable action with an inked impact frame.
- Use speed lines, flashes, silhouettes, or held poses.
- Cover a transition with an foreground wipe, whip pan, sound lead, or reaction shot.
- Retimer a small usable section instead of forcing the full take.
Color-match every clip. Different methods may shift saturation, black levels, paper white, line weight, texture, and sharpness. Apply a consistent grade, grain or paper treatment, and output sharpening so the sequence feels like one production.
Do not upscale every experiment. Lock the edit first, then repair and upscale only the selected shots. This saves processing time and avoids polishing footage that will never appear.
A practical review checklist
Before approving each shot, check:
- Face, hair, body proportions, costume, and props match the reference.
- Character and camera motion follow the shot list.
- The background geometry remains believable.
- Line art and screentones do not shimmer distractingly.
- Hands and object interactions survive at normal playback speed.
- The opening frame connects to the previous shot.
- The ending frame offers a clean cut or transition.
- Dialogue and mouth motion remain synchronized.
- The shot supports the emotional turn.
- The result is legally cleared and appropriate to disclose for its destination.
Use the fewest tools that complete the scene. Every additional platform creates another export, color difference, cost, privacy decision, and set of terms to review.
Final recommendation
Turning manga or comics into animation is an adaptation process, not an automatic page conversion. Clean the panels, reconstruct missing information, separate layers, define continuity, test timing in an animatic, and choose the animation method shot by shot.
The most faithful result may use simple parallax for the strongest original panels, image-to-video for subtle character motion, specialized lip sync for a few dialogue close-ups, and broader generation only for selected action or transition shots. Let the comic’s composition and emotion lead. AI should add time, motion, and sound without erasing the choices that made the original page worth animating.
FAQ
Can AI animate a complete manga page automatically?
It can create motion from panel art, but a publishable adaptation still needs cleanup, shot design, continuity references, timing, dialogue, sound, editing, and review. Uploading a full page with text and borders often produces confused motion and unstable lettering.
How do I keep a manga character consistent?
Create a clean character bible, reuse approved reference images, state immutable features, keep shots short, avoid forcing the model to invent hidden angles, and review identity after every generation.
What animation method is best for comic panels?
Use 2.5D parallax when faithfulness matters most, image-to-video for subtle motion, specialized lip sync for controlled dialogue close-ups, and broader generative video for carefully selected action or transitions. Most scenes benefit from a hybrid.
Can I animate a copyrighted manga for a social channel if I give credit?
Credit alone does not automatically grant adaptation or distribution permission. Use your own work, public-domain material, or content for which you have obtained the necessary rights. Seek legal advice if the status is unclear.
How long should a first AI comic animation be?
Thirty to sixty seconds is enough to test the complete pipeline without creating an unmanageable project. Choose one emotional turn, one location, and a small cast.