To swap one face in a group video, first pick a short shot where the intended person remains easy to distinguish from everyone else. In Video Face Swap, upload that shot, add a single source portrait, then choose Target Face by face-size rank. Check the full result before using the shot. The number selects a face by its size in the media, so relative distance to the camera matters.
Suppose two adult performers are seated in a café scene. The performer in the foreground has the larger face at the beginning. If the second performer leans toward the camera or a cut moves to their close-up, the intended face may have a different rank. Mark that change before you generate and use separate shots if needed.
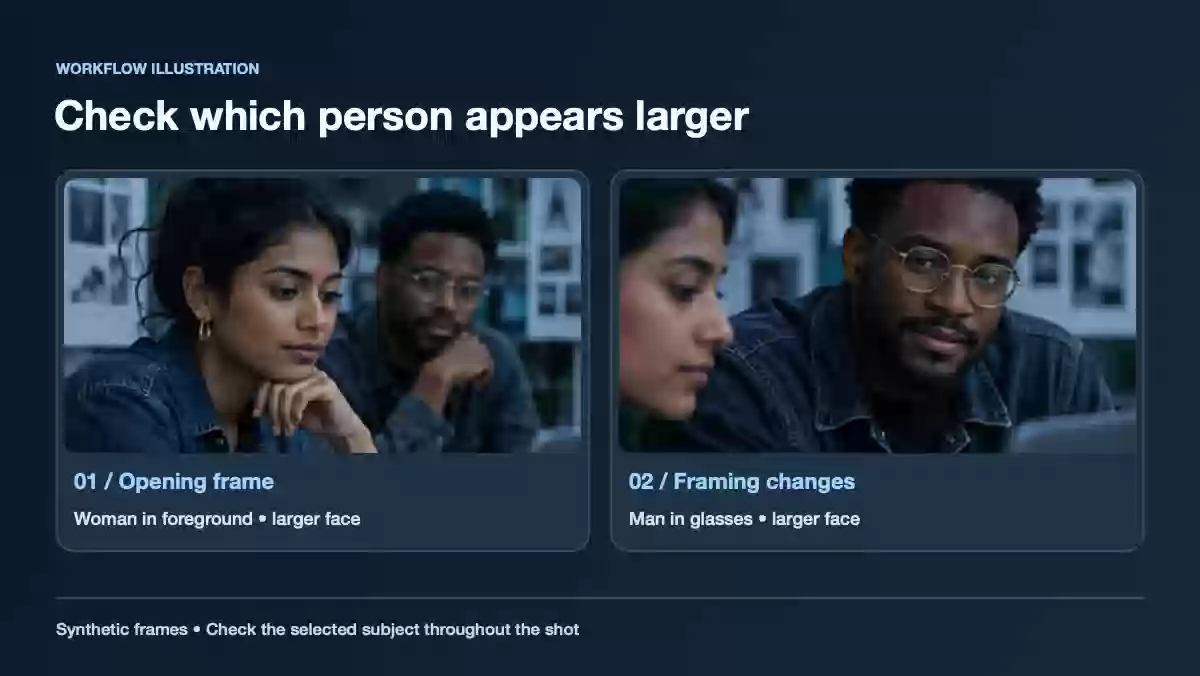
Use the illustration to identify the size change. The figure describes a shot-planning check rather than a measured model result.
Map the faces before uploading
Pause at the start, in the middle, and near the end. Write down who appears largest and where the intended performer is. Include a second pass at crossings, profile turns, entrances, and exits. A face in a mirror or on a screen can also make a scene harder to evaluate.
| What you see | First setting or edit | Check after generation |
|---|---|---|
| The intended face stays visibly largest | Start with Largest face (default) | Confirm the other performer's face stays unchanged throughout |
| The intended face stays visibly second-largest | Try Second-largest face on a short section | Watch the largest face as well as the intended one |
| The faces trade sizes or overlap | Cut the scene into stable shots before choosing a rank | Review the last frames before a cut and the first frames after it |
| Several faces appear at nearly the same size | Start with a closer or simpler angle | Compare the final clip with the original frame by frame around movement |
Choose material you have permission to edit and share. In a group scene, review that permission for the original performers as well as the replacement portrait, including anyone still recognizable by voice or appearance.
Select one target in the editor
- Save a short copy of the shot with stable framing and upload it as Target Video or GIF.
- Add a clear portrait as Source Face Image. Use the source photo guide if you need to choose between several references.
- Once the target file appears, set Target Face. The first two options name the largest and second-largest faces. Further options are labeled by size rank. Choose a rank that is present in the shot.
- Generate, then review the intended face and at least one other face in the same frame. Watch the section again at normal speed, especially if one person walks in front of the other.
- If the wrong person changes, revisit the ranking at the exact moment it happens. Trim around the shot boundary or use a clearer angle before another generation.
What to do when the shot changes halfway through
A size rank identifies one target per run. For a shot in which the two performers trade foreground positions, try separating the footage at a natural edit point. Choose the rank for each shot on its own and review both clips together afterward. In a continuous moving shot with repeated crossings, a different take with clearer separation can be faster to review than repeated attempts at the same sequence.
Watch the output from start to finish to confirm that the other faces stayed the same. If a small or partly hidden face keeps causing problems, follow the video face swap troubleshooting guide to decide which input to change next.